background image


Version: 3.1.0 


53


3.1.1.3 System Construction of Type VI Sensor 

To use a type VI torque sensor, configure it as follows: 

a. 

Correctly install the hardware of the torque sensor, and connect its connecting terminal to the TIO 

interface at the robot end, with the XY direction of the sensor consistent with that of the end flange; 

b. 

Turn on the robot CAB, open the JAKA Zu app, connect the robot to the app, and power on the robot; 

c. 

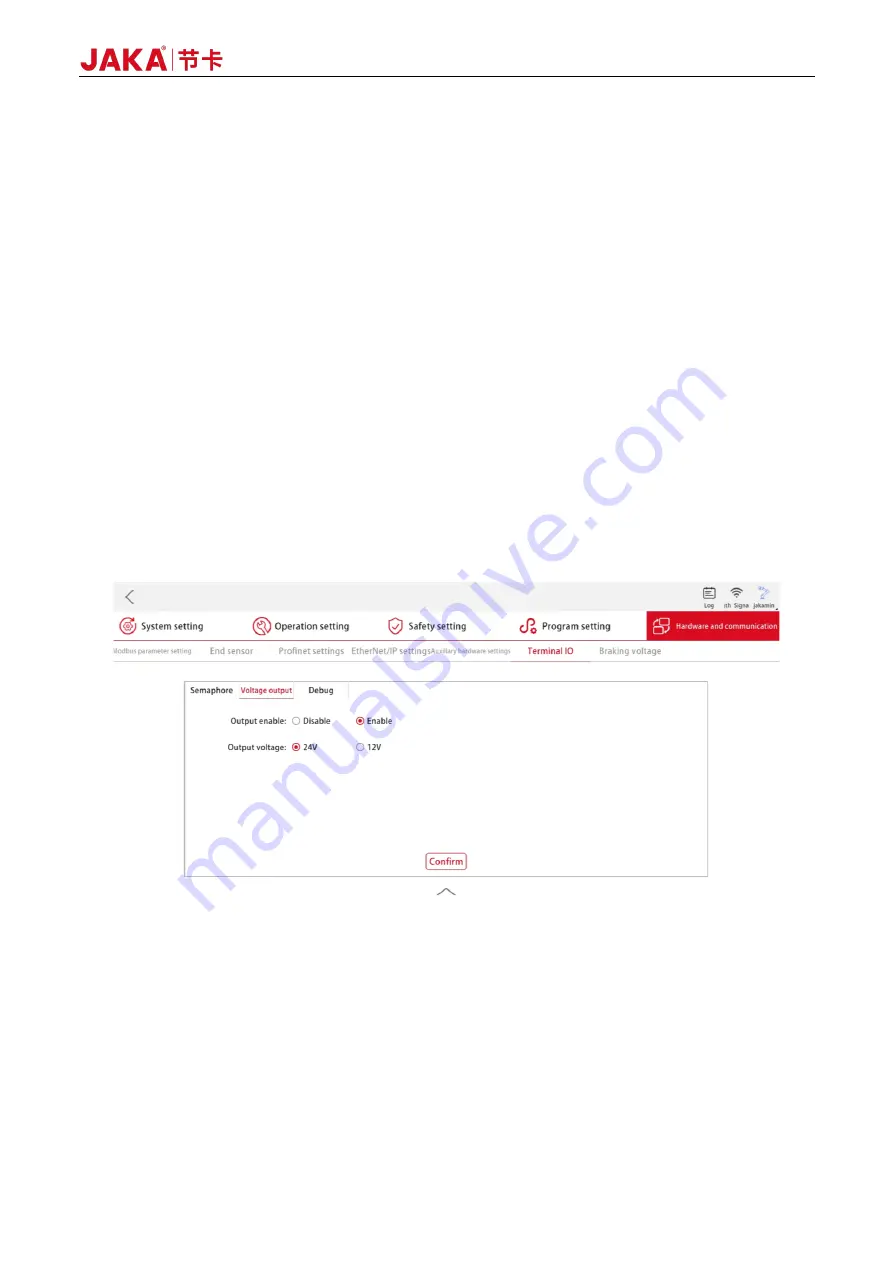
Tap [Settings] → [Hardware and communication] → [Terminal IO] → [Voltage output] to configure the 

TIO output power supply, set the output voltage to 12V and enable it (see Figure 3-5). At this time, the 

sensor indicator light is on, indicating the sensor is powered on. 

d. 

As shown in Figure 3-6, tap [I/O panel] → [Tool end], and tap "DO1" in the [Digital output] sub-window. 

(Note: tap "DO1" instead of the toggle switch above it). Then the "I/O settings" window will pop up. 

Select "Reuse as RS485 channel 1" in the drop-down box of the [Mode setting] bar, tap [Confirm] to 

exit, and [RS485 configuration] will be displayed on the right of the title of the [Digital output] sub-

window; 

e. 

Tap [RS485 configuration], and the configuration interface of the RS485 channel will pop up, including 

communication parameters and function/mode configuration. As shown in Figure 3-6, select [Torque 

sensor], and set the baud rate to 230400, the data bit length to 8, the stop bit length to 1, and the parity 

method to be none. After that, tap [Confirm], and the communication configuration between TIO and 

external torque sensor is completed; 


Figure 3-5 Power-on Configuration Interface of Type VI Sensor 

Содержание Zu Series

Страница 1: ...JAKA ROBOTICS Force Control Products JAKA Se and JAKA Sp...

Страница 2: ...JAKA ROBOTICS User Manual for Force Control Products JAKA Se and JAKA Sp Version 3 1 0 Applicable to products with control cabinet versions 1 5 13 32 1 7 0 38 or later...

Страница 3: ......

Страница 4: ......

Страница 5: ...tment by JAKA JAKA will not be held liable for any mistakes in this manual or for any accidents or indirect injuries resulting from the use of this manual and relevant products Please carefully read t...

Страница 6: ...1 3 Wiring of the Sensor 11 2 1 1 4 Sensor Specifications 12 2 1 1 5 Precautions for Use 12 2 1 1 6 Reference Tightening Torques for Sensor Mounting Bolts 12 2 1 2 Type II Force Sensor 14 2 1 2 1 Over...

Страница 7: ...view 40 2 1 6 2 Sensor Installation 40 2 1 6 3 Wiring of the Sensor 42 2 1 6 4 Sensor Specifications 43 2 1 6 5 Precautions for Use 44 2 1 6 6 Reference Tightening Torques for Sensor Mounting Bolts 44...

Страница 8: ...elocity Compliance Control Function 64 3 1 2 7 Motion Stop Conditions Function 65 3 2 JAKA ZU SP SOFTWARE USAGE 67 3 2 1 JAKA Zu Sp System Construction 67 3 2 2 Usage of JAKA Zu Sp 70 3 2 2 1 Real tim...

Страница 9: ...e Setting safe contact force and force control parameters in the software interface With Se series products utilizing end sensors providing constant force control and compliant traction teaching for t...

Страница 10: ...o the control cabinet in real time When its end effector is subjected to external force the robot will adjust its end position and posture to adapt to the force At the same time you can directly drag...

Страница 11: ...installed on the robot base Real time perception of external contact forces Fx Fy and Fz dimensional forces and Mx My and Mz dimensional torques Traction teaching for the whole robot in three directio...

Страница 12: ...sor is powered on or off 3 When using the robot please ensure that the emergency stop button is clearly visible and easily reachable 4 After installing and configuring the sensor hardware for the firs...

Страница 13: ...to carefully consider the operating conditions when using JAKA s robots The following dangerous situations may occur The uncontrolled motion of the robot end caused by a damaged force sensor The uncon...

Страница 14: ...the force exerted on it and then measures the change in its elastic element with a resistance strain gauge The sensor contains a high precision and highly responsive embedded system which can acquire...

Страница 15: ...etween the sensor and the adapter plate d Connect the output flange to the sensor output end The mechanical interface of the output flange is identical to that of the robot end flange The connections...

Страница 16: ...he sensor so do not forget to check that the wiring is correct c The sensor has built in precision components such as embedded systems Although we have carried out relevant vibration and shock tests i...

Страница 17: ...Version 3 1 0 13 M3 2 0 M4 4 0 M5 8 0 M6 13 0 M8 35 0...

Страница 18: ...inciple The sensor contains a high precision and highly responsive embedded system which can acquire and analyze changes in signals from the resistance strain gauge as well as output the magnitude and...

Страница 19: ...a Please ensure that the surfaces of the robot end mounting flange and sensor are free of damage or foreign objects If the contact is non uniform due to factors such as the inclusion of foreign object...

Страница 20: ...tooling CAUTION Before installing the sensor please keep the XY directions of the sensor coordinate system consistent with that of the robot end flange coordinate system that is keeping the direction...

Страница 21: ...e product It is a multicore cable and its interface matches the cable interface on the sensor Align the interface of the multicore cable with the cable interface of the sensor and push it in See Figur...

Страница 22: ...Sensor Specifications The sensor specifications of type II are as follows Table 2 4 Sensor Specifications of Type II Model JK SE II 200 JK SE II 400N JK SE II H Directions Fx Fy Fz Mx My Mz Fx Fy Fz...

Страница 23: ...nsor is installed and powered on it is recommended to warm up for one hour before operating f When using the sensor pay attention to the mass of the device mounted on it which should be within the pay...

Страница 24: ...nd To prevent the swinging or pulling of the cable from affecting the force sensor measurements the robot should be fixed during installation and the bolts should be installed from the direction of th...

Страница 25: ...NING Do not use screws other than those provided with this product Using other screws may cause irreversible damage to the sensor or a robot fault Figure 2 13 Installation and Dimensions of the F T Se...

Страница 26: ...the internal power of the CAB or an additional power source Be careful not to connect the positive and negative of the power supply in reverse or the sensor will be damaged Refer to Table 2 6 for pow...

Страница 27: ...tems Although we have carried out relevant vibration and shock tests it is still necessary to prevent it from dropping which could cause excessive vibration and subsequent malfunctions d Do not strike...

Страница 28: ...contains a high precision and highly responsive embedded system which can acquire and analyze changes in signals from the resistance strain gauge as well as output the magnitude and direction of the a...

Страница 29: ...ves the factory the mounting flange and the sensor are connected by six embedded hexagon socket screws Use a 3 mm Allen key to loosen them so as to separate the mounting flange from the sensor as show...

Страница 30: ...or performance if not used WARNING Do not use screws other than those provided with this product Using other screws may cause irreversible damage to the sensor or a robot fault 2 1 4 3 Wiring of the S...

Страница 31: ...hield Figure 2 23 Wiring of the 422 485 USB Adapter and Power Plug Note This sensor requires a 24V DC power supply from the internal power of the CAB or an additional power source The DC power plug sh...

Страница 32: ...hortcircuit and damage to the internal circuit of the sensor so do not forget to check that the wiring is correct c The sensor has built in precision components such as embedded systems Although we ha...

Страница 33: ...Version 3 1 0 29 Table 2 11 Reference Tightening Torques for Type V Sensor Mounting Bolts Metric Reference Tightening Torque Nm M2 0 4 M3 2 0 M4 4 0 M5 8 0 M6 13 0 M8 35 0...

Страница 34: ...nalyze changes in signals from the resistance strain gauge as well as output the magnitude and direction of the applied force in real time Please install the sensor properly so as not to interfere wit...

Страница 35: ...ons of the sensor are shown in Figure 2 26 M6 6 M4 TIO Fx Fy My Mx Fz Mz Figure 2 26 Appearance and Dimensions of the Sensor M6 threaded hole 6 positioning pin hole Dust washer Tool end flange TIO int...

Страница 36: ...orm contact between the sensor and the robot or adapter tooling CAUTION Before installing the sensor please keep the XY directions of the sensor coordinate system consistent with that of the robot end...

Страница 37: ...nnecting cable is a multicore one and its interface is matched with the TIO cable interface at the robot end Align the interface of the multicore cable with the cable interface at the robot end and pu...

Страница 38: ...and install the mounting flange to the robot When the sensor leaves the factory the mounting flange and the sensor are connected by six embedded hexagon socket screws Use a 3 mm Allen key to loosen th...

Страница 39: ...tallation of the Sensor to the Robot d Connect the tool interface of the robot to the sensor tool end flange The sensor tool end flange comes with four M6 screw holes and 6 pin holes for connecting de...

Страница 40: ...om the direction of the tool end a Please ensure that the surfaces of the robot end adapter plate and sensor are free of damage or foreign objects If the contact is non uniform due to factors such as...

Страница 41: ...Version 3 1 0 37 Figure 2 36 Installation and Dimensions of the Force Sensor Indicator light...

Страница 42: ...0N JK SE VI 800N JK SE VI 400NS JK SE VI 1200NS Directions Fx Fy Fz Mx My Mz Fx Fy Fz Mx My Mz Fx Fy Fz Mx My Mz Fx Fy Fz Fz Range 200N 8Nm 400N 24Nm 800N 40Nm 400N 1200N Overload 200 F S 200 F S 400...

Страница 43: ...of the robot g If you have any doubts or if any faults occur during use please do not attempt to operate the product Instead contact us directly 2 1 5 7 Reference Tightening Torques for Sensor Mountin...

Страница 44: ...oading end tool end and the installation method are shown in Figure 2 38 Due to variations in sensor models and batches the actual size may differ from what is indicated in Figure 2 38 Please contact...

Страница 45: ...nate system that is keeping the direction from the center of the robot end flange to the TIO consistent with the Y direction of the sensor Inconsistent installation directions may affect subsequent us...

Страница 46: ...directly connected to the sensor as shown in Figure 2 39 During installation each cable core should be wired in strict accordance with the specified core color definitions the wiring diagram is shown...

Страница 47: ...d on in operation Off Sensor powered off damaged WARNING Before securing the sensor wiring harness with cable ties be sure to check that attached peripherals do not interfere with the robot s operatio...

Страница 48: ...nt it from dropping which could cause excessive vibration and subsequent malfunctions d Do not strike or knock the sensor when installing it especially when installing it onto the mounting flange If t...

Страница 49: ...e definition of the sensor coordinate system is shown in Figure 2 41 Figure 2 41 Sensor Coordinates 2 2 1 2 Sensor Installation The flange that connects the force sensor to the base should be designed...

Страница 50: ...be the same as that of the sensor For the specific configuration method please refer to the instructions in the JAKA Zu Sp System Construction section of Chapter 3 The default IP for the sensor upon...

Страница 51: ...shock tests it is still necessary to prevent it from dropping which could cause excessive vibration and subsequent malfunctions d Do not strike or knock the sensor when installing it If the mounting c...

Страница 52: ...you connect the cable to a router set the router IP to 192 168 2 x If you directly connect the cable to the network port at the bottom of the CAB set the CAB IP in the app Tap Settings at the upper ri...

Страница 53: ...the IP and port number For type III sensor the default IP is 192 168 2 108 and the port number is 4008 For type I sensor please refer to separate instructions or contact us and then tap Confirm After...

Страница 54: ...r on the sensor turn on the CAB redo the configurations If the problem persists after restarting please contact us Any unauthorized attempt to disassemble and repair the sensor robot CAB or cable is N...

Страница 55: ...ap the toggle switch on the right to change its status from Edit to Run g Open the Manual operation page tap Configure check Do not initialize tap confirm and close the page Then tap the View button o...

Страница 56: ...connected to the sensor or use the auto load identification function See the Usage of JAKA Zu Se section for details Once the load identification data has been verified or after manually entering the...

Страница 57: ...As shown in Figure 3 6 tap I O panel Tool end and tap DO1 in the Digital output sub window Note tap DO1 instead of the toggle switch above it Then the I O settings window will pop up Select Reuse as R...

Страница 58: ...uration interface Select the sensor type VI then tap Confirm Ensure the sensor brand is set successfully and tap the toggle switch on the right to change its status from Edit to Run Then the sensor ca...

Страница 59: ...is a 1D sensor turn on the toggle switch of Fz Slightly push or pull the sensor If the graph fluctuates the sensor communication is normal See the usage of the real time display of external force fun...

Страница 60: ...lue in real time You can check the corresponding force data curve by turning on off the toggle switches in front of Fx Fy Fz Mx My and Mz If the Real time toggle switch is on the force data curves wil...

Страница 61: ...Version 3 1 0 57 Figure 3 8 Force Display Interface of the App...

Страница 62: ...ve the robot to a suitable position power on and enable the robot and leave enough clearance near the robot end so that the joints 4 5 and 6 can move without collision or cable pulling Then tap Confir...

Страница 63: ...y construct the sensor system to ensure that the sensor is operating properly b Tap Settings at the upper right of the Home page then tap Hardware and communication End sensor Sensor limit to enter th...

Страница 64: ...e it s released CAUTION Damping force is merely a parameter for softness or hardness not an exact value In other words if you set the Damping force to 25N it does not imply that you must apply a force...

Страница 65: ...powered on for a long time be sure to check Initialization before using this function for the first time otherwise it could lead to uncontrolled robot movement potentially causing damage to device or...

Страница 66: ...e system Constant force compliance parameter setting Activate constant force compliance control and Inactivate constant force compliance control The scene for the example program in Figure 3 12 is tha...

Страница 67: ...Place the Set force control coordinate system and Constant force compliance parameter setting modules above the Activate constant force compliance control module Otherwise they may not function proper...

Страница 68: ...gn a safe trajectory and correct speed for the robot c The function of the Set force control coordinate system program block is the same as that of the coordinate system selection in the configuration...

Страница 69: ...or a long time do not use this function until you ve confirmed that the traction teaching function is not reporting any errors See the Traction Teaching Function section for details to avoid accidents...

Страница 70: ...the program appears to run normally during testing the sensors or other hardware components could potentially fatigue and fail due to prolonged repeated heavy pulling squeezing or bending Therefore i...

Страница 71: ...e bottom of the CAB c Connect the sensor power supply which can be powered by the internal power supply of the robot CAB or an additional 24V DC power supply d If you connect the cable to a router set...

Страница 72: ...68 Force Control Products Figure 3 17 Network Setting Interface Note If you do not want to use the default sensor IP address you can consult us and modify it through the sensor host computer...

Страница 73: ...e to change its status from Edit to Run and the sensor can be turned on normally j Open the Manual operation page tap Configure check Do not initialize tap confirm and close the page Then tap the View...

Страница 74: ...ss the emergency stop button to avoid property damage or personal injury 3 2 2 1 Real time Display of External Force Function Tap View in the manual operation interface to check the contact external f...

Страница 75: ...Version 3 1 0 71 Figure 3 19 Force Display Interface of the App...

Страница 76: ...when you re dragging it CAUTION After the device is installed the robot is powered on again the robot is recovered from a fault or the sensor is powered on for a long time set the Damping force to a h...

Страница 77: ...Se Note Due to factors such as sensor temperature drift if the robot position drifts in the drag mode please tap the toggle switch to exit the drag mode check Initialization in the configuration inte...

Страница 78: ...the waiting period otherwise the initialization may fail leading to uncontrolled robot movement device damage or personal injury CAUTION Due to factors such as sensor temperature drift it is recommend...

Страница 79: ...Version 3 1 0 75 Figure 3 21 Collision Detection Function Settings of JAKA Zu Sp...

Страница 80: ...76 Force Control Products Shanghai JAKA Robotics Ltd Address Building 33 35 610 Jianchuan Road Minhang District Shanghai China Tel 400 006 2665 Web www jaka com...

Отзывы: