background image

8. Peripherals and Options                                                                                                                     

- 238 -

8

8.3  External Operating Panel

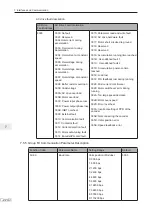
The MD32NKE1 is the external operating panel applicable to the  drive. It adopts the LED display 
and has the same operation mode as the operating panel on the drive. For details, refer to 

Chapter  4  

Operating Panel (Keypad & Display)

.

7KHIROORZLQJ¿JXUHVVKRZWKHSK\VLFDODSSHDUDQFHDQGPRXQWLQJGLPHQVLRQVRIWKH0'1.(

116.0

76.0

54.0

104.0

11.0


92.5

71

15.0

27.0

10.0

Crystal head

5.0

6.5

11.0

Ø3.5

Unit: mm 


Ƶ

Connecting Cable 

Inovance provides MDCAB-MD (3 meters) and MDCAB2-MD (1.5 meters) for the user to connect 
external operating panel. The users can prepare connecting cable by themselves.

Note

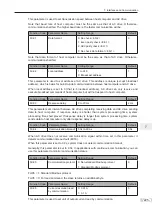
Once external operating panel is connected, the inbuilt operating panel becomes invalid.

Содержание MD290 Series

Страница 1: ......

Страница 2: ...ponent for professional incorporation into a complete machine or process system It is the responsibility of the user or machine builder or installation contractor or electrical designer engineer to take all necessary precautions to ensure that the system complies with current standards and to provide any devices including safety components required to ensure the overall safety of the equipment and...

Страница 3: ...l Installation 48 3 1 Typical System Connection 48 3 2 Main Circuit Wiring 49 3 3 Control Circuit Wiring 68 3 4 Wiring Checklist 77 Chapter 4 Operating Panel Keypad Display 80 4 1 Introduction 80 4 2 Inbuilt LED Operating Panel 80 Chapter 5 Quick Setup 92 5 1 Get Familiar With Operating Panel 92 5 2 Setup Flowchart 93 Chapter 6 Description of Parameters 102 6 1 Start Stop Command Source 102 6 2 Se...

Страница 4: ...ing Bracket 257 Chapter 9 Maintenance and Inspection 262 9 1 Daily Inspection 262 9 2 Periodic Inspection 264 9 3 Lifetime of Fans and Electrolytic DC Bus Capacitors 266 9 4 Storage 270 9 5 Warranty Agreement 270 Chapter 10 Troubleshooting 272 10 1 Safety Information 272 10 2 Troubleshooting During Trial Run 273 10 3 Fault Display 273 10 4 Resetting Fault 274 10 5 Faults and Diagnostics 275 10 6 S...

Страница 5: ...ol circuits within the AC Drive must not be relied upon for the safety of personnel Such control circuits do not isolate mains power voltages from the output of the AC Drive The mains power supply must be disconnected by an electrical safety isolation device before accessing the internal parts of the AC Drive Safety risk assessments of the machine or process system which uses an AC Drive must be u...

Страница 6: ...o the mains supply with a plug and socket then upon disconnecting the plug and socket be aware that the plug pins may be exposed and internally connected to EXV FDSDFLWRUV YLD WKH LQWHUQDO EULGJH UHFWL HU LQ UHYHUVHG ELDV DLW PLQXWHV WR DOORZ VWRUHG FKDUJH in the DC bus capacitors to be dissipated by the bleed resistors before commencing work on the AC Drive Electrical Shock Hazard Ensure the prot...

Страница 7: ...r controlling noise The drive with CE mark meets the following EMC guidelines and the Low Voltage Directive Ɣ 2014 35 EU Low Voltage Directive Ɣ 2014 30 EU Electromagnetic compatibility Machines and devices used in combination with this drive must also be CE certified and marked The integrator who integrates the drive with the CE mark in into other devices has the responsibility of ensuring compli...

Страница 8: ...1 Product Information 3URGXFW 7 SH GHQWL FDWLRQ 8 1 2 Internal View of MD290 9 1 3 Ratings 13 7HFKQLFDO 6SHFL FDWLRQV 16 1 5 De rating 20 ...

Страница 9: ...XODU XQLW LJXUH 3URGXFW W SH LGHQWL FDWLRQ MODEL MD290T18 5G 22P INT INPUT 3PH AC 380 480V 59 0A 50Hz 60Hz OUTPUT 3PH AC 0 480V 45 0A 0 500Hz 22kW Suzhou Inovance Technology Co Ltd S N Serial Number AC drive model Rated input Rated output S N code Nameplate Manufacturer MD290 series AC drive MD290 T Voltage Class T General type Mark G Mark Type of Applicable Motor Three phase 380 to 480 V With Bui...

Страница 10: ... Never remove install or wire the drive when the indicator is lighting Barcode View the serial number and model of the drive here Operating panel See section 4 2 Fixing pin of extension PG card See section 8 4 3 Cabling tray and fixing pin of ground cable of control board This ground cable can only be connected to the ground bar after the system is grounded reliably Main circuit terminals See sect...

Страница 11: ...minals See section 3 2 1 EMC and VDR screw Refer to Power Grid System in section 3 2 2 and requirement on current leakage in section A 1 8 Fixing pin of extension card See sections 8 4 1 and 8 4 2 Ground bar Ground the PG card and control board only after ensuring reliable system grounding Cooling fan For replacement see section 9 3 Nameplate Refer to Figure 1 1 Operating panel See section 4 2 Int...

Страница 12: ...3 2 2 and requirement on current leakage in section A 1 8 Ground bar It is used for grounding of the PG card and control board Fixing pin of extension card See sections 8 4 1 and 8 4 2 Operating panel See section 4 2 Cabling tray and fixing pin of ground cable of control board This ground cable can only be connected to the ground bar after the system is grounded reliably Interface of remote operat...

Страница 13: ...e can only be connected to the ground bar after the system is grounded reliably Ground bar It is used for grounding of the PG card and control board Fixing pin of extension card See sections 8 4 1 and 8 4 2 Housing Live indicator Do not remove install the drive when this indicator is lighting EMC and VDR screw Refer to Power Grid System in section 3 2 2 and requirement on current leakage in sectio...

Страница 14: ...45 55 75 G type HP 25 30 40 50 60 75 100 P type kW 22 30 37 45 55 75 90 P type HP 30 40 50 60 75 100 120 Output Current A G type 37 45 60 75 91 112 150 P type 45 60 75 91 112 150 176 Default Carrier Frequency kHz 6 6 6 5 5 4 3 Overload Capacity G type 150 for 60 Sec P type 110 for 60 Sec Max Output Voltage Three phase 380 to 480 VAC proportional to input voltage Max Output Frequency 500 Hz Braking...

Страница 15: ...28 Drive Output Applicable Motor G type kW 90 110 132 160 G type HP 120 150 180 220 P type kW 110 132 160 200 P type HP 150 180 220 267 Output Current A G type 176 210 253 304 P type 210 253 304 377 Default Carrier Frequency kHz 3 3 3 3 Overload Capacity G type 150 for 60 Sec P type 110 for 60 Sec Max Output Voltage Three phase 380 to 480 VAC proportional to input voltage Max Output Frequency 500 ...

Страница 16: ...2 5 789 4 882 645 860 860 860 Enclosure IP00 Table 1 4 Ratings of MD290T315G to MD290T450G and MD290T355P to MD290T500P Voltage Class 380 to 480 VAC Model MD290Txxxx L INT 315G 355P 355G 400P 400G 450P 450G 500P Drive Input Rated Input Voltage Three phase 380 to 480V 15 to 10 Rated Input Current A 565 624 617 708 687 782 782 840 Power Capacity kVA 517 571 565 647 629 715 716 768 Rated input freque...

Страница 17: ...e 0 0s to 36 0s Current level of DC injection braking 0 to 100 Jog running Frequency range of jog running 0 00 to 50 00 Hz Acceleration Deceleration time of jog running 0 0s to 6500 0s Onboard multiple preset speeds The system implements up to 16 speeds by using simple PLC function or by using digital input signals Onboard PID The system implements the proportionalegral derivative PID function in ...

Страница 18: ...ps of motor parameters and can control up to two motors 0XOWLSOH HOG EXVHV 7KH GULYH VXSSRUWV IRXU HOG EXVHV Ɣ Modbus RTU Ɣ PROFIBUS DP Ɣ CANlink Ɣ CANopen Motor overheat protection Option The optional input output I O extension card allows AI3 to receive a signal from the motor temperature sensor input PT100 PT1000 to implement motor overheat protection User programmable function Option The optio...

Страница 19: ...tal input DI terminals one of which supports up to 100 kHz high speed pulse inputs Ɣ 2 analog input AI terminals one of which supports only 0 to10 V input and the other supports 0 to 10 V and 4 to 20 mA current input Expanded capacity Ɣ 5 digital input DI terminals Ɣ 1 AI terminal that supports 10 to 10 V voltage input and PT100 PT1000 motor temperature sensor inputs Output terminals Standard Ɣ 1 ...

Страница 20: ...on Stop after running at 150 of rated current for 60 seconds Overcurrent protection Stop when output current exceeds 250 of rated current of the AC drive Braking protection Ɣ Braking unit overload protection Ɣ Braking resistor short circuit protection Short circuit protection Ɣ Output inter phase short circuit protection Ɣ Output short circuit to ground protection Environment Installation location...

Страница 21: ...84 0 79 5 75 100 0 91 8 84 2 77 5 90 100 0 90 8 82 3 74 9 110 100 0 91 9 84 4 77 7 132 100 0 93 1 86 7 80 8 160 100 0 92 6 85 7 79 7 200 100 0 90 0 81 0 73 1 220 100 0 90 8 82 5 75 1 250 100 0 91 2 83 2 76 2 280 100 0 91 8 84 3 77 8 315 100 0 91 7 83 9 77 0 355 100 0 92 3 85 2 78 7 400 100 0 91 4 83 6 76 8 Ƶ Ambient Temperature De rating Drive operation between 10 C to 40 C is normal without de ra...

Страница 22: ...2 1 Installation Environment 22 2 2 Mounting Orientation and Clearance 23 2 3 Mounting Dimensions 25 2 4 Installation Method and Procedures 28 5HPRYH DQG 5H W WKH URQW RYHU 44 2 Mechanical Installation ...

Страница 23: ...plosive gases and vapours Ɣ Free from oil dirt dust or metallic powders Vibration Ensure the mounting location is not affected by levels of vibration that exceeds 0 6 g Avoid installing the enclosure near punching machines or other mechanical machinery that generates high levels of vibration or mechanical shock Protective enclosure The AC drive must be installed in a nonconbustible cabinet that pr...

Страница 24: ...ting clearance of MD290T18 5G 22P to MD290T160G 200P B B A A C Upright Side View Front view 18 5 to 22 kW Power Rating 30 to 37 kW 45 to 160 kW A 10 mm A 50 mm A 50 mm B 200 mm B 200 mm B 300 mm C 40 mm C 40 mm C 40 mm Clearance Requirements Figure 2 2 Correct mounting clearance of MD290T200G to MD290T450G and MD290T220P to MD290T500P B2 A2 D Upright Power Rating Clearance Requirements Unit mm Sid...

Страница 25: ...s shown in Figure 2 2 Figure 2 3 Clearance for multi drive installation A 18 5 to 22 kW A 10 mm 30 to 37 kW A 50 mm 45 to 160 kW A 50 mm Power Rating Clearance Requirements A Where an AC drive is required to be mounted directly above another AC drive it is recommended to install an air guide plate to divert exhaust cooling air of the bottom unit away from the top unit Figure 2 4 Installation of an...

Страница 26: ...18 5G 22P to MD290T160G 200P MD290 Model Dimensions mm Weight kg Housing Type A B H H1 W D d MD290T18 5G 22P 195 335 350 210 192 Ø6 9 1 Plastic housing MD290T22G 30P MD290T30G 37P 230 380 400 250 220 Ø7 17 5 Plastic housing MD290T37G 45P MD290T45G 55P 245 523 525 542 300 275 Ø10 35 Sheet metal housing MD290T55G 75P MD290T75G 90P 270 560 554 580 338 315 Ø10 51 5 Sheet metal housing MD290T90G 110P M...

Страница 27: ... Model Dimensions mm Weight kg Housing Type A1 A2 B1 B2 H H1 W W1 D D1 MD290T200G 240 150 1035 86 1086 1134 300 360 500 Ø13 110 Sheet metal housing MD290T220P MD290T250P MD290T220G MD290T280P MD290T250G 225 185 1175 97 1248 1284 330 390 545 Ø13 155 Sheet metal housing MD290T315P MD290T280G MD290T355P MD290T315G 240 200 1280 101 1355 1405 340 400 545 Ø16 185 Sheet metal housing MD290T400P MD290T355...

Страница 28: ...Dimensions mm Weight Kg Housing Type A1 A2 B1 B2 H H1 W W1 D D1 MD290T200G L 240 150 1035 424 1424 1472 300 360 500 ĭ 160 Sheet metal housing MD290T220P L MD290T250P L MD290T220G L MD290T280P L MD290T250G L 225 185 1175 435 1586 1622 330 390 545 ĭ 215 Sheet metal housing MD290T315P L MD290T280G L MD290T355P L MD290T315G L 240 200 1280 432 1683 1733 340 400 545 ĭ 245 Sheet metal housing MD290T400P ...

Страница 29: ...450G and MD290T220P to MD290T500P W UHTXLUHV LQVWDOODWLRQ RI LQJ EHDP ERWWRP PRXQWLQJ EUDFNHW DQG JXLGH UDLO UVW 7KH GULYH FDQ EH WKHQ pushed into the cabinet and secured 2 4 1 Backplate Mounting Note It is very important that you identify correct mounting hole locations and diameters RI WKH GULYH RX DUH LQVWDOOLQJ QG FKHFN WKDW RX KDYH LGHQWL HG FRUUHFW GLPHQVLRQV before you start to drill the mo...

Страница 30: ...2 Mechanical Installation 29 2 Figure 2 9 Backplate mounted installation of a plastic housing Figure 2 10 Backplate mounted installation of a sheet metal housing Eye bolt Mounting holes ...

Страница 31: ...ment if you attempt to carry move or support them without help Ɣ D WKH GULYH KRXVLQJ RQ D VWURQJ ÀDW VXUIDFH ZLWK FRQWURO SDQHO IDFLQJ XSZDUGV Ɣ Fit the supplied through hole mounting brackets to the housing Fit brackets in correct orientation depending on whether you are pushing the housing through the front or from the rear of the supporting surface For sheet metal housing use the two supplied e...

Страница 32: ...our mounting holes Ɣ Carefully cut a rectangular cut out hole in the supporting surface according to the markings you made in step 6 Ɣ Prepare edges of the cut out to remove sharp edges and burrs Ƶ Step 3 Installing the AC Drive into the Hole Cut out Ɣ Lift the AC drive into the cut out you have prepared Insert the AC drive from the correct side of the mounting surface depending on whether you are...

Страница 33: ...ng Bracket Model Applicable AC Drive Model Bracket Dimensions MD500 AZJ A1T5 MD290T18 5G 22P Refer to 8 5 Through hole Mounting Bracket MD290T22G 30P MD500 AZJ A1T6 MD290T30G 37P MD290T37G 45P MD500 AZJ A1T7 MD290T45G 55P MD290T55G 75P MD500 AZJ A1T8 MD290T75G 90P MD290T90G 110P MD290T110G 132P MD500 AZJ A1T9 MD290T132G 160P MD290T160G 200P ...

Страница 34: ...to MD290T450G L and MD290T220P L to MD290T500P L support mounting in cabinet only Ƶ Ventilation Ventilation space must be considered when mounting drives of MD290T132G 160P MD290T160G 200P MD290T200G L to MD290T450G L and MD290T220P L to MD290T500P L Figure 2 11 Cabinet without fan on the top Air inlet of front door 2200 100 MD290 Ventilation airflow Cabinet top air outlet cover Isolation barrier ...

Страница 35: ...90T220P L MD290T250P L MD290T220G L 2 722 31809 50894 MD290T280P L MD290T250G L 3 789 47713 76341 MD290T315P L MD290T280G L 3 882 47713 76341 MD290T355P L MD290T315G L 3 644 47713 76341 MD290T400P L MD290T355G L 3 796 47713 76341 MD290T450P L MD290T400G L 3 796 47713 76341 MD290T500P L MD290T450G L 3 796 47713 76341 Note 1 CFM 0 0283 m3 min 2 Effective area means through hole area 7KH VSHFL FDWLRQ...

Страница 36: ...2 Mechanical Installation 35 2 Figure 2 12 Cabinet with fan on the top Air inlet of front door Isolation barrier Fan Ventilation airflow of MD290 MD290 100 2200 ...

Страница 37: ...e top fan center HUB MD290T160P MD290T160G 2 620 31809 50894 MD290T200P MD290T200G L 2 586 31809 50894 MD290T220P L MD290T250P L MD290T220G L 2 722 31809 50894 MD290T280P L MD290T250G L 3 789 47713 76341 MD290T315P L MD290T280G L 3 882 47713 76341 MD290T355P L MD290T315G L 3 644 47713 76341 MD290T400P L MD290T355G L 3 796 47713 76341 MD290T450P L MD290T400G L 3 796 47713 76341 MD290T500P L MD290T4...

Страница 38: ...pull it out of the cabinet after moving the drive onto the guide rail Make sure to align the castors to the guide rail and arrange two persons for drive push in and pull out to ensure safety CAUTION Ɣ Refer to Figure 2 3 for mounting clearance requirements Ensure WKHUH LV VXI FLHQW VSDFH DOORZ IRU HI FLHQW KHDW GLVVLSDWLRQ RI WKH drive and the other devices in the cabinet Ɣ Arrange two persons for...

Страница 39: ...nput reactor MD290 450 kW Front door air inlet Wind screen Cabinet input copper bar Grounding terminal of MD290 Ventilation airflow of MD290 Front door Transformer from 380 V to 220 V Cabinet base 100mm 2200 mm Note Ɣ The cabinet dimension is 2200 x 800 x 600 mm The height 2200 mm includes the 200 mm cabinet ventilation top cover but does not include the 100 mm cabinet base Ɣ IWHU SXVK LQ UHPRYH W...

Страница 40: ...290T250G L to MD290T450G L and MD290T315P L to 0 7 3 LV PRXQWHG LQ WKH QLQH IROGLQJ FDELQHW RI PP GHHS WKH LQJ EHDP must fold inwards When the drive is mounted in the cabinet of 800 mm deep folding inwards is not required LJXUH ROGLQJ LQZDUGV RI WKH LQJ EHDP LQ WKH FDELQHW RI PP GHHS Nine folding MD290 Fixing beam Note If the cabinet has front door and back door the cabinet of 600 mm deep is too s...

Страница 41: ...bottom mounting bracket Nine folding AL cabinet M5 self tapping screw Quantity 6 PCS Bottom mounting bracket standard configuration Ɣ Assemble the guide rail model MD500 AZJ A3T10 option Figure 2 18 Assemble the guide rail M5 x 12 combined screws 8PCS Connecting plate above Left rail Right rail Connecting plate below RQQHFW WKH JXLGH UDLO WR WKH ERWWRP PRXQWLQJ EUDFNHW DQG WKHP ZLWK WZR 0 QXWV Fig...

Страница 42: ...rive to the guide rail Figure 2 20 Align castors of the drive to the guide rail Guide rail optional Ɣ Push the drive into the cabinet slowly Please use auxiliary strap in the process of push in to SUHYHQW WXUQRYHU DV VKRZQ LQ WKH IROORZLQJ JXUH Figure 2 21 Push the drive into the cabinet Because the center of gravity of the drive is too high please use soft strap with hook at both ends in the proc...

Страница 43: ...h in completed Ɣ L WKH GULYH WR WKH EHDPV RQ WKH EDFN RI WKH FDELQHW DV VKRZQ LQ WKH IROORZLQJ JXUH Cabinet frame Beams on cabinet back Mounting bracket Guide rail optional Ɣ Check that installation of the drive is secure and remove the guide rail ...

Страница 44: ...n the cabinet Baffle of ventilation Ɣ Please use top hoist rings to move or hoist the drive If it is necessary to place the drive in a horizontal position use the top hoist ring and bottom hoist hole when you hoist the drive again Ensure the DC bus terminals suffer no stress Ɣ If it is necessary to place the drive in an upright position prevent a stress RQ ERWK VLGHV RI WKH GULYH DQG SUHYHQW SODFL...

Страница 45: ...front cover A falling cover may cause damage to the drive or personal injury Ƶ 5HPRYH DQG 5H W WKH URQW RYHU RI D 3ODVWLF RXVLQJ Removal Pinch inwards on the latch on both sides of the cover to release the cover 1 3 2 Hold the lower part of the front cover 3 Lift the front cover 1 2 5H WWLQJ 1 1 Locate the cover top at its fixing position 2 Align the front cover to the drive and push it down in th...

Страница 46: ... 2 Ƶ 5HPRYH DQG 5H W WKH URQW RYHU RI D 6KHHW 0HWDO RXVLQJ Removal Loosen four screws from the front cover and then remove the front cover Reattaching RFDWH DQG DOLJQ WKH LQJ KRRN DW WKH WRS RI WKH FRYHU DQG VHFXUH WKH IRXU VFUHZV ...

Страница 47: ... the Front Cover of MD290T200G L to MD290T450G L and MD290T220P L to MD290T500P L Removal Loosen six screws from the front cover and then remove the front cover Reattaching RFDWH DQG DOLJQ WKH LQJ KRRN DW WKH WRS RI WKH FRYHU DQG VHFXUH WKH VL VFUHZV ...

Страница 48: ...3 Electrical Installation 3 1 Typical System Connection 48 3 2 Main Circuit Wiring 49 3 3 Control Circuit Wiring 68 3 4 Wiring Checklist 77 ...

Страница 49: ... output voltage current switchable 0 to 10VDC 0 to 20mA Pulse output 0 to 100 kHz Open collector output 10 to 24VDC 0 to 50mA Open collector output 10 to 24VDC 0 to 50mA Relay output 250 VAC between 10 mA and 3 A 30 VDC between 10 mA and 1 A Braking unit Mains External RFI filter Line reactor option Supply ground RS485 RS485 Current mode Voltage mode Current mode Voltage mode Jumper J7 for AO1 0 1...

Страница 50: ...nal Function Table 3 1 Description of input and output connections of the drive Terminal Name Description R S T Three phase supply input Connected to three phase power supply DC bus terminals Connected to external braking unit MDBUN with AC drive units of 90 kW and above BR Braking resistor connection Connected to external braking resistor for AC drive units of 75 kW and below U V W AC drive outpu...

Страница 51: ...rica the recommended cables in the preceding table must be copper wires rated 600 V 75 C Figure 3 1 Terminal dimensions of MD290T18 5G 22P and MD290T22G 30P 136 16 15 17 16 15 M6 combination screw Table 3 2 Recommended cable dimensions and tightening torque of MD290T18 5G 22P and MD290T22G 30P AC Drive Model Rated Input Current A Power Input Output Cable Crimp Terminal Model Ground Cable Crimp Ter...

Страница 52: ...of MD290T30GB 37P and MD290T37GB 45P AC Drive Model Rated Input Current A Power Input Output Cable Crimp Terminal Model Ground Cable Crimp Terminal Model Tightening Torque N m Screw Spec MD290T30G 57 3 x 16 mm2 3 x 4 AWG 14 L6 16 mm2 8 AWG 8 6 4 0 M6 MD290T37P 71 3 x 16 mm2 3 x 4 AWG 14 L6 16 mm2 8 AWG 8 6 4 0 M6 MD290T37G 69 3 x 16 mm2 3 x 4 AWG 14 L6 16 mm2 8 AWG 8 6 4 0 M6 MD290T45P 86 3 x 25 m...

Страница 53: ...que of MD290T45G 55P and MD290T55G 75P AC Drive Model Rated Input Current A Power Input Output Cable Crimp Terminal Model Ground Cable Crimp Terminal Model Tightening Torque N m Screw Spec MD290T45G 89 3 x 35 mm2 3 x 2 AWG 22 8 25 mm2 6 AWG 14 8 10 5 M8 MD290T55P 111 3 x 50 mm2 3 x 1 0 AWG 60 8 25 mm2 6 AWG 14 8 10 5 M8 MD290T55G 106 3 x 50 mm2 3 x 1 0 AWG 60 8 25 mm2 6 AWG 14 8 10 5 M8 MD290T75P ...

Страница 54: ...ower Cable Crimp Terminal Model Ground Cable Crimp Terminal Model Tightening Torque N m Screw Spec MD290T75G 139 3 x 70 mm2 3 x 2 0 AWG 70 12 35 mm2 4 AWG 22 12 35 0 M12 MD290T90P 167 3 x 95 mm2 3 x 3 0 AWG 80 12 50 mm2 4 AWG 22 12 35 0 M12 MD290T90G 164 3 x 95 mm2 3 x 3 0 AWG 80 12 50 mm2 4 AWG 22 12 35 0 M12 MD290T110P 198 3 x 120 mm2 3 x 4 0 AWGl 100 12 70 mm2 3 AWG 38 12 35 0 M12 MD290T110G 19...

Страница 55: ...0T132G 160P and MD290T160G 200P AC Drive Model Rated Input Current A Power Input Output Cable Crimp Terminal Model Ground Cable Crimp Terminal Model Tightening Torque N m Screw Spec MD290T132G 240 3 x 150 mm2 300 kcmil 150 12 95 mm2 2 AWG 38 12 35 0 M12 MD290T160P 295 3 x 185 mm2 300 kcmil 250 12 95 mm2 2 AWG 38 12 35 0 M12 MD290T160G 287 3 x 185 mm2 350 kcmil 250 12 95 mm2 2 AWG 38 12 35 0 M12 MD...

Страница 56: ... V W 60 40 35 35 130 33 62 69 35 35 60 8 M12 3 13 135 2 13 236 5 85 50 174 31 5 108 5 108 5 48 5 Figure 3 7 Terminal dimensions of MD290T200G L MD290T220G L and MD290T220P L to MD290280P L with output reactor 62 33 33 122 5 122 5 102 5 303 4 50 118 5 U V W 8 M12 48 116 174 108 5 3 13 60 40 31 5 48 5 2 13 50 85 236 5 468 35 35 315 5 33 108 5 ...

Страница 57: ...ightening torque of MD290T200G L MD290T220G L and MD290T220P L to MD290T280P L AC Drive Model Rated Input Current A Power Input Output Cable Crimp Terminal Model Ground Cable Crimp Terminal Model Tightening Torque N m Screw Spec MD290T200G L 365 2 x 3 x 95 mm2 4 0 AWG x 2P 100 12 95 mm2 1 AWG 60 12 35 0 M12 MD290T220P L 410 2 x 3 x 120 mm2 300 kcmil x 2P 150 12 120 mm2 1 0 AWG 60 12 35 0 M12 MD290...

Страница 58: ...0 192 5 85 50 2 13 Figure 3 10 Terminal dimensions of MD290T250G L MD290T280G L MD290T315P L and MD290T355P L with output reactor 42 60 129 5 48 62 484 29 29 13 3 W V U 348 5 122 5 122 5 119 5 299 5 115 115 193 5 33 50 50 85 192 5 2 13 50 36 36 36 118 5 8 M12 In Figure 3 10 the side entry copper bar can be removed if necessary Terminal dimensions of main circuit terminals without side entry copper...

Страница 59: ...rimp Terminal Model Ground Cable Crimp Terminal Model Tightening Torque N m Screw Spec MD290T250G L 441 2 x 3 x 120 mm2 300 kcmil x 2P 150 12 120 mm2 1 0 AWG 60 12 35 0 M12 MD290T315P L 559 2 x 3 x 185 mm2 500 kcmil x 2P 250 16 185 mm2 2 0 AWG 70 16 35 0 M12 MD290T280G L 495 2 x 3 x 150 mm2 400 kcmil x 2P 200 12 150 mm2 1 0 AWG 60 12 35 0 M12 MD290T355P L 624 2 x 3 x 185 mm2 500 kcmil x 2P 250 16 ...

Страница 60: ...0P L to MD290T500P L with output reactor 48 120 62 463 36 36 40 60 W V U 123 123 196 45 45 45 50 118 111 398 8 M16 3 17 2 17 30 49 50 85 244 130 130 In Figure 3 13 the side entry copper bar can be removed if necessary Terminal dimensions of main circuit terminals without side entry copper bar are shown below ...

Страница 61: ...d Cable Crimp Terminal Model Tightening Torque N m Screw Spec MD290T315G L 565 2 x 3 x 185 mm2 500 kcmil x 2P 250 16 185 mm2 2 0 AWG 70 16 85 0 M16 MD290T400P L 708 2 x 3 x 240 mm2 600 kcmil x 2P 325 16 240 mm2 3 0 AWG 80 16 85 0 M16 MD290T355G L 617 2 x 3 x 185 mm2 500 kcmil x 2P 250 16 185 mm2 2 0 AWG 70 16 85 0 M16 MD290T450P L 782 2 x 3 x 240 mm2 600 kcmil x 2P 325 16 240 mm2 3 0 AWG 80 16 85 ...

Страница 62: ... 4 12 0 29 8 13 3 10 5 9 0 5 8 1 5 YA 4 14 L6 6 4 16 0 32 8 14 5 10 5 9 0 5 8 1 5 YA 4 14 8 8 4 16 0 32 8 14 5 10 5 9 0 5 8 1 5 YA 4 22 8 8 4 16 5 33 7 13 5 12 0 11 5 7 7 1 8 YA 5 22 12 13 0 22 0 42 5 19 5 12 0 11 5 7 7 1 8 YA 5 Table 3 11 Models and dimensions of the JST crimp terminal above Model Dimensions mm Crimping Tool No d2 Min B Max L F E D d1 T 38 12 13 0 22 0 42 7 17 7 14 0 13 3 9 4 1 8...

Страница 63: ...5 35 6 26 0 4 5 YF 1 YET 300 1 250 16 17 0 44 0 78 0 24 5 31 5 35 6 26 0 4 5 YF 1 YET 300 1 325 16 17 0 50 5 88 0 33 5 35 5 37 6 28 0 4 5 YF 1 YET 300 1 3 2 2 Main Circuit Cable Recommendations Ƶ Main Circuit Cable Selection Inovance recommends symmetrical shielded cable as main circuit cable which can reduce electromagnetic radiation of entire conductive system compared with four conductor cable ...

Страница 64: ...H GULYH WRJHWKHU WR the cabinet main grounding terminal Conductive surface Ƶ DC Bus Terminals WARNING Ɣ DC bus terminals labeled and are terminals that carry a residual voltage for a period after the drive has been switched off Ɣ 7R DYRLG ULVN RI HTXLSPHQW GDPDJH RU UH ZKHQ RX VHOHFW DQ H WHUQDO braking unit for use with an AC drive of 90 kW and above DO NOT reverse the poles and Ɣ Use a cable not...

Страница 65: ...e not exceeding 5 m to connect an external braking resistor Ɣ To avoid risk of ignition due to overheating of the braking resistor do not place anything combustible around the braking resistor Ɣ Set F6 15 Braking use ratio and F9 08 Braking unit action initial voltage correctly according to load after connecting braking resistor to WKH GULYH RI XS WR N WKDW LV WWHG ZLWK DQ LQWHUQDO EUDNLQJ XQLW Ƶ ...

Страница 66: ... the screen shield of the cables Installation of the bracket is shown below Table 3 13 Cable support bracket models Cable Support Bracket Model Applicable Drive Model MD500 AZJ A2T5 MD290T18 5G 22P MD290T22G 30P MD500 AZJ A2T6 MD290T30G 37P MD290T37G 45P MD500 AZJ A2T7 MD290T45G 55P MD290T55G 75P MD500 AZJ A2T8 MD290T75G 90P MD290T90G 110P MD290T110G 132P MD500 AZJ A2T9 MD290T132G 160P MD290T160G ...

Страница 67: ...or complies with technical standards and local safety regulations Because the leakage current exceeds 3 5 mA in all models IEC 61800 5 1 states that either the power supply must be automatically disconnected in case of discontinuity of the protective earthing conductor or a protective earthing conductor with a cross section of at least 10 mm2 Cu or 16 mm2 Al must be used Failure to comply may resu...

Страница 68: ...er input must be suitably rated for the power and voltage class of the drive under normal conditions and under possible fault conditions such as system overload and short circuit on the power input Ƶ Power Grid System Ɣ The drive is applicable to system with neutral point grounded WARNING If the drive is used in an IT power system with an ungrounded power system or a high resistance grounded over ...

Страница 69: ... Control Circuit Terminals Ƶ Terminal Arrangement Figure 3 17 Control circuit terminal arrangement AO1 output selection voltage output by default J7 J9 J10 I V AI2 input impedance selection 500 by default 250 selectable AI2 input selection voltage input by default ...

Страница 70: ...alog input 1 Voltage range of inputs 0 to 10 VDC QSXW LPSHGDQFH Nȍ AI2 GND Analog input 2 Either a voltage or a current input determined by jumper J9 Input voltage range 0 to 10 VDC Input current range 0 to 20 mA QSXW LPSHGDQFH Nȍ YROWDJH LQSXW ȍ RU ȍ FXUUHQW LQSXW GHFLGHG E J10 1 Digital inputs DI1 OP Digital input 1 Optically coupled isolation compatible with dual polarity inputs QSXW LPSHGDQFH ...

Страница 71: ...ty 250 VAC 3 A Cos f 0 4 30 VDC 1 A Applies to overvoltage Category II circuit T A T C Normally open NO terminal Auxiliary interfaces J13 Extension card interface Interface for the 28 core terminal and optional cards I O extension card PLC card and various bus cards J11 External operating panel interface Connected to an external operating panel Jumpers 2 J7 AO1 output selection Either a voltage or...

Страница 72: ...mize electrical interference from the PWM effects of the motor cable Ɣ Do not run motor cables power input cables and control wirings in the same duct to avoid electromagnetic interference caused by coupling of these cables Ɣ If control wiring must run across power cable ensure they are arranged at an angle of 90 The recommended cabling diagram is as follows MD290 Min 200 mm Min 300 mm Power suppl...

Страница 73: ...ce LQVWDOO D OWHU FDSDFLWRU RU D IHUULWH PDJQHWLF FRUH DW VRXUFH RI DQDORJ VLJQDO 7KH SLJ WDLO RI the shield must be connected to the PE terminal on the drive Figure 3 19 Connect shield to the PE terminal of the drive Grounding clamp Grounding bar a a a b Press it to open the grounding clamp Ƶ Wiring of AI2 When you select voltage input via AI2 use the same wiring method as AI1 When you select cur...

Страница 74: ...ve the jumper between terminals 24V and OP and between terminals COM and CME Connect positive side of external power 24V to OP and external power 0V to corresponding DI terminal via contact on external controller CAUTION In SINK mode do not connect DI terminals of different AC drives in parallel otherwise a digital input fault will occur If it is necessary to connect different AC drives in paralle...

Страница 75: ...umper between terminals 24V and OP Connect 24V to the common port of external controller and connect terminal OP to terminal COM If you intend to use an external power supply remove the jumper between terminals 24V and OP Connect external power 0V to terminal OP and the positive side of external power 24V to corresponding DI terminal via contact on external controller Ƶ Wiring of DI5 High speed Pu...

Страница 76: ... DO CME COM Relay Diode MD290 24V CAUTION Ɣ Be careful to install absorption diode with correct polarity to prevent damage to the 24 VDC power supply Ɣ CME and COM are internally insulated but are shorted externally by a jumper In this case DO1 is driven by 24 V by default Remove the jumper if you need to drive DO1 by an external power supply Ƶ Wiring of High speed Output FM When the FM terminal i...

Страница 77: ... or diode Figure 3 27 Wiring of relay 220 VAC 24 VDC T C T A T B T C T A T B Ƶ LUH 6L H DQG 7RUTXH 6SHFL FDWLRQ Please use a ferrule type terminal with insulated sleeves Prepare wire ends with insulated sleeves before connecting to the drive See Figure 3 28 Ferrule dimensions below Figure 3 28 Ferrule dimensions 6 mm 7DEOH LUH VL H DQG WRUTXH VSHFL FDWLRQ Terminal Block Single Wire AWG mm2 Twisted...

Страница 78: ...nnect motor input cables to the U V W terminals of the drive properly Ƒ 9 KHFN WKDW FDEOH GLDPHWHU RI PDLQ FLUFXLW FRPSOLHV ZLWK VSHFL FDWLRQ Ƒ 10 Decrease F0 15 carrier frequency if motor output cable exceeds 50 m Ƒ 11 Ground the AC drive properly Ƒ 12 Check that output terminals and control signal terminals are connected securely and reliably Ƒ 13 Check whether more than one motors are driven If...

Страница 79: ...3 Electrical Installation 78 3 ...

Страница 80: ...4 Operating Panel Keypad Display 4 1 Introduction 80 4 2 Inbuilt LED Operating Panel 80 ...

Страница 81: ... identical functions to the inbuilt version 4 2 Inbuilt LED Operating Panel The LED operating panel allows you to monitor system operation modify parameters and start or stop the AC drive Figure 4 1 Details of the operating panel MF K RUN STOP RES QUICK PRG ENTER RUN LOCAL REMOT FWD REV TUNE TC RPM A V Hz Other status indicator Running direction indicator Parameter unit indicator Increment key Con...

Страница 82: ... displayed value Ɣ When the AC drive is in RUNNING mode it decreases the speed Shift Ɣ Select the displayed parameter in the STOP or RUNNING status Ɣ 6HOHFW WKH GLJLW WR EH PRGL HG ZKHQ PRGLI LQJ D SDUDPHWHU YDOXH RUN RUN Start the AC drive when using the operating panel control mode It is inactive when using the terminal or communication control mode STOP RES Stop Reset Ɣ Stop the AC drive when t...

Страница 83: ...G DQG XVHU PRGL HG SDUDPHWHUV 00 non of them will display XVHU GH QHG SDUDPHWHUV ZLOO GLVSOD XVHU PRGL HG SDUDPHWHUV ZLOO GLVSOD 11 both of them will display 00 Ƶ Status Indicators There are four red LED status indicators at the top of the operating panel Indicator Indication RUN OFF indicates the STOP status ON indicates the RUNNING status LOCAL REMOT OFF indicates under operating panel control O...

Страница 84: ...ning RPM A V Hz Hz for frequency RPM A V Hz A for current RPM A V Hz V for voltage RPM A V Hz RPM for motor speed RPM A V Hz Percentage Ƶ LED Display 7KH YH GLJLW GDWD GLVSOD FDQ VKRZ WKH IROORZLQJ UDQJH RI LQIRUPDWLRQ Ɣ Frequency reference Ɣ Output frequency Ɣ Monitoring information Ɣ Fault code The following table lists indication of LED display LED Display Indication LED Display Indication LED ...

Страница 85: ... three levels of menu 1 Level I function parameter group 2 Level II function parameter 3 Level III function parameter value Figure 4 3 Structure of three levels of menu 50 00 F0 F0 F1 FP A0 A1 U1 U0 FP A1 F0 F1 F0 00 F0 01 F0 28 F0 00 F0 28 1 2 F0 01 ENTER PRG PRG PRG PRG PRG ENTER ENTER ENTER PRG A5 U0 U1 A0 ...

Страница 86: ...f the three levels of menu is as follows Default screen Level I menu Return Return PRG Level II menu Level III menu Hz Hz PRG PRG PRG ENTER ENTER ENTER ENTER The following example shows how to modify F3 02 from 10 00 Hz to 15 00 Hz Return PRG ENTER ENTER ENTER ...

Страница 87: ...Q HYHO PHQXV LI WKH SDUDPHWHU GRHV QRW LQFOXGH D ÀDVKLQJ GLJLW WKHQ it is not possible to modify that parameter There are two possible reasons for this 1 The function parameter you have selected is read only This is because The display is showing the AC drive model The display is showing an actual parameter detected by the system The display is showing a running record parameter 2 The displayed fu...

Страница 88: ...rameter Group Figure 4 4 Selection of function parameter group Level I menu Function code group PRG When FP 02 1x When FP 02 x1 Default screen Press to cycle through function code groups in positive sequence Press to cycle through function code groups in reverse sequence Ƶ Selection of Displaying A and U Groups The value you set for function parameter FP 02 determines whether the operating panel d...

Страница 89: ...00 DI1 function selection FE 10 F4 01 DI2 function selection FE 11 F4 02 DI3 function selection FE 12 F5 04 DO1 function selection FE 13 F5 07 AO1 function selection FE 14 F6 00 Start mode FE 15 F6 10 Stop mode I D IXQFWLRQ FRGH LQ JURXS LV VHW WR LW LQGLFDWHV WKDW QR SDUDPHWHU LV GH QHG E the user If is displayed after you press QUICK LW LQGLFDWHV WKDW WKH XVHU GH QHG menu is empty Ƶ Editing Func...

Страница 90: ...ward jog Forward jog of the drive can be implemented through the MF K key This function is valid only when command source is operating panel 4 Reverse jog Forward jog of the drive can be implemented through the MF K key This function is valid only when command source is operating panel 4 2 5 Saving and Restoring Settings After you change value of any function parameter the drive saves the new valu...

Страница 91: ...G the display shows You must enter the correct password to enter the programming menu To remove password protection do as follows 1 Use the current password to enter the function parameter editing mode 2 Set FP 00 to zero 3 Press ENTER to exit the function parameter editing mode The password protection is successfully removed 7KH IROORZLQJ JXUH JLYHV DQ H DPSOH VKRZLQJ KRZ WR VHW WKH SDVVZRUG WR P...

Страница 92: ...5 Quick Setup 5 1 Get Familiar With Operating Panel 92 5 2 Setup Flowchart 93 ...

Страница 93: ...VWHP RSHUDWLRQ PRGLI SDUDPHWHUV DQG VWDUW RU stop the AC drive MF K RUN STOP RES QUICK PRG ENTER RUN LOCAL REMOT FWD REV TUNE TC RPM A V Hz Other status indicator Running direction indicator Parameter unit indicator Increment key Confirm key Shift key Decrement key Stop Reset key Multi function selection key Command source indicator Running status indicator LED display for parameters Program key M...

Страница 94: ...or parameters 2 Clear records including errors 4 Back up parameters 501 Restore user s backup parameters NOTE It is recommended to Restore default settings prior to commissioning the AC drive Set motor parameters Motor Nameplate F1 01 Rated motor power model dependent 1 5 Unit kW F1 02 Rated motor voltage model dependent 380 Unit V F1 03 Rated motor current model dependent 3 4 Unit A F1 04 Rated m...

Страница 95: ... QLVK WKLV DXWR WXQLQJ ZDLW XQWLO LED stops displaying TUNE 5 Restore F0 02 to the default value 1 Set AI2 F4 18 AI curve 2 minimum input 0 00 If AI3 is frequency reference 0 V to F4 20 F4 19 Corresponding percentage of AI2 minimum input 0 0 100 0 to 100 0 F4 20 AI2 maximum input 10 00 F4 18 to 10 00 V F4 21 Corresponding percentage of AI2 maximum input 100 0 100 0 to 100 0 Set AI3 F4 23 AI curve ...

Страница 96: ...terminal 2 14 Multi reference terminal 3 15 Multi reference terminal 4 16 Terminal 1 for acceleration deceleration time selection 17 Terminal 2 for acceleration deceleration time selection 18 Frequency source switchover 19 UP and DOWN setting clear terminal keypad 20 Command source switchover terminal 1 21 Acceleration Deceleration prohibited 22 PID pause 23 PLC status reset 24 Swing pause 25 Coun...

Страница 97: ...46 Speed control Torque control switchover 47 Emergency stop 48 External STOP terminal 2 49 Deceleration DC injection braking 50 Clear the current running time 51 59 Reserved Setting range 0 to 59 F4 01 DI2 function selection 4 Setting range same as DI1 F4 02 DI3 function selection 9 Setting range same as DI1 F4 03 DI4 function selection 12 Setting range same as DI1 F4 04 DI5 function selection 13...

Страница 98: ... Motor overload pre warning 7 AC drive overload pre warning 8 Set count value reached 9 Designated count value reached 10 Length reached 11 PLC cycle completed 12 Accumulative running time reached 13 Frequency limited 14 Torque limited 15 Ready for RUN 16 Reserved 17 Frequency upper limit reached 18 Frequency lower limit reached no output at stop 19 Undervoltage status output 20 Communication sett...

Страница 99: ...P C 0 Setting range same as FM the relay P A P B P C is on extension I O card F5 04 DO1 function selection 1 Setting range same as FM F5 05 Extension card DO2 function selection 4 Setting range same as FM F5 06 FM pulse signal function selection 0 0 Running frequency 1 Set frequency 2 Output current 3 Reserved 4 Output power 5 Output voltage 6 Pulse input 7 AI1 8 AI2 9 AI3 10 Length 11 Count value...

Страница 100: ...6500 0s if F0 19 1 0 to 65000s if F0 19 0 F0 18 Deceleration time 1 model dependent 0 00 to 650 00s if F0 19 2 0 0 to 6500 0s if F0 19 1 0 to 65000s if F0 19 0 Set S curve F6 07 Acceleration Deceleration mode 0 0 Linear acceleration deceleration 1 Static S curve acceleration deceleration 2 Dynamic S curve acceleration deceleration F6 08 Time proportion of S curve at Accel start 30 0 0 0 to 100 0 F...

Страница 101: ...cy limit of torque boost 50 00 0 00 Hz to maximum output frequency F3 03 Multi point V F frequency 1 0 00 0 00 Hz to F3 05 F3 04 Multi point V F voltage 1 0 0 0 0 to 100 0 V F3 05 Multi point V F frequency 2 0 00 F3 03 to F3 07 Hz F3 06 Multi point V F voltage 2 0 0 0 0 to 100 0 V F3 07 Multi point V F frequency 3 0 00 F3 05 to rated motor frequency F1 04 Hz F3 08 Multi point V F voltage 3 0 0 0 0...

Страница 102: ... 2 Set Frequency Reference 110 6 3 Start Stop the AC Drive 136 6 4 Motor Auto tuning 143 6 5 Control Performance 146 6 6 Protections 153 6 7 Monitoring 160 6 8 Process Control 166 6 9 Control Circuit Terminals 178 6 10 Communication 192 6 11 Auxiliary Function 200 ...

Страница 103: ...nd STOP RES on the operating panel Press RUN to start the AC Drive Press STOP RES to stop the AC Drive For details on operating panel refer to Chapter 4 Operating Panel Keypad Display Ɣ F0 02 1 Terminal I O control The LOCAL REMOT indicator is on The terminal I O control mode applies to installations where the Start and Stop signals come from A DIP switch or electromagnetic button or A dry contact...

Страница 104: ...3 Three wire control mode 2 0 Figure 6 1 Four terminal I O control modes F0 02 Command source selection Serial communication Terminal I O control DI AI1 Keypad control MF K RUN STOP RES QUICK PRG ENTER RUN LOCAL REMOT FWD REV TUNE TC RPM Hz A V Operating panel keypad display F4 11 Terminal command mode DI FWD REV DI COM Two wire control mode 1 Two wire control mode 2 DI Run enabled Direction DI CO...

Страница 105: ...me Value Function Description F0 02 Command source selection 1 Terminal I O control F4 11 Terminal I O control mode 0 Two wire control mode 1 F4 00 DI1 function selection 1 Forward RUN FWD F4 01 DI2 function selection 2 Reverse RUN REV In this mode Ɣ When SW1 is closed motor rotates in forward direction When SW1 is open motor stops Ɣ When SW2 is closed motor rotates in reverse direction When SW2 i...

Страница 106: ...e 1 sequence normal Motor speed SW1 forward run command SW2 reverse run command Stop Motor rotates in forward direction Motor rotates in reverse direction Figure 6 4 Two wire 1 sequence abnormal Stop Stop SW1 forward run command SW2 reverse run command Motor speed Motor rotaes in forward direction Motor rotates in reverse direction ...

Страница 107: ...ection 2 Reverse RUN REV In this mode Ɣ When SW1 is closed motor rotates in forward direction with SW2 open Ɣ When SW1 is closed motor rotates in reverse direction with SW2 closed Ɣ When SW1 is open motor stops no matter whether SW2 is open or closed Figure 6 5 Two wire 2 sequence wiring diagram DI1 Running command DI2 COM SW1 SW2 1 1 0 0 0 1 0 1 Running Command Forward Reverse Stop Stop SW2 SW1 R...

Страница 108: ...are normally open buttons Ɣ SW3 must remain closed during START sequence and during normal RUN operation Ɣ Motor stops immediately when SW3 opens Ɣ Signals from SW1 and SW2 are valid only with SW3 closed Ɣ On normal condition SW3 closed after you press down SW1 motor rotates in forward direction After you press down SW2 motor rotates in reverse direction Figure 6 7 Three wire 1 sequence wiring dia...

Страница 109: ... Ɣ SW3 must remain closed during start sequence and during normal run operation Ɣ Motor stops immediately when SW3 opens Ɣ Signals from SW1 and SW2 are valid only with SW3 closed Ɣ On normal condition SW3 closed after you press down SW1 motor rotates in forward direction with SW2 open Motor rotates in reverse direction with SW2 closed Figure 6 9 Three wire 2 sequence wiring diagram DI1 Three wire ...

Страница 110: ... data frame Local address Response delay Communication timeout Keep the following parameter setting in AC drive consistent with that in the host computer Extension Modbus card 485 485 CGND RS485 Connect host computer and the extension Modbus card that has been inserted onto the drive Host computer 0 Serial comms Running command To make the drive run in reverse direction the host computer sends the...

Страница 111: ...hannel 6 2 1 Set Main Frequency Reference Main frequency reference has nine setting channels F0 03 selects a required channel to set the main frequency reference described in the following JXUH Function Code Parameter Name Setting Range Default F0 03 Main frequency reference setting channel selection 0 Digital setting non retentive at power down 1 Digital setting retentive at power down 2 AI1 3 AI...

Страница 112: ...tionship of pulse frequency and corresponding percentage 5 Pulse reference DI1 F4 00 to F4 04 12 13 14 15 FC 00 to FC 15 Set 16 frequency references Take any four vacant DI terminals Only DI5 can be used for pulse input 6 Multi reference Operation panel Group FC 7 Simple PLC F0 03 Main frequency reference setting channel Group FA 8 PID reference Host computer Fd 00 to Fd 05 Set related parameters ...

Страница 113: ...0 23 Retentive selection of digital setting frequency upon stop determines whether to save frequency reference selection by pressing and or via the up down function when the AC drive stops It is not the same as F0 03 0 or 1 which determines whether to retain the setting on power off Function Code Parameter Name Setting Range Default F0 23 Retentive selection of digital setting frequency upon stop ...

Страница 114: ...set by F4 13 to F4 16 Figure 6 13 Set AI curve 1 Corresponding percentage frequency 100 0 0 0 0 00 V 0 00 mA F4 16 F4 14 F4 13 10 00 V 20 mA F4 15 AI F4 13 to F4 16 These five parameters set relationship between analog input and corresponding percentage Ɣ When analog input voltage exceeds the value of F4 15 the AC drive uses the maximum value Ɣ When analog input voltage is below the value of F4 13...

Страница 115: ...e Setting Range Default F4 18 AI curve 2 min input 0 00 V to F4 20 0 00 V F4 19 Corresponding percentage of AI curve 2 min input 100 00 to 100 0 0 0 F4 20 AI2 curve max input F4 18 to 10 00 V 10 00 V F4 21 Corresponding percentage of AI curve 2 max input 100 00 to 100 0 100 0 F4 23 AI curve 3 min input 0 00 V to F4 25 0 00 V F4 24 Corresponding percentage of AI curve 3 min input 100 00 to 100 0 0 ...

Страница 116: ...t 10 00 V to A6 02 0 00 V A6 01 Corresponding percentage of AI curve 4 min input 100 0 to 100 0 0 0 A6 02 FXUYH LQÀH LRQ LQSXW A6 00 to A6 04 3 00 V A6 03 Corresponding percentage of FXUYH LQÀH LRQ LQSXW 100 0 to 100 0 30 0 A6 04 FXUYH LQÀH LRQ LQSXW A6 02 to A6 06 6 00 V A6 05 Corresponding percentage of FXUYH LQÀH LRQ LQSXW 100 0 to 100 0 60 0 A6 06 AI curve 4 max input A6 06 to 10 00 V 10 00 V ...

Страница 117: ...ts position 321 F4 17 OWHU WLPH 0 00s to 10 00s 0 10s F4 22 OWHU WLPH 0 00s to 10 00s 0 10s F4 27 OWHU WLPH 0 00s to 10 00s 0 10s DQG VHW VRIWZDUH OWHU WLPH I DQDORJ LQSXW LV OLDEOH WR LQWHUIHUHQFH increase this parameter to stabilize detected analog input But too large a setting slows response of analog detection Set it correctly based on actual conditions Step 3 Select a required AI terminal as ...

Страница 118: ...o 100 0 100 0 corresponds to max frequency F0 10 50 00 Hz AI2 F4 18 F4 19 20 0 2 00 F4 20 F4 21 10 00 80 0 F4 22 0 10 Final frequency reference Select main frequency reference as final frequency reference Para AI mA 20 0 16 0 12 0 8 0 4 0 100 0 0 80 0 60 0 40 0 20 0 0 0 F4 19 F4 21 F4 18 F4 20 Corresponding percentage 4D A module GND AO 0 to 10 V J9 F0 07 units position 0 F4 33 units position 2 Se...

Страница 119: ...on Code Parameter Name Setting Range Default F4 28 Pulse min input 0 00 kHz to F4 30 0 00 kHz F4 29 Corresponding percentage of pulse min input 100 00 to 100 0 0 0 F4 30 Pulse max input F4 28 to 50 00 kHz 50 00 kHz F4 31 Corresponding percentage of pulse max input 100 00 to 100 0 100 0 F4 32 3XOVH OWHU WLPH 0 00s to 10 00s 0 10s Figure 6 19 Pulse input at DI5 to control frequency reference Note 10...

Страница 120: ...0 0 FC 12 Reference 12 100 0 to 100 0 0 0 FC 13 Reference 13 100 0 to 100 0 0 0 FC 14 Reference 14 100 0 to 100 0 0 0 FC 15 Reference 15 100 0 to 100 0 0 0 In multi reference mode combinations of different DI terminal states correspond to different frequency references The AC drive supports a maximum of 16 references implemented by 16 state combinations of four DI terminals allocated with function...

Страница 121: ...N OFF OFF ON Reference 9 FC 09 ON OFF ON OFF Reference 10 FC 10 ON OFF ON ON Reference 11 FC 11 ON ON OFF OFF Reference 12 FC 12 ON ON OFF ON Reference 13 FC 13 ON ON ON OFF Reference 14 FC 14 ON ON ON ON Reference 15 FC 15 Note Besides multi speed function the multi reference can be also used as PID reference source or voltage source for V F separation Ƶ Simple PLC When simple PLC is used to cont...

Страница 122: ...53 5s h 0 0s h FC 27 Acceleration deceleration time of simple PLC reference 4 0 to 3 0 FC 28 Running time of simple PLC reference 5 0 0s h to 6553 5s h 0 0s h FC 29 Acceleration deceleration time of simple PLC reference 5 0 to 3 0 FC 30 Running time of simple PLC reference 6 0 0s h to 6553 5s h 0 0s h FC 31 Acceleration deceleration time of simple PLC reference 6 0 to 3 0 FC 32 Running time of sim...

Страница 123: ...3 0 FC 48 Running time of simple PLC reference 15 0 0s h to 6553 5s h 0 0s h FC 49 Acceleration deceleration time of simple PLC reference 15 0 to 3 0 FC 16 determines the simple PLC running mode Function Code Parameter Name Setting Range Default FC 16 Simple PLC running mode 0 Stop after running one cycle HHS QDO YDOXHV DIWHU UXQQLQJ RQH F FOH 2 Repeat after running one cycle 0 Ɣ FC 16 0 Stop afte...

Страница 124: ...stop integral operation when PID output reaches the limit 0 Continue integral operation 1 Stop integral operation Retentive at power down 0 Not retentive 1 Retentive 00 FC 50 sets running time unit in simple PLC mode FC 51 selects the setting channel of reference 0 Function Code Parameter Name Setting Range Default FC 50 Time unit of simple PLC running 0 s second 1 h hour 0 FC 51 Reference 0 sourc...

Страница 125: ... cause system oscillation Ɣ Integral time Ti1 The shorter the integral time is the faster the error will be predicted But too short setting will cause overshoot or system oscillation Ɣ Derivative time Td1 The longer the derivative time is the faster the system will respond to the error But too longer setting will cause vibration Figure 6 22 Function block diagram of the PID control 1 1 Kp S Td S T...

Страница 126: ...auxiliary for main auxiliary calculation Final frequency reference Main Auxiliary Main auxiliary calculation PID switch Any of F4 00 to F4 09 set for function 22 PID disabled or PID deviation smaller than FA 09 PID error limit Function Code Parameter Name Setting Range Default FA 00 PID reference setting channel 0 Set by FA 01 1 AI1 2 AI2 3 AI3 4 Pulse reference DI5 5 Serial comms 6 Multi referenc...

Страница 127: ...3 0 Forward When PID feedback is smaller than PID reference the AC drive increases output frequency The winding tension control requires forward PID operation Ɣ FA 03 1 Reverse When PID feedback is smaller than PID reference the AC drive decreases output frequency The unwinding tension control requires reverse PID operation FA 04 It is a non dimensional parameter and is used for calculating displa...

Страница 128: ...stable Function Code Parameter Name Setting Range Default FA 10 PID differential limit 0 00 to 100 00 0 10 FA 10 applies a limit to PID differential output as a large output can cause excessive system oscillation Function Code Parameter Name Setting Range Default FA 11 PID reference change time 0 00s to 650 00s 0 00s FA 11 sets time it takes PID reference to change from 0 0 to 100 0 PID reference ...

Страница 129: ...to another set of PID parameters may EH UHTXLUHG WR QH WXQH WKH RYHUDOO SHUIRUPDQFH DV ORDG FRQGLWLRQV FDQ YDU GXULQJ WKH different machine cycles Switchover can be implemented via a DI terminal or automatically implemented according to PID error level Figure 6 24 Switchover of two groups of PID parameters PID error PID parameters PID 1 FA 19 FA 20 FA 05 FA 06 FA 07 PID 2 FA 15 FA 16 FA 17 Functio...

Страница 130: ...A 27 Detection time of PID feedback loss 0 0s to 20 0s 0 0s DQG GH QH WKH 3 IHHGEDFN ORVV GHWHFWLRQ IXQFWLRQ KHQ 3 IHHGEDFN LV smaller than the value set in FA 26 for time set in FA 27 AC drive detects Err31 and acts as selected in ten thousands position in F9 49 Function Code Parameter Name Setting Range Default FA 28 Selection of PID operation at stop 0 Disabled 1 Enabled 0 FA 28 This function p...

Страница 131: ...10000 host computer sends write command 01 06 10 00 27 10 97 36 hexadecimal In the command Ɣ 01H settable AC drive address Ɣ 06H write command Ɣ 1000H frequency reference address Ɣ 2710H frequency reference converted into decimal 10000 Ɣ 9736H CRC check Master Command Slave Response ADDR 01H ADDR 01H CMD 06H CMD 06H Parameter address high bits 10H Parameter address high bits 10H Parameter address ...

Страница 132: ... Analog inputs AI1 0 to 10 V AI2 0 to 10 V 4 to 20 mA AI3 10 to 10 V Extended J9 Digital setting Digital setting AI1 AI2 AI3 0 1 2 3 4 Digital inputs DI5 F4 04 30 Allocate DI5 with pulse input function F4 33 Select AI curve F4 28 to F4 32 Set the relationship of pulse frequency and corresponding percentage 5 Pulse reference DI1 F4 00 to F4 04 12 13 14 15 FC 00 to FC 15 Set 16 frequency references ...

Страница 133: ...ation and between auxiliary and main auxiliary calculation through a DI set for function 18 Frequency reference setting channel switchover LJXUH 6HW QDO IUHTXHQF UHIHUHQFH F0 03 Main frequency setting channel 1 2 3 4 5 6 Digital setting not retentive AI1 AI2 AI3 Pulse reference Multi reference 0 F0 05 F0 06 Limit auxiliary for main auxiliary calculation Final frequency reference Main Auxiliary Mai...

Страница 134: ...H XVHG IRU FDOFXODWLRQ QDO frequency reference is set by main and auxiliary calculation pay attention to the following aspects Ɣ If auxiliary frequency reference is digital setting preset frequency F0 08 does not take effect You can directly adjust auxiliary frequency reference by pressing keys and on the operating panel or using the UP DOWN function of input terminals based on main frequency refe...

Страница 135: ...0 100 1 0 9 0 900 9 Units position Tens position Hundreds position Output 0 0 0 000 0 0 0 1 001 1 0 0 9 009 9 Units position Tens position Hundreds position Setting Output 0 0 0 000 0 1 0 0 010 1 9 0 9 090 9 Setting When a command source frequency reference setting channel is used to control final frequency reference both main and auxiliary frequency reference setting channels F0 03 and F0 04 beco...

Страница 136: ...wed to run at frequency reference below the setting in this function parameter Ɣ F0 10 It limits max output frequency of the AC drive Ɣ F0 11 It selects setting channel of frequency reference upper limit 6 2 6 Running Mode When Frequency Reference Below Lower Limit Function Code Parameter Name Setting Range Default F8 14 Running mode when frequency reference lower than frequency lower limit 0 Run ...

Страница 137: ...ode 0 Direct start 1 Catching a spinning motor 2 Pre excited start 0 F6 01 Mode of catching a spinning motor 0 From stop frequency 1 From zero speed 2 From max frequency 4 Catching a spinning motor in HOG RULHQWDWHG FRQWURO UHTXLULQJ static auto tuning F1 37 1 0 F6 02 Speed of catching a spinning motor 1 to 100 20 F6 03 Start frequency 0 00 to 10 00 Hz 0 00 Hz F6 04 Start frequency holding time 0 ...

Страница 138: ...pplicable to drive load such as elevator and crane as shown in Figure 6 30 3 Figure 6 30 1 Sequence of direct start Acceleration time Output frequency RUN command Figure 6 30 2 Sequence of start with start frequency Acceleration time Output frequency RUN command F6 03 start frequency F6 04 Start frequency holding time Figure 6 30 3 Sequence of start with DC injection braking Acceleration time Outp...

Страница 139: ... speed F6 00 1 catching a spinning motor Automatic motor speed tracking Accelerate RUN command F6 21 Demagnetization time Motor speed tracking time Ƶ F6 00 2 Pre excited Start W LV YDOLG RQO IRU DV QFKURQRXV PRWRU DQG XVHG IRU EXLOGLQJ PDJQHWLF HOG EHIRUH PRWRU running For pre excited current and pre excited time see F6 05 and F6 06 If pre excited time is 0 the AC drive cancels pre excitation and ...

Страница 140: ... 12 When the running frequency decreases to the value set in F6 11 the AC drive stops output for a period of time and then starts DC injection braking This prevents the occurrence of fault such as overcurrent caused by direct DC injection braking at high speed F6 13 It has the following two different base values Ɣ If the rated motor current is less than or equal to 80 of the rated AC drive current...

Страница 141: ...ure 6 33 Decelerate to stop Acceleration time Output frequency RUN command Deceleration time Ƶ F6 10 1 Coast to Stop Once the stop command is input the AC drive immediately stops output The motor then coasts to stop based on the mechanical inertia Figure 6 34 Coast to stop Acceleration time Output frequency Start command The AC drive stops output immediately Actual motor speed ...

Страница 142: ...tion time for selection You can perform switchover by using a DI terminal Ɣ Group 1 F0 17 F0 18 Ɣ Group 2 F8 03 F8 04 Ɣ Group 3 F8 05 F8 06 Ɣ Group 4 F8 07 F8 08 For example select DI7 and DI8 for switchover Related function parameters are set as follows Function Code Parameter Name Setting Function Description F4 06 DI7 function selection 16 Terminal 1 for acceleration deceleration time selection...

Страница 143: ...Linear acceleration deceleration 1 Static S curve acceleration deceleration 2 Dynamic S curve acceleration deceleration 0 F6 08 Time proportion of S curve start segment 0 0 to 100 0 F6 09 30 0 F6 09 Time proportion of S curve end segment 0 0 to 100 0 F6 08 30 0 F6 07 sets acceleration deceleration mode Ɣ F6 07 0 Linear acceleration deceleration Output frequency increases or decreases linearly The ...

Страница 144: ... not allowed OK Dynamic auto tuning It is applied to applications where motor can be disconnected from load Best Static auto tuning 2 It is applied to applications where the motor cannot be disconnected from the load and dynamic auto tuning is not allowed Better Motor 1 is used to describe motor auto tuning methods below If you need to perform motor 2 auto tuning set F0 24 1 and refer to 6 8 4 Mot...

Страница 145: ...cates that auto tuning is completed Parameters F1 06 to F1 10 are obtained Ƶ F1 37 3 Static Auto tuning 2 If motor cannot be disconnected from load use static auto tuning 2 The static auto tuning 2 process is as follows Steps Description Step 1 Power on the AC drive Set F0 02 0 to select operating panel as command source Step 2 Input motor nameplate parameters F1 00 to F1 05 correctly Step 3 Set F...

Страница 146: ...ning result Function Code Parameter Name Setting Range Default F1 06 Stator resistance WR ȍ GULYH SRZHU N WR ȍ GULYH SRZHU N Model dependent F1 07 Rotor resistance WR ȍ GULYH SRZHU N WR ȍ GULYH SRZHU N Model dependent F1 08 Leakage inductive reactance WR P GULYH SRZHU N 0 001 to 65 535 mH AC drive power 55 kW Model dependent F1 09 Mutual inductive reactance WR P GULYH SRZHU N 0 01 to 655 35 mH AC ...

Страница 147: ...i point V F voltage 1 0 0 to 100 0 0 0 F3 05 Multi point V F frequency 2 F3 03 to F3 07 0 00 Hz F3 06 Multi point V F voltage 2 0 0 to 100 0 0 0 F3 07 Multi point V F frequency 3 F3 05 to rated motor frequency F1 04 0 00 Hz F3 08 Multi point V F voltage 3 0 0 to 100 0 0 0 1 General constant torque linear V F curve Figure 6 36 General constant torque linear V F curve Output frequency Output voltage...

Страница 148: ...acteristic The three voltage points and frequency points must satisfy V1 V2 V3 f1 f2 f3 When RX VHW DQG VHW UVW WKHQ DQG QDOO F3 03 3 Variable torque Square V F curve Figure 6 38 Variable torque Square V F curve Output frequency Output voltage F1 02 Rated voltage F1 04 Rated frequency F3 01 Torque boost Output voltage and output frequency change according to square curve when below rated frequency...

Страница 149: ...to 1000 0s 0 0s F3 16 Voltage decline time of V F separation 0 0s to 1000 0s 0 0s F3 17 Stop mode selection for V F separation 0 Frequency and voltage declining to 0 independently 1 Frequency declining after voltage declines to 0 0 Voltage rise time of V F separation indicates time required by voltage to rise from 0 to rated motor voltage Voltage decline time of V F separation indicates time requi...

Страница 150: ... WRUTXH LV H SHULHQFHG LQFUHDVH WKH WRUTXH ERRVW LQ F3 01 Ɣ Decrease this parameter on light loads to avoid overheating the motor F3 02 sets the cutoff frequency The torque boost function is disengaged when the output frequency exceeds the cutoff point 6 5 3 Current Limit Control When output current exceeds the value set in F3 18 during acceleration constant running or deceleration current limit i...

Страница 151: ...ch as centrifuge where high running frequency and several times of field weakening are required and load inertia is large The current limit level above rated frequency fs fn x k x LimitCur Ɣ fs running frequency Ɣ fn rated motor frequency Ɣ k compensation factor of speed multiplying current limit level F3 21 Ɣ LimitCur current limit level F3 18 Figure 6 41 Current limit above rated frequency Rated...

Страница 152: ...frequency Output frequency Voltage limit Voltage limit Voltage limit Voltage limit Function Code Parameter Name Setting Range Default F3 22 Voltage limit 650 to 800 V 760 V F3 23 Voltage limit selection 0 Disabled 1 Enabled 1 F3 24 Frequency gain for voltage limit 0 to 100 30 F3 25 Voltage gain for voltage limit 0 to 100 30 F3 26 Frequency rise threshold during voltage limit 0 to 50 Hz 5 Hz F9 08 ...

Страница 153: ...PD ORDGLQJ FDSDFLW LQ PRWRU HOG ZHDNHQLQJ DUHD GMXVWPHQW RI WKLV SDUDPHWHU LV QRW UHTXLUHG normally 6 5 6 Auxiliary Control Function Code Parameter Name Setting Range Default A5 00 DPWM switchover frequency upper limit 0 00 to 15 00 Hz 12 00 Hz Increasing this parameter to the max frequency will reduce motor audible noise Function Code Parameter Name Setting Range Default A5 01 PWM modulation patt...

Страница 154: ...75 80 min 40 min 15 min 6 min 185 225 30s 10s 245 4 min 2 5 min 2 min 90s 195 60s When motor running current reaches 175 of rated motor current and motor runs at this level for 2 minutes Err11 motor overload is detected When motor running current reaches 115 of rated motor current and motor runs at this level for 80 minutes Err11 is detected Suppose that rated motor current is 100 A Ɣ F9 01 1 00 A...

Страница 155: ...Function Code Parameter Name Setting Range Default F9 02 Motor overload pre warning FRHI FLHQW 50 to 100 80 The AC drive has the motor overload pending function that reminds of motor overload in advance through digital output function 6 On the condition that F9 01 1 00 and F9 02 80 when motor running current reaches 145 of rated motor current and motor runs at this level for 80 x 6 4 8 minutes DO ...

Страница 156: ...set this position to 0 6 6 3 Fault Reset Function Code Parameter Name Setting Range Default F9 09 Auto reset times 0 to 20 0 This function parameter sets permissible times of auto fault reset If reset times exceed the value set in this parameter the AC drive will keep fault status Note Ɣ Undervoltage Err09 is reset automatically when bus voltage recovers to normal It is not included in auto reset ...

Страница 157: ...o stop mode Encoder fault Err20 0 Coast to stop 1 Switch over to V F control stop according to stop mode 2 Switch over to V F control continue to run Reserved Accumulative running time reached Err26 0 Coast to stop 1 Stop according to stop mode 2 Continue to run Motor overheat Err25 0 Coast to stop 1 Stop according to stop mode 2 Continue to run 00000 Function Code Parameter Name Setting Range Def...

Страница 158: ...hes the value set in F9 58 digital output terminal set for function 39 becomes on The drive supports both PT100 and PT1000 Make sure to set sensor type correctly You can view motor temperature in U0 34 6 6 6 Power Dip Ride through The power dip ride through function ensures the system to run continuously at occurrence of momentary power loss When an instantaneous power loss occurs the AC drive com...

Страница 159: ...constant control when line voltage recovers the AC drive accelerates to target frequency Ɣ In deceleration to stop mode when line voltage recovers the AC drive continues to decelerate to 0 Hz and stops The AC drive will not be started until it receives RUN command again 6 6 7 Load Lost Protection Function Code Parameter Name Setting Range Default F9 63 Load lost protection 0 Disabled 1 Enabled 0 F...

Страница 160: ...on is disabled A5 04 0 in hoist applications such as crane 6 6 9 Output Overcurrent Protection This is to provide overcurrent protection for the AC drive If the drive s output current is equal to or smaller than the value set in F8 36 and the duration exceeds the value set in F8 37 digital output terminal set for function 36 becomes on Figure 6 45 Output current limit Time Time F8 36 ON F8 37 Outp...

Страница 161: ... 6 5 4 3 2 1 0 Low 15 14 13 12 11 10 9 8 High 0 0 1 1 1 1 0 1 0 0 1 0 0 0 0 0 8 0 3 D Binary Hexadecimal F7 03 Ɣ Press the ENTER key on the operation panel The operation panel displays Ɣ Press the PRG key twice on the operation panel The display of the operation panel starts from bit 0 the lowest bit in F7 03 Ɣ Press the key to view the running frequency bus voltage output voltage output current o...

Страница 162: ...layed during running set corresponding bit to 1 and set F7 03 to hexadecimal equivalent 1F F7 04 LED display running parameters 2 0000 to FFFF 7 6 5 4 3 2 1 0 PID feedback PLC stage Pulse reference kHz Running frequency 2 Remaining running time AI1 voltage before correction AI2 voltage before correction AI3 voltage before correction 15 14 12 11 10 9 8 Motor speed Current power on time H Current ru...

Страница 163: ...fore power down by default Ɣ If parameters to be monitored cannot be found in F7 03 F7 04 and F7 05 view them in group U0 Ƶ View Parameters in Group U0 You can view parameter values by using operation panel convenient for on site commissioning or from the host computer by means of communication address 0x7000 0x7044 8 WR 8 DUH WKH PRQLWRULQJ SDUDPHWHUV LQ WKH UXQQLQJ DQG VWRS VWDWXV GH QHG E and F...

Страница 164: ...Relay 2 DO1 DO2 VDO1 Bit6 Bit7 Bit8 Bit9 Bit10 Bit11 VDO2 VDO3 VDO4 VDO5 Function Code Parameter Name Display Range U0 10 AI2 voltage V current mA 0 00 to 10 57 V 0 00 to 20 00 mA U0 10 Whether AI2 receives voltage input or current input is determined by setting of jumper J9 on the control board Function Code Parameter Name Display Range U0 14 Load speed display 0 to rated motor speed U0 15 PID re...

Страница 165: ...in minimum unit of 1 Hz It is the same as U0 18 except for difference in units Function Code Parameter Name Display Range U0 28 Communication reference 100 00 to 100 00 U0 28 It displays data written by means of communication address 0x1000 Function Code Parameter Name Display Range U0 30 Main frequency reference 0 00 to 500 00 Hz U0 31 Auxiliary frequency reference 0 00 to 500 00 Hz U0 34 Motor t...

Страница 166: ...splay Range U0 44 DI set for function state display 2 U0 44 It displays whether DI terminals set for functions 41 to 59 are active The display format is similar to U0 43 The 7 segment LEDs display functions 41 48 49 56 and 57 59 respectively from right to left Function Code Parameter Name Display Range U0 59 Frequency Reference 100 00 to 100 00 U0 60 Running frequency 100 00 to 100 00 Function Cod...

Страница 167: ...niform linear speed Reciprocating mechanism Set wobble function related parameters With wobble function Without wobble function Pendulum motor f t Fb 01 Fb 02 Fb 03 Fb 04 Function Code Parameter Name Wobble amplitude time coefficient Triangular wave rising Wobble cycle Wobble step 7KH WUDFH RI UXQQLQJ IUHTXHQF DW WLPH D LV LV VKRZQ LQ WKH IROORZLQJ JXUH Figure 6 47 The wobble function schematic di...

Страница 168: ...cy source superposition selection x Fb 01 Ɣ When Fb 00 1 Aw wobble amplitude F0 10 Max frequency x Fb 01 Wobble step frequency Aw wobble amplitude x Fb 02 Wobble step The wobble running frequency must be within frequency upper limit and frequency lower limit Function Code Parameter Name Setting Range Default Fb 03 Wobble cycle 0 0s to 3000 0s 10 0s Fb 04 Triangular wave rising WLPH FRHI FLHQW 0 0 ...

Страница 169: ...es counting function F4 04 27 Any of F4 04 to F4 09 28 Allocate DIx with the length reset function Fb 06 Actual length Fb 05 Set length Clear to 0 Compare DO Any of F5 00 to F5 05 10 Reset Allocate DO with the length reached function DO outputs the length reached signal Length reset input Length reached output Length pulses input 1 2 3 10 11 12 1 2 Fb 06 0 Fb 06 11 Fb 05 11 U0 13 0 Number of sampl...

Страница 170: ...outputs the designated count value reached signal Reset Any of F5 00 to F5 05 8 Allocate DO with the designated count value reached function Count reset input Output of set count value reached Count pulse input U0 12 Count value Fb 08 11 U0 12 11 1 2 3 10 11 12 U0 12 0 19 20 21 Fb 09 20 U0 12 20 1 2 Output of designated count value reached 7KH VHWWLQJV RI UHODWHG IXQFWLRQ SDUDPHWHUV LQ WKH SUHFHGL...

Страница 171: ... the DI is inactive motor parameter group 1 is selected If the DI is active motor parameter group 2 is selected Function Code Parameter Name Setting Description Any of F4 00 to F4 09 DIx function selection 41 Motor selection Note Ɣ If any of F4 00 to F4 09 is set for function 41 Motor selection DI terminal overrides F0 24 If none of F4 00 to F4 09 is set for function 41 Motor selection motor selec...

Страница 172: ...various process requirements For details of MD38PC1 see the User Programmable Card User Manual The function of this card must be used together with parameters in group A7 Figure 6 50 User programmable function A7 00 1 Set the programmable card to activate Jumper J2 Jumper J3 DIP switch S1 The grey indicates ON Setting of A7 02 1 2 3 4 5 6 7 8 0 1 2 3 4 5 6 7 8 1 1 2 3 4 5 6 7 8 2 1 2 3 4 5 6 7 8 3...

Страница 173: ...0 V or 20 mA PLC program modified A7 00 1 Set the programmable card to activate 0 output invalid 0 output invalid 0 output invalid 1 output valid Control mode ten thousands position of A7 01 1 output valid 1 output valid PLC controls digital output tens position of A7 05 PLC controls digital output units position of A7 05 Figure 6 52 The user programmable use schematic 3 Command ǂ0 No command ǂ1 F...

Страница 174: ...ge output 5 AI3 PTC input AO2 current output 6 AI3 PT100 input AO2 voltage output 7 AI3 PT100 input AO2 current output 0 The user programmable card provides an analog input terminal AI3 and an analog output terminal AO2 Set DIP switch S1 jumper J2 and jumper J3 on the card and then set A7 02 Setting of S1 S2 and J3 must be consistent with setting in A7 02 Otherwise communication will be abnormal 3...

Страница 175: ...ard control AO1 0 AC drive control 1 User programmable card control FMP FM used as pulse output 0 AC drive control 1 User programmable card control 00000 A7 03 PLC program controls the FMP output 0 0 to 100 0 0 0 A7 04 PLC program controls the AO1 output 0 0 to 100 0 0 0 A7 05 Selection of PLC program controlling digital output Relay1 0 Disabled 1 Enabled FMR 0 Disabled 1 Enabled DO 0 Disabled 1 E...

Страница 176: ... user programmable card is enabled frequency reference of the AC drive is determined by setting of A7 06 You can implement control of frequency reference of AC drive via PLC program by operating corresponding D component Function Code Parameter Name Setting Range Default A7 06 Setting frequency reference via the user programmable card 100 00 to 100 00 0 00 The base value of this parameter is F0 10...

Страница 177: ...50 Actual drive frequency 50 Hz 50 x 50 x 10 0 47 5 Hz Note Setting range 0 0 to 100 0 of F8 15 correspond to 0 00 to 10 00 on operating panel Function Code Parameter Name Setting Range Default A8 00 Point point communication 0 Disabled 1 Enabled 0 This function parameter determines whether to enable point point communication The point point communication indicates direct communication between two...

Страница 178: ... its output frequency to the slave In this case ensure F8 15 0 Ɣ A8 03 1 The master sends its frequency reference to the slave Function Code Parameter Name Setting Range Default A8 04 Zero offset of received data 100 00 to 100 00 0 00 A8 05 Gain of received data 10 00 to 10 00 1 00 These two function parameters correct received data Function Code Parameter Name Setting Range Default A8 06 Point po...

Страница 179: ...hree wire control The DI terminal set for this function determines three wire control mode of the AC drive 4 Forward jog FJOG FJOG indicates forward jog running and RJOG indicates reverse jog running Jog frequency jog acceleration time and jog deceleration time are described respectively in F8 00 F8 01 and F8 02 5 Reverse jog RJOG 6 Terminal UP The terminals selecting these two functions are used ...

Страница 180: ...ol If command source is communication control F0 02 2 this terminal is used to perform switchover between communication control and operation panel control 21 Acceleration Deceleration prohibited This function ensures the AC drive to maintain current frequency output without being affected by external signals except STOP command 22 PID disabled This function disables the PID function The AC drive ...

Страница 181: ...comes on frequency reference is replaced by preset frequency set in F0 08 41 Motor selection Switchover between motor 1 and motor 2 can be implemented through two state combinations of terminal set for this function 42 Reserved 43 PID parameter switchover If PID parameters switchover is done via DI terminal FA 18 1 PID parameters are FA 05 to FA 07 when terminal set for this function becomes off P...

Страница 182: ...omes on reverse running of the AC drive is prohibited It is the same as function of F8 13 53 to 59 Reserved Function Code Parameter Name Setting Range Default F4 35 DI1 delay 0 0s to 3600 0s 0 0s F4 36 DI2 delay 0 0s to 3600 0s 0 0s F4 37 DI3 delay 0 0s to 3600 0s 0 0s When state of DI terminals changes these three function parameters set delay time of the change Now the drive supports delay funct...

Страница 183: ...ed from COM and inactive when being connected with COM 6 9 2 Function of DO Terminals The drive provides a digital output DO terminal an analog output AO terminal a relay terminal and an FM terminal either high speed pulse output or open collector output Extra AO terminal AO2 relay terminal relay2 and DO terminal DO2 are provided by the I O extension card Function Code Parameter Name Setting Range...

Страница 184: ...minal set for this function becomes on when count value reaches the value set in Fb 08 9 Designated count value reached Terminal set for this function becomes on when count value reaches value set in Fb 09 10 Length reached Terminal set for this function becomes on when detected actual length exceeds value set in Fb 05 11 PLC cycle completed Terminal set for this function outputs a pulse signal wi...

Страница 185: ...1 input voltage upper limit or smaller than value set in F8 45 AI1 input voltage lower limit 32 Load lost Terminal set for this function becomes on when load gets lost 33 Reverse running Terminal set for this function becomes on when the AC drive runs in reverse direction 34 Zero current Refer to descriptions of F8 34 and F8 35 35 IGBT temperature reached Terminal set for this function becomes on ...

Страница 186: ...lay1 active mode 0 Positive logic active 1 Negative logic active FMR active mode 0 Positive logic active 1 Negative logic active Relay2 active mode 0 Positive logic active 1 Negative logic active DO2 active mode 0 Positive logic active 1 Negative logic active DO1 active mode 0 Positive logic active 1 Negative logic active 00000 This function parameter sets active mode of terminals FMR relay1 relay...

Страница 187: ...KH YH YLUWXDO WHUPLQDOV 9 WR 9 ZKLFK KDYH the same digital input functions 0 to 59 as ten DI terminals do For more details see description of F4 00 to F4 09 Function Code Parameter Name Setting Range Default A1 05 VDI active state setting mode VDI2 0 Decided by state of VDOx 1 Decided by A1 06 VDI1 0 Decided by state of VDOx 1 Decided by A1 06 VDI3 0 Decided by state of VDOx 1 Decided by A1 06 VDI...

Страница 188: ... AI1 reaches limit VDO1 becomes on Then VDI1 becomes on and the AC GULYH UHFHLYHV XVHU GH QHG IDXOW Ɣ 1 Decided by A1 06 To enable the AC drive to automatically enter running status after power on perform the following settings Set A1 00 to 1 to set VDI1 for function 1 Forward RUN FWD Set A1 05 to xxx1 to determine VDI1 active state by state of A1 06 Set F0 02 to 1 to use terminal control as comma...

Страница 189: ...ly 1 to 40 0 A1 14 VDO4 function selection 0 Short with physical DIx internally 1 to 40 0 A1 15 VDO5 function selection 0 Short with physical DIx internally 1 to 40 0 A1 16 VDO1 output delay 0 0s to 3600 0s 0 0s A1 17 VDO2 output delay 0 0s to 3600 0s 0 0s A1 18 VDO3 output delay 0 0s to 3600 0s 0 0s A1 19 VDO4 output delay 0 0s to 3600 0s 0 0s A1 20 VDO5 output delay 0 0s to 3600 0s 0 0s A1 21 VD...

Страница 190: ...n hysteresis state between 3 V and 7 V Figure 6 54 Relationship between AI input voltage and DI state AI voltage 7 VDC 3 VDC DI state Time OFF ON ON Function Code Parameter Name Setting Range Default A1 07 Function selection for AI1 used as DI 0 to 59 0 A1 08 Function selection for AI2 used as DI 0 to 59 0 A1 09 Function selection for AI3 used as DI 0 to 59 0 A1 10 Active state selection for AI us...

Страница 191: ...range of AO1 and AO2 is 0 to 10 V or 0 to 20 mA The functions of the three terminals are listed in the following table Value Output Function Range Corresponding to 0 0 to 100 0 of Pulse or Analog Output Range 0 Running frequency 0 to max frequency 1 Frequency reference 0 to max frequency 2 Output current 0 to 2 times of rated motor current 4 Output power 0 to 2 times of rated power 5 Output voltag...

Страница 192: ...RQGV WR 9 RU P RX FDQ FDOFXODWH WKH JDLQ DQG WKH HUR RIIVHW FRHI FLHQW IURP WKH IROORZLQJ IRUPXODV K Y1 Y2 x Xmax X1 X2 x Ymax b X1 xY2 X2 x Y1 X1 X2 x Ymax In the formulas Ɣ b represents zero offset Ɣ k represents gain Ɣ X represents output frequency Ɣ Y represents actual output of the AO Ɣ Xmax represents max output frequency determined by F0 10 Ɣ Ymax represents max output 10 V or 20 mA For exa...

Страница 193: ...communication timeout time 0 0 Invalid 0 1 to 60 0 0 6 10 1 Read and Write Function Parameters Ƶ Read Function Parameters For function parameters in groups F0 to FF and A0 to AF the highest eight bits in communication address indicate function code group while the lowest eight bits indicate hexadecimal number converted from SN in function code group For example communication address of F0 16 is F0...

Страница 194: ...e 40 to 4F or A0 to AF according to whether to write parameter to EEPROM while the lowest eight bits indicate the hexadecimal number converted from SN in function code group For example host computer writes data to AC 08 If not writing to EEPROM communication address is 4C08H If writing to EEPROM communication address is AC08H To write data host computer needs to send a write command to the AC dri...

Страница 195: ...e AC GULYH LV PRGL DEOH UDQJH WR DQG GULYH UXQQLQJ VWDWXV LV IRUZDUG UXQ The format of message sent by the master is as follows Message ID Hex RTR Data Hex 0x605 0 40 30 00 00 00 00 00 00 0x605 0x600 0x05 Node ID DIP setting Format of response message returned by the slave is as follows Message ID Hex RTR Data Hex 0x585 0 40 30 00 00 00 00 00 00 0x585 0x580 0x05 Node ID DIP setting Sending message...

Страница 196: ...p 0x02 for 02 DATA4 Data 1 Data low byte DATA5 Data 2 Data high byte DATA6 Data 3 Correct 0 Incorrect SDO operation failed error code DATA7 Data 4 Returned message format of read operation is described as follows CAN CANopen Data Description 11 bit ID 0x580 Node ID The Node ID of the equipment is set via the DIP switch RTR 0 Remote frame sign 0 DATA0 Command code 0x40 0x40 read command DATA1 Index...

Страница 197: ... writing the running command set baud rate and local address The settings of related parameters are as follows Function Parameter Setting Description Fd 00 Baud rate Select the CANlink baud rate in thousands position of Fd 00 You must set the same baud rate in the master and slave Otherwise the communication will not be implemented Fd 02 Local address The CANlink address range is 1 to 63 Suppose t...

Страница 198: ...essage Sending CANlink frame of write operation is as follows CAN CANlink Description IDbit28 25 Arbitration sign The arbitration sign of the command frame is 1000 IDbit24 Q A sign Q A sign 1 is the question frame IDbit23 16 Command code Write register command is 0x05 IDbit15 8 Target address CANlink target address IDbit7 0 Source address CANlink local address DATA1 Data Write data high byte DATA2...

Страница 199: ...84CAH CRC check Note Range of frequency reference given via communication is 10000 to 10000 corresponding to 100 00 to 100 00 100 00 corresponds to negative maximum frequency 0 00 corresponds to minimum frequency and 100 00 corresponds the maximum frequency Suppose that F0 10 50 Hz if frequency reference in write command is 1F40H converted to decimal 8000 frequency reference that is written is 50 ...

Страница 200: ...GUHVV DQG FRPPDQG RI DQDORJ DQG KLJK VSHHG SXOVH RXWSXWV DUH GH QHG in the following table Related communication address and command are as follows Communication Address Command Description AO1 2002H 0 to 7FFF indicates 0 to 100 AO2 2003H FMP 2004H 6 10 7 Parameter Initialization You can initialize parameters via host computer by using this function If FP 00 user password is set to a non zero valu...

Страница 201: ...unction If this function is enabled and any of F4 00 to F4 09 is set to 4 forward jog or 5 reverse jog becomes active the AC drive enters jog running status immediately Figure 6 55 Jog running F8 01 Time t Output frequency F0 25 Set acceleration time Set deceleration time Actual acceleration time Actual deceleration time F8 02 F8 00 Jog command Follow the steps below to control the drive jog via t...

Страница 202: ...H ZKHQ UXQQLQJ IUHTXHQF DFFHOHUDWHV WR WKH YDOXH WKDW LV FORVH WR jump frequency during acceleration the AC drive runs for a period at current frequency reference and then jumps over jump frequency The jump width is twice of F8 11 When running frequency decelerates to the value close jump frequency during deceleration the AC drive runs for a period at current frequency reference and then jumps ove...

Страница 203: ... FWD direction runs at 0 0 Hz 0 0 Frequency reference Frequency reference 0 Frequency reference 0 Reverse RUN command terminal communication 0 1 RUN command operation panel Forward RUN command terminal communication Function Code Parameter Name Setting Range Default F8 13 Reverse RUN selection 0 Enabled 1 Disabled 0 F0 09 Running direction 0 Run in the default direction FWD REV indicator off 1 Run...

Страница 204: ...ncy 50 00 Hz F8 29 Frequency detection hysteresis 2 0 0 to 100 0 5 0 F8 19 It sets detection value for digital output function 3 When running frequency exceeds the detection value digital output terminal set for function 3 becomes on F8 20 It sets hysteresis level for the frequency detection function It is a percentage of the frequency detection value F8 19 6 11 4 Frequency Reference Reached Detec...

Страница 205: ...cy Hz Acceleration time 2 Acceleration time 1 Deceleration time 1 Deceleration time 2 During acceleration if the running frequency is below F8 25 acceleration time 2 is selected If it is above F8 25 acceleration time 1 is selected During deceleration if the running frequency is above F8 26 deceleration time 1 is selected If it is below F8 26 deceleration time 2 is selected Function Code Parameter ...

Страница 206: ... Setting Range Default F8 30 Detection of frequency 1 0 00 Hz to max frequency 50 00 Hz F8 31 Detection width of frequency 1 0 0 to 100 0 max frequency 0 0 F8 32 Detection of frequency 2 0 00 Hz to max frequency 50 00 Hz F8 33 Detection width of frequency 2 0 0 to 100 0 max frequency 0 0 6 11 7 Zero Current Detection If output current of the AC drive is equal to or smaller than the value set in F8...

Страница 207: ...urrent 0 0 F8 40 Detection level of current 2 0 0 to 300 0 rated motor current 100 0 F8 41 Detection width of current 2 0 0 to 300 0 rated motor current 0 0 6 11 9 Timing Function Function Code Parameter Name Setting Range Default F8 42 Timing function 0 Disabled 1 Enabled 0 F8 43 Running time setting channel 0 Set by F8 44 1 AI1 2 AI2 3 AI3 100 of analog input corresponds to the value of F8 44 0 ...

Страница 208: ...7 digital output terminal set for function 35 becomes on 6 11 12 Cooling Fan Function Code Parameter Name Setting Range Default F8 48 Cooling fan working mode 0 Working during drive running 1 Working continuously 0 This function parameter sets working mode of cooling fan Ɣ F8 48 0 Working during running The fan works during drive running When the drive stops the fan works if heatsink temperature i...

Страница 209: ...ID reference whether to perform PID operation in hibernating state is determined by FA 28 Selection of PID operation at stop 6 11 14 Running Time Threshold This Time Function Code Parameter Name Setting Range Default F8 53 Running time threshold this time 0 0 to 6500 0 min 0 0 min If running time this time reaches the value set in this parameter digital output terminal set for function 40 becomes ...

Страница 210: ... and Communication 7 1 About Use of MD290 Terminals 202 7 2 Serial Communication 204 7 3 About Multi functional Extension Interfaces 205 H QLWLRQ RI RPPXQLFDWLRQ DWD GGUHVV 206 7 5 Modbus Communication Protocol 209 ...

Страница 211: ...ime and Delay Functions F4 10 sets a filter time on the DI signal to improve performance of the drive in conditions of strong electrical interference The drive also provides a signal delay function on digital inputs DI1 to DI3 to support some applications that require a delayed digital input You can set the delay separately for each of the three DI terminals Ɣ Function code F4 35 controls the dela...

Страница 212: ...Value 100 corresponds to a pulse frequency of 100 kHz Ƶ Use of AI Terminals The drive supports a maximum of three analog input terminals Of these AI1 and AI2 are on the control board and AI3 is on the optional extension card Terminal Input Signal Characteristic AI1 GND It receives the signal of 0 to 10 VDC AI2 GND If J9 jumps to the V position AI receives voltage signal of 0 to 10 VDC If J9 jumps ...

Страница 213: ...negative 7 2 Serial Communication You must install relevant extension card in the drive and set F0 28 correctly before you can use one of available serial communication protocols The available serial communication protocols are Ɣ RS485 Ɣ PROFIBUS DP Ɣ CANopen Ɣ CANlink Note that function code F0 28 has correct value for the CANlink communication protocol by default See 7 5 5 Group Fd Communication...

Страница 214: ... MD38IO2 Provides three extra DI terminals Available for all models Modbus communication card MD38TX1 RS485 communication adapter with isolation Available for all models CANlink communication card MD38CAN1 CANlink communication adapter Available for all models CANopen communication card MD38CAN2 CANopen communication adapter Available for all models 3UR EXV 3 FRPPXQLFDWLRQ card MD38DP2 3UR EXV 3 F...

Страница 215: ...A0 to AF the high 16 bits of the communication address indicate the group number and the low 16 bits indicate the parameter number in the group Example Communication address of F0 16 is F010H where F0H represents group F0 and 10H is the hexadecimal data format of serial number 16 in the group Communication address of AC 08 is AC08H where ACH represents group AC and 08H is the hexadecimal data form...

Страница 216: ...ain current fault code of the AC drive by reading the address 3 AC drive running status When the drive running status is read via communication the communication address is 3000H You can obtain current running status information of the AC drive by reading WKH DGGUHVV 7KH UXQQLQJ VWDWXV LV GH QHG LQ WKH IROORZLQJ WDEOH Communication Address of AC Drive s Running Status 6WDWXV H QLWLRQ 3000H 1 Forwa...

Страница 217: ...e set to function 12 Communication setting host computer can implement control on AO and high speed pulse outputs by means of FRPPXQLFDWLRQ DGGUHVVHV 7KH GH QLWLRQ LV SURYLGHG LQ WKH IROORZLQJ WDEOH Communication Address of AO1 AO2 and FMP Output RPPDQG H QLWLRQ AO1 2002H 0 to 7FFF indicates 0 to 100 AO2 2003H FMP 2004H Ɣ Parameter initialization This function is required when you need to perform ...

Страница 218: ...or an HMI and initiates communication to perform parameter read or write operations on slaves The other devices slaves provide data to respond to query or operations from the master At the same moment either the master or the slave transmits data and the other can only receives data The address range of the slaves is 1 to 247 and 0 is broadcast address A slave address must be unique in the network...

Страница 219: ...tion address Number of bytes 2n Parameter address H L Function parameter H L CRC and L H Idle Frame of writing command from the master Idle frame header 1 byte 1 byte 2 byte 2 byte 3 5 byte 2 byte Calculate CRC Target station address Write command 0x06 Parameter address H L Function parameter H L CRC and L H Idle Idle frame header 1 byte 1 byte 2 byte 2 byte 3 5 byte 2 byte Calculate CRC Target st...

Страница 220: ...ing command During transmission low order bytes follow the high order bytes Function code address L Number of function codes H It is the number of function codes read by this frame If it is 1 it indicates that one function code is read During transmission low bytes follow high bytes In the present protocol only one function code is read once and WKLV HOG LV XQDYDLODEOH Number of function codes L D...

Страница 221: ...W LQ WKH UHJLVWHU 7KHQ WKH UHVXOW LV VKLIWHG LQ WKH GLUHFWLRQ RI WKH OHDVW VLJQL FDQW ELW 6 ZLWK D HUR OOHG LQWR WKH PRVW VLJQL FDQW ELW 06 SRVLWLRQ 7KH 6 LV H WUDFWHG and examined If the LSB was a 1 the register then performs XOR with a preset value If the LSB was a 0 no XOR is performed This process is repeated until eight shifts have been performed After the last eighth shift the next eight bit...

Страница 222: ... the AC drive In addition pay attention to setting range unit and description of parameters when modifying them Parameter Group Visited Address Parameter Address in RAM F0 to FE 0xF000 to 0xFEFF 0x0000 to 0x0EFF A0 to AC 0xA000 to 0xACFF 0x4000 to 0x4CFF U0 0x7000 to 0x70FF Frequent storage to the EEPROM reduces its service life Therefore in communication mode users can change values of certain pa...

Страница 223: ...put indication 1019 Linear speed 100A AI1 voltage 101A Current power on time 100B AI2 voltage 101B Current running time 100C AI3 voltage 101C Pulse input frequency unit 1Hz 100D Counting value input 101D Communication reference 100E Length value input 101E Actual feedback speed 100F Load speed 101F Main frequency reference display 1020 Auxiliary frequency reference display Note Ɣ Communication set...

Страница 224: ...00H DO terminal control write only Command Address Command Content 2001H BIT0 DO1 control BIT1 DO2 control BIT2 RELAY1 control BIT3 RELAY2 control BIT4 FMR control BIT5 VDO1 BIT6 VDO2 BIT7 VDO3 BIT8 VDO4 BIT9 VDO5 AO1 control write only Command Address Command Content 2002H 0 to 7FFF indicates 0 to 100 AO2 control write only Command Address Command Content 2003H 0 to 7FFF indicates 0 to 100 Pulse ...

Страница 225: ...14 Encoder PG card fault 0015 Parameter read and write fault 0016 AC drive hardware fault 0017 Motor short circuited to ground 0018 Reserved 0019 Reserved 001A Accumulative running time reached 8VHU GH QHG IDXOW 8VHU GH QHG IDXOW 001D Accumulative power on time reached 001E Load lost 001F PID feedback lost during running 0028 Fast current limit timeout 0029 Motor switchover error during running 00...

Страница 226: ...ge Default Fd 03 Response delay 0 to 20 ms 2 ms This parameter sets interval between AC drive completing receiving data and AC drive sending data to host computer If response delay is shorter than system processing time system processing time shall prevail If response delay is longer than system processing time system sends data to host computer only after response delay is up Function Code Parame...

Страница 227: ...7 Interfaces and Communication 226 7 ...

Страница 228: ...8 Peripherals and Options 8 1 MCCB Fuse and Contactor 231 8 2 Braking Unit and Braking Resistor 232 8 3 External Operating Panel 238 8 4 Extension Cards 239 8 5 Through hole Mounting Bracket 257 ...

Страница 229: ...ve Failure to comply will damage the drive because of static electricity Ɣ Operating the motor at low speed lowers the cooling effect and increases the motor WHPSHUDWXUH ZKLFK XQOHVV WKH RXWSXW WRUTXH LV VLJQL FDQWO UHGXFHG PD UHVXOW LQ damage to the motor If the required motor speed range differs from that of the motor manufacturer please contact them for advice Ɣ If the torque characteristic is ...

Страница 230: ...g Electromagnetic contactor Moulded case circuit breaker MCCB or leakage breaker Three phase AC power supply AC reactor on input side Braking resistor EMC filter R S T P W V U BR Grounding BR PE Braking unit MDBUN To prevent electric shock AC drive and motor must be well grounded Braking resistor MD290 External operating panel MD32NKE1 Motor AC reactor on output side R S T W V U BR PE MD290 MF K R...

Страница 231: ...DQG WKHUPDO VWDELOLW RI WKH GULYH Eliminate impact of higher harmonics of the AC drive input side and reduce external conduction and radiation interference Braking resistor Use braking resistor for the GB type model of 75 kW and below Dissipate regenerative energy during motor deceleration Braking unit Use braking unit MDBUN of Inovance and recommended braking resistor for G type model of 90 kW an...

Страница 232: ...75 FWH 275A 170 250 MD290T110G 132P 325 FWH 325A 205 400 MD290T132G 160P 400 FWH 400A 245 400 MD290T160G 200P 500 FWH 500A 300 400 MD290T200G L 600 FWH 600A 410 500 MD290T220P L 700 FWH 700A 410 630 MD290T220G L 700 FWH 700A 410 630 MD290T250P L 800 FWH 800A 475 630 MD290T250G L 800 FWH 800A 475 630 MD290T280P L 800 FWH 800A 620 700 MD290T280G L 800 FWH 800A 620 700 MD290T315P L 1000 170M5016 620 ...

Страница 233: ... K ranges from 15 to 30 Ɣ Pr refers to power of braking resistor Ɣ D refers to braking frequency percentage of regenerative process to whole deceleration The following two formulas can be obtained K Pr Pb D U U R D Pr U U D R K 7KH XVHU FDQ FDOFXODWH EUDNLQJ UHVLVWRU SRZHU LV GHUDWLQJ FRHI FLHQW RI EUDNLQJ UHVLVWRU RZ K value can ensure that braking resistor does not get overheated The K value can...

Страница 234: ...1 6 8 MD290T90PB 90 ȍ 1 6 8 MD290T90G 90 MDBUN 60 T 2 ȍ 2 Input voltage 9 9 3 x 2 90 MDBUN 60 5T 2 ȍ 2 Input voltage 440 VAC 10 5 x 2 MD290T110P 110 MDBUN 60 T 2 ȍ 2 Input voltage 9 9 3 x 2 110 MDBUN 60 5T 2 ȍ 2 Input voltage 440 VAC 10 5 x 2 MD290T110G 110 MDBUN 60 T 2 ȍ 2 Input voltage 9 9 3 x 2 110 MDBUN 60 5T 2 ȍ 2 Input voltage 440 VAC 10 5 x 2 MD290T132P 132 MDBUN 60 T 2 ȍ 2 Input voltage 44...

Страница 235: ... 2 ȍ 2 Input voltage 440 VAC 3 0 x 2 MD290T220G L 220 MDBU 200 B 2 ȍ 2 Input voltage 9 2 5 x 2 220 MDBU 200 C 2 ȍ 2 Input voltage 440 VAC 3 0 x 2 MD290T250P L 250 MDBU 200 B 2 ȍ 2 Input voltage 9 2 5 x 2 250 MDBU 200 C 2 ȍ 2 Input voltage 440 VAC 3 0 x 2 MD290T250G L 250 MDBU 200 B 2 ȍ 2 Input voltage 9 2 5 x 2 250 MDBU 200 C 2 ȍ 2 Input voltage 440 VAC 3 0 x 2 MD290T280P L 280 MDBU 200 B 2 ȍ 2 In...

Страница 236: ...e 440 VAC 3 0 x 2 MD290T450G L 450 MDBU 200 B 3 ȍ 3 Input voltage 9 2 5 x 2 450 MDBU 200 C 3 ȍ 3 Input voltage 440 VAC 3 0 x 2 MD290T500P L 500 MDBU 200 B 3 ȍ 3 Input voltage 9 2 5 x 2 500 MDBU 200 C 3 ȍ 3 Input voltage 440 VAC 3 0 x 2 Note Ɣ Minimum resistance supports operating condition with ED of 10 and longest time for single braking of 10s Ɣ Default initial braking voltage is 760 V Ɣ The pre...

Страница 237: ...UN Series Braking Unit ĭ5 60 236 247 165 224 110 Unit mm Always mount MDBUN series braking unit in an upright position Hot air Cold air 100 50 50 100 Upright For use and installation of MDBUN series braking unit refer to the MDBUN Series Braking Unit User Manual ...

Страница 238: ...d during motor braking to the grid saving braking unit and braking resistor can reducing heating pollution on surrounding environment The AFE unit has advantages of energy saving low noise low harmonics pollution and high power factor H B W A Ï D AFE Model Dimensions mm Weight kg H W D A B ĭ MD051T5 5G 305 190 163 130 290 7 0 7 2 MD051T7 5G 305 190 163 130 290 7 0 7 2 MD051T11G 305 190 163 130 290...

Страница 239: ...Panel Keypad Display 7KH IROORZLQJ JXUHV VKRZ WKH SK VLFDO DSSHDUDQFH DQG PRXQWLQJ GLPHQVLRQV RI WKH 0 1 116 0 76 0 54 0 104 0 11 0 92 5 71 15 0 27 0 10 0 Crystal head 5 0 6 5 11 0 Ø3 5 Unit mm Ƶ Connecting Cable Inovance provides MDCAB MD 3 meters and MDCAB2 MD 1 5 meters for the user to connect external operating panel The users can prepare connecting cable by themselves Note Once external opera...

Страница 240: ... use with the drive Name Model Function Frequency Dividing RHI FLHQW Remark I O extension card 1 MD38IO1 Provides the following Ɣ Five extra DI terminals Ɣ An analog input Ɣ A relay output Ɣ A digital output Ɣ An analog output Supports Modbus RTU and CANlink Available for all models I O extension card 2 MD38IO2 Provides three extra DI terminals Available for all models User programmable card MD38P...

Страница 241: ...scriptions of MD38IO1 Type Terminal Terminal Name Function Description Power supply 24V COM External 24V power supply Provide 24 V power supply to an external unit Generally used to supply DI DO terminals and external sensors Max output current 170 mA OP1 Digital input power terminal Connect to 24V by the jumper J8 by default When applying an external power supply remove the jumper J8 to disconnec...

Страница 242: ...y open collector output Output voltage range 0 to 24 V Output current range 0 to 50 mA Note that CME1 and COM are internally insulated but are shorted by jumper J7 internally Remove the jumper if you need to apply an external power to DO2 Relay outputs RELAY2 PA PB Normally closed terminal Contact driving capacity 250 VAC 3 A Cos f 0 4 30 VDC 1 A PA PC Normally closed terminal RS485 communication ...

Страница 243: ...resistor OFF 1 2 S1 AI3 PT100 PT1000 selection AI3 1 2 3 set to ON ON 1 2 3 4 5 6 7 8 PT1000 4 5 6 set to ON ON 1 2 3 4 5 6 7 8 PT100 6 7 8 set to ON ON 1 2 3 4 5 6 7 8 Note Ɣ Setting of jumpers takes top view with main terminals at the bottom of the card as visual angle Jumpers are silk screened on the card Ɣ When using CANlink or Modbus protocol for communication match terminal resistor to the e...

Страница 244: ...n be connected either to external power or 24V according to the actual need Digital inputs DI6 OP2 Digital input 6 Optically coupled isolation compatible with dual polarity inputs QSXW UHVLVWDQFH Nȍ IRU DQG Nȍ for DI8 Voltage range for inputs 9 to 30 V DI6 DI7 and DI8 are common input terminals with input frequency 100 Hz DI7 OP2 Digital input 7 DI8 OP2 Digital input 8 Table 8 4 Jumper description...

Страница 245: ...RXW PRGL FDWLRQ MD38PC1 has the following I O terminals and communication interface COM J9 S1 J1 RUN CN6 J4 AI3 PGNDAO2 GND 485 485 PE CGND DI7 DI8 DI9 DI10 COM OP1 DI6 24V PC1 PA2 PC2 PA1 CN4 AO AI 24V OP1 STOP ON 1 2 3 4 5 6 7 8 J2 J3 J7 J8 CN1 Table 8 5 Terminal descriptions of the MD38PC1 Type Terminal Terminal Name Function Description Power supply 24V COM External 24V power supply Provide 24...

Страница 246: ...UHVLVWDQFH Nȍ Voltage range for inputs 9 to 30 V DI7 OP1 Digital input 7 DI8 OP1 Digital input 8 DI9 OP1 Digital input 9 DI10 OP1 Digital input 10 Analog output AO2 GND Analog output 2 Output voltage range 0 to 10 V Output current range 0 to 20 mA Relay outputs RELAY x 2 PA1 PC1 Relay 1 NO terminal Contact driving capacity 250 VAC 3 A Cos f 0 4 30 VDC 1 A PA2 PC2 Relay 2 NO terminal RS485 communic...

Страница 247: ...rminal resistor J7 Run Stop selection Run Stop J8 OP1 connecting mode selection If DI connected in SINK mode OP1 connected to 24V If DI connected in SOURCE mode OP1 connected to COM S1 AI3 PT100 PT1000 selection AI3 1 2 3 set to ON ON PT1000 4 5 6 set to ON ON PT100 6 7 8 set to ON ON Note Setting of jumpers takes top view with main terminals at the bottom of the card as visual angle Jumpers are s...

Страница 248: ...bus seamlessly 1 1 1 SW1 J2 CN1 J1 Table 8 7 Terminal descriptions of MDCAN1 Type Terminal Terminal Name Function Description CAN communication terminal CANH CAN positive input Connect to positive pole of CAN bus CANL CAN negative input Connect to negative pole of CAN bus COM Power ground Connect to reference ground of all CAN nodes Table 8 8 Jumper descriptions of MDCAN1 Jumper Description Meanin...

Страница 249: ...NH CANL COM Run the twisted cable and cable connected to COM closely CANH CANL COM Connect the shield to COM CANH CANL COM Twist the other unused cables into one rope and connect it to COM CANH CANL COM Twist the other unused cables into one rope and connect it to COM Connect the shield to PE 1 Self prepared single core cable 2 Twin core STP cable 3 Multi core twisted pair cable non shielded 4 Mul...

Страница 250: ...ee TPDOs and three RPDOs 5 Emergency object 1 1 1 SW1 ON 1 2 3 4 1 ON ON 1 2 3 4 S2 S3 J2 CN1 J1 3 5 55 581 Table 8 9 Terminal descriptions of MDCAN2 Type Terminal Terminal Name Function Description CAN communication terminal CANH CAN positive input Connect to the positive pole of the CAN bus CANL CAN negative input Connect to the negative pole of the CAN bus COM Power ground Connect to the refere...

Страница 251: ... 1 1 1 0 62 1 1 1 1 1 1 63 Ɣ Indicators Table 8 12 Descriptions of indicators Indicator State Description PWR in red ON Power on is normal OFF Power on is abnormal Check whether the installation is proper ERR in red ON The communication of the AC drive times out Flashing quickly The CANopen address is set incorrectly Flashing twice The CANopen messages emergently RUN in green ON The CANopen enters...

Страница 252: ...ut RS485 communication terminal with isolation input 485 RS485 negative input RS485 communication terminal with isolation input CGND RS485 Power ground Isolated power Table 8 14 Jumper descriptions of MD38TX1 Jumper Description Meaning Setting J3 RS485 terminal resistor matching selection Matching the terminal resistor Not matching the terminal resistor Note Setting of jumpers takes top view with ...

Страница 253: ...e of each node branch must be smaller than 3 m Connect the reference ground of all nodes together The connecting modes of multiple nodes are described as below Daisy chain connection mode Master Slave 1 Slave 2 Slave 3 Slave N RS485 bus Recommended Branching connection mode Master Slave 1 Slave 2 Slave 3 Slave N RS485 bus 3 m 3 m 3 m Recommended Note Distance from the bus to the node cannot exceed...

Страница 254: ...be connected to ground 4 8 5 node 485 485 CGND 4 8 5 node 485 485 CGND Non shielded multi core cable STP cable Terminal wiring if node does not have CGND For nodes without CGND do not connect CGND cable or shield to PE of node directly 4 8 5 node 485 485 4 8 5 node 485 485 Shield unconnected CGND cable unconnected Take the following steps to handle it Step 1 Check whether a common reference ground...

Страница 255: ...P2 Type Terminal Terminal Name Function Description Terminal Arrangement PROFIBUS communication terminal J2 1 2 7 9 NC Vacant internally 1 2 3 4 5 6 7 8 9 RTS GND 5V Data line A NC NC NC NC Data line B 3 Data line B Data line positive 4 RTS Request of sending signal 5 GND Isolation 5 V power ground 6 5V Isolation 5 V power supply 8 Data line A Data line negative CANlink communication terminals J3 ...

Страница 256: ...wered on or DP card is installed improperly D3 in yellow DP card and master communication indicator ON Communication between DP card and the master is normal OFF There is no communication between DP card and the master check PROFIBUS cable connection and setting of station No Flash The master does not operate or error occurs on communication between DP card and the master D2 in green DP card and d...

Страница 257: ...IBUS bus and set DIP switch properly The system PEs must be reliably grounded Length of communication cable between MD38DP2 and PROFIBUS DP master varies with different setting of baud rate of the master Restrict communication cable lead length strictly according to the Siemens DB9 standard The following table describes requirements on baud rate and communication cable lead length Baud Rate Kbps M...

Страница 258: ...e size of MD290T18 5G 22P to MD290T22G 30P unit mm 350 210 192 380 260 96 5 4 6 70 240 15 243 227 15 243 60 232 360 240 4 M5 screw 5 5 Figure 8 2 Bracket dimensions and hole size of MD290T30G 37P to MD290T37G 45P unit mm 15 220 400 70 290 430 255 267 283 300 125 15 4 7 283 56 5 270 403 290 4 M6 screw 6 5 ...

Страница 259: ...D290T55G 75P unit mm 345 57 325 548 450 4 M7 screw 10 85 30 525 5 318 300 380 600 345 450 542 28 145 5 269 3 10 11 Figure 8 4 Bracket dimensions and hole size of MD290T75G 110P to MD290T110G 132P unit mm 338 355 72 470 10 11 383 418 580 554 144 309 2 26 5 23 5 630 383 52 5 363 588 470 4 M8 screw 10 ...

Страница 260: ...5 38 35 5 10 5 27 10 5 580 780 65 65 80 5 144 40 65 305 17 5 140 62 181 9 2 FH6 M15 9 39 5 See details A 30 A Scale 1 1 525 725 27 5 100 125 41 5 104 100 100 75 66 5 42 5 22 5 2 5 6 6 2 10 This guide rail figure is applicable to the PS cabinet width 800 x depth 600 width 800 x depth 800 Note mounting bracket MD290T220G 280P L Version Change mode Change order No Date Designed by Audited by Processe...

Страница 261: ...binet width 800 x depth 600 width 800 x depth 800 Change mode Scale Product 1 5 MD290T280G 355P L MD290T250G 315P L and Figure 8 8 Bracket dimensions and hole size of MD290T315G L to MD290T450G L and MD290T400P L to MD290T500P L unit mm 30 A Scale 11 42 5 22 5 2 5 Note mounting bracket Change order No Date Designed by Audited by Processed by Standardized by Approved by Projection symbol Code Scale...

Страница 262: ...9 Maintenance and Inspection 9 1 Daily Inspection 262 9 2 Periodic Inspection 264 9 3 Lifetime of Fans and Electrolytic DC Bus Capacitors 266 9 4 Storage 270 9 5 Warranty Agreement 270 ...

Страница 263: ... operations in accordance with instructions Ɣ 7LJKWHQ DOO WHUPLQDO VFUHZV EDVHG RQ VSHFL HG WLJKWHQLQJ WRUTXH Ɣ Ensure that input voltage is within permissible range Incorrect input voltage of main circuit may result in abnormal running Ɣ Keep combustible materials far away from the AC drive or mount the AC drive on incombustible surfaces such as a metal wall Ɣ 5HSODFH WKH FRROLQJ IDQ LQ FRUUHFW Z...

Страница 264: ... exists Ɣ Check mechanical connections Ɣ Check power phases of the motor Ɣ Tighten all loose screws Fan Inspect whether the cooling fan of the AC drive and the motor works abnormally Ɣ Check running of the drive side cooling fan Ɣ Check running of the motor side cooling fan Ɣ Check whether the cooling fan is clogged or dirty Ɣ Check whether ambient temperature is within the permissible range Insta...

Страница 265: ...ust on the surface of the AC drive Use a vacuum cleaner to suck up wastes and dust to prevent direct touching Wipe surface dirt gently with a soft cloth immersed in neutral detergent Cables Inspect power cables and connections for discoloration Inspect wiring insulation for aging or wear Replace cracked cable Replace damaged terminals Peripheral devices such as relay and contactor Inspect contacto...

Страница 266: ...C drive Ɣ Do not conduct the dielectric strength test High voltage 500 V test need not be performed again because it has been completed before delivery Figure 10 1 Test insulation on the main circuit R S T U V W BR P 500 VDC Megameter MD290 7KH PHDVXUHG LQVXODWLRQ UHVLVWDQFH PXVW EH JUHDWHU WKDQ 0ȍ Before test remove the VDR screw as shown in the following position VDR jumper screw EMC jumper scew...

Страница 267: ...the safe valve has projected Ɣ Measure the static capacitance Ɣ Measure the insulation resistance The standard service time indicates the service time when the AC drive is used on the following conditions Ɣ Ambient temperature about 40 C on average yearly Ɣ Load rate below 80 Ɣ Operating rate below 24 hours per day You can determine when to replace these parts according to the actual operating tim...

Страница 268: ...l the fan upward and disconnect the pluggable connector of power cable Fan power cable connector Look down from the back of the drive Installing 1 Plug in the fan power cable Fan power socket 2 Install the fan into the drive and ensure that the mounting pins are aligned Mounting pin x 4 3 Insert the two guide pins into the square holes and then press in the hook Guide pin Square hole HHS DLU ÀRZ G...

Страница 269: ... from the drive Fan power socket 2 Remove the four screws from the drive 3 Remove the fan and fan cover from the drive Fan power cable Fan cover Fan Installing 1 Align the mounting holes of the cooling fan fan cover and the drive 2 Install the fan and fan cover on the AC drive L WKH VFUHZV DQG HQVXUH FRUUHFW DLU ÀRZ GLUHFWLRQ Keep the air flow direction upward ...

Страница 270: ...an box out in the direction of arrow 4 Loosen four screws from each fan cover and remove the fan 1 2 3 4 Installing 3XW WKH WKUHH IDQV LQWR WKH IDQ ER RQH E RQH DQG VHFXUH WKHP E LQJ WKH VFUHZV 2 Align the fan box to the rail and push it into the drive RQQHFW WKH IDQ SRZHU FDEOH FRQQHFWRUV DQG WKH WKUHH VFUHZV IWHU UHSODFHPHQW LV FRPSOHWHG FKHFN WKDW WKH DLU ÀRZ GLUHFWLRQ LV XSULJKW Ƶ Replacement ...

Страница 271: ...AC drive must be switched on and off once every 2 years each time lasting at least 5 hours Ensure to increase the input voltage gradually to rated value by using voltage regulator 9 5 Warranty Agreement Free warranty only applies to the AC drive itself Reasonable repair expenses will be charged for the damages due to the following causes Ɣ Improper operation without following the instructions Ɣ LU...

Страница 272: ...10 Troubleshooting 10 1 Safety Information 272 10 2 Troubleshooting During Trial Run 273 10 3 Fault Display 273 10 4 Resetting Fault 274 10 5 Faults and Diagnostics 275 10 6 Symptoms and Diagnostics 282 ...

Страница 273: ... inside an enclosed cabinet use cooling fan or air conditioner to keep temperature below 50 C Failure to comply may result in RYHUKHDWLQJ RU HYHQ D UH Ɣ 7LJKWHQ DOO VFUHZV EDVHG RQ WKH VSHFL HG WLJKWHQLQJ WRUTXH DLOXUH WR FRPSO PD UHVXOW LQ HOHFWULF VKRFN RU D UH Ɣ OZD V FRQ UP LQSXW YROWDJH LV ZLWKLQ QDPHSODWH UDWLQJ DLOXUH WR FRPSO PD UHVXOW LQ HOHFWULF VKRFN RU D UH Ɣ HHS ÀDPPDEOH DQG FRPEXVWLE...

Страница 274: ... when heavy load is suddenly removed or during deceleration 1 Ensure that F3 23 voltage limit selection is set to 1 enabled Increase the setting of F3 24 F3 25 frequency gain voltage gain for voltage limit by 10 gradually The permissible maximum setting here is 100 The default value of F3 22 is 30 2 Decrease the setting of F3 22 voltage limit by 10 V gradually The permissible minimum setting here ...

Страница 275: ...t the fault Troubleshoot the fault according to section 11 5 Faults and Diagnostics Fault resetting method Fault resetting through a DI terminal Allocate a DI terminal with function 9 Fault reset RESET by setting any of F4 00 to F4 09 to 9 DI COM Fault reset AC drive Fault resetting via operating panel RQ UP WKDW GHIDXOW YDOXH 7KHQ SUHVV the STOP RES key on operating panel MF K RUN STOP RES QUICK ...

Страница 276: ...r it stops The AC drive suffers external interference View historical fault records If the current value is far from WKH RYHUFXUUHQW OHYHO QG LQWHUIHUHQFH VRXUFH I H WHUQDO interference does not exist it is the drive board or hall device problem Operating Panel Display Fault Name Overcurrent during deceleration Cause Possible Solution Ground fault or short circuit exists in the output circuit Chec...

Страница 277: ...n Cause Possible Solution Input voltage is too high Adjust input voltage to normal range An external force drives motor during acceleration Cancel the external force or install a braking resistor The overvoltage stall prevention parameters are set improperly Ensure that the voltage limit function is enabled F3 23 1 The setting of voltage limit F3 22 is too large Adjust it between 700 V and 770 V T...

Страница 278: ...inuously Contact the agent or Inovance Operating Panel Display Fault Name Undervoltage Cause Possible Solution Instantaneous power failure occurs QDEOH WKH SRZHU GLS ULGH WKURXJK IXQFWLRQ The AC drive s input voltage is not within the permissible range Adjust the voltage to normal range The bus voltage is abnormal Contact the agent or Inovance 7KH UHFWL HU EULGJH WKH EXIIHU resistor the drive boar...

Страница 279: ... when the motor is running Check whether the motor three phase winding is normal The drive board or the IGBT is abnormal Contact the agent or Inovance Operating Panel Display Fault Name IGBT overheat Cause Possible Solution The ambient temperature is too high Lower the ambient temperature The ventilation is clogged Clean the ventilation The fan is damaged Replace the cooling fan Thermally sensitiv...

Страница 280: ... exists restore the default settings Operating Panel Display Fault Name Contactor fault Cause Possible Solution Drive board and power supply are abnormal Replace drive board or power supply board Contactor is abnormal Replace contactor The lightning protection board is abnormal Replace the lightning protection board Operating Panel Display Fault Name Current detection fault Cause Possible Solution...

Страница 281: ...eration Operating Panel Display Fault Name 8VHU GH QHG IDXOW Cause Possible Solution 8VHU GH QHG IDXOW LV LQSXW YLD Reset the operation 8VHU GH QHG IDXOW LV LQSXW YLD YLUWXDO 2 Reset the operation Operating Panel Display Fault Name Accumulative power on time reached Cause Possible Solution Accumulative power on time reaches the setting value Clear the record through parameter initialization Operat...

Страница 282: ...drive Perform motor switchover after the AC drive stops Operating Panel Display Fault Name Motor overtemperature Cause Possible Solution Cable connection of temperature sensor becomes loose Check cable connection of temperature sensor The motor temperature is too high Decrease carrier frequency or take other measures to cool the motor Operating Panel Display Fault Name Braking unit overload Cause ...

Страница 283: ...and 28 pin wire Related components on control board are damaged Contact the agent or Inovance The motor or motor cable is short circuited to ground The hall is damaged The mains voltage is too low Operating Panel Display Fault Description Err23 is displayed at power on Cause Possible Solution Motor or motor output cable is short circuited to ground Use a megger to measure insulation resistance of ...

Страница 284: ...cables Jumper across OP and 24 V becomes loose 5H FRQ UP WKH MXPSHU EDU DFURVV 23 DQG 9 The control board is faulty Contact the agent or Inovance Operating Panel Display Fault Description Operating Panel Display Fault Description The AC drive detects overcurrent and overvoltage frequently Cause Possible Solution Motor parameters are set improperly Set motor parameters or perform motor auto tuning ...

Страница 285: ...10 Troubleshooting 284 11 ...

Страница 286: ...Appendix Appendix A Standards Compliance 286 A 1 CE 286 8 HUWL FDWLRQ 305 Appendix B Parameter Table 306 B 1 Introduction 306 B 2 Standard Parameters 307 B 3 Monitoring Function Codes 342 ...

Страница 287: ...lectromagnetic compatibility 0DFKLQHV DQG GHYLFHV XVHG LQ FRPELQDWLRQ ZLWK WKLV GULYH PXVW DOVR EH FHUWL HG DQG marked The integrator who integrates the drive with the CE mark in into other devices has the responsibility of ensuring compliance with CE standards and verifying that conditions meet European standards A 1 2 CE Low Voltage Directive Compliance This drive has been tested according to IE...

Страница 288: ... 400 FWH 400B MD290T160G 200P 500 FWH 500B MD290T200G L MD290T220P L 600 FWH 600B MD290T250P L 600 FWH 600B MD290T220G L MD290T280P L 700 FWH 700B MD290T250G L MD290T315P L 800 FWH 800B MD290T280G L MD290T355P L 800 FWH 800B MD290T315G L MD290T400P L 1000 170M5016 MD290T355G L MD290T450P L 1000 170M5016 MD290T400G L MD290T500P L 1400 170M6017 MD290T450G L 1400 170M6017 Ƶ Preventing Entry of Foreig...

Страница 289: ...C directive and standard EN 61800 3 2004 A1 2012 Category C2 C3 or C4 according to the system application environment H QLWLRQ RI 7HUPV Ɣ First environment Environment that includes domestic premises it also includes establishments directly connected without intermediate transformers to a low voltage power supply network which supplies buildings used for domestic purposes Ɣ Second environment Envi...

Страница 290: ...el Schaffner Input AC Filter Model Changzhou Jianli MD290T18 5GB 22P FN 3258 55 34 DL 50EBK5 MD290T22GB 30P FN 3258 75 34 DL 65EBK5 MD290T30GB 37P FN 3258 75 34 DL 65EBK5 MD290T37GB 45P FN 3258 100 35 DL 80EBK5 MD290T45GB 55P FN 3258 100 35 DL 100EBK5 MD290T55GB 75P FN 3258 130 35 DL 130EBK5 MD290T75GB 90P FN 3258 180 40 DL 160EBK5 MD290T90G 110P FN 3258 180 40 DL 200EBK5 MD290T110G 132P FN 3270H ...

Страница 291: ...5 20 29 5 16 250 45 70 220 235 25 5 4 1 22 M5 22 5 29 5 30 270 50 85 240 255 30 5 4 1 25 M5 25 39 5 42 310 50 85 280 295 30 5 4 1 25 M6 25 37 5 55 250 85 90 220 235 60 5 4 1 39 M6 42 5 26 5 75 270 80 135 240 255 60 6 5 1 5 39 M6 40 70 5 100 270 90 150 240 255 65 6 5 1 5 45 M10 45 64 130 270 90 150 240 255 65 6 5 1 5 45 M10 45 64 180 380 120 170 350 365 102 6 5 1 5 51 M10 60 47 ...

Страница 292: ...dix 291 12 LPHQVLRQV RI 6FKDIIQHU 1 VHULHV OWHU M A I J C O D U U K N B L H E E G 150 to 250 A Unit mm M A I E F G N B O C L U U D K H E 320 to 2500 A Unit mm Dimensions of copper bar V W Z X Y 320 to 1000 A ...

Страница 293: ...170 250 F 185 185 205 235 235 235 255 255 275 330 G ĭ ĭ ĭ ĭ ĭ ĭ ĭ ĭ ĭ ĭ H 2 2 2 2 2 2 3 3 3 3 I 33 33 33 43 43 43 53 53 93 98 J M10 M10 M10 M12 M12 M12 M12 M12 M12 M16 K 55 55 62 5 20 20 20 25 25 25 25 L 30 30 35 20 20 20 25 25 25 25 M 420 420 420 440 440 440 510 510 N 171 171 191 221 221 221 241 241 O 127 127 132 122 122 142 177 177 S 26 35 T 26 35 U 50 50 55 60 60 60 60 60 60 100 V 25 25 25 40 4...

Страница 294: ...265 58 70 102 25 92 M6 58 M4 74 49 M6 6 4 x 9 4 DL 35EBK5 DL 50EBK5 DL 65EBK5 DL 80EBK5 354 323 388 66 155 188 30 92 M8 62 M4 86 56 M8 6 4 x 9 4 DL 100EBK5 DL 130EBK5 DL 160EBK5 DL 200EBK5 LPHQVLRQV RI WKH LDQOL VHULHV OWHU 12 440 350 290 210 234 262 158 160 M12 Unit mm 25 5 10 11 250 to 300 A 25 8 10 15 400 to 600 A 30 10 10 15 700 to 800 A Unit mm ...

Страница 295: ...T37G 45P DL 120EB1 10 MD290T45G 55P MD290T55G 75P DL 180EB1 10 MD290T75G 90P MD290T90G 110P to MD290T450G L Unavailable Mounting Dimensions 6 5 0 2 4 5 0 2 Mounting length 80 0 2 120 2 Length 157 3 100 2 Mounting width 115 0 5 Width 130 2 13 75 1 55 1 M4 M6 x 6 17 1 35 1 Height 50 2 Unit mm Simple EMC Filter Model Overall Dimensions Length x Width x Height Mounting Dimensions Mounting Length x Mou...

Страница 296: ...und cable length cannot exceed 300 mm PE R S T Cable length 300 mm Cable length 300 mm Cxy 1 1 Safety capacitance box Magnetic ring Wind three turns Mounting dimensions of safety capacitance box 6 5 0 2 4 5 0 2 45 0 5 65 2 72 2 38 2 Brown Brown Brown Yellow green 65 2 75 0 5 85 2 Unit mm Safety Capacitance Box Model SN Overall Dimensions Length x Width x Height Mounting Dimensions Mounting Length ...

Страница 297: ...GB 22P MD ACL 50 0 28 4T 2 MD290T22GB 30P MD ACL 60 0 24 4T 2 MD290T30GB 37P MD ACL 90 0 16 4T 2 MD290T37GB 45P MD ACL 90 0 16 4T 2 MD290T45GB 55P MD ACL 120 0 12 4T 2 MD290T55GB 75P MD ACL 150 0 095 4T 2 MD290T75GB 90P MD ACL 200 0 07 4T 2 MD290T90G 110P MMD ACL 250 0 056 4T 2 MD290T110G 132P MD ACL 250 0 056 4T 2 MD290T132G 160P MD ACL 330 0 042 4T 2 MD290T160G 200P MD ACL 330 0 042 4T 2 MD290T2...

Страница 298: ... E Rated Current A B C D E F G H A mm 50 155 130 148 95 135 95 6 x 15 80 60 195 165 188 92 130 120 8 5 x 20 72 80 195 165 188 92 130 120 8 5 x 20 72 90 195 165 188 92 130 120 8 5 x 20 72 120 195 165 188 112 140 120 8 5 x 20 92 Dimensions of AC output reactor of 150 to 250 A are shown as below U V W X Y Z A D B C H F G J E K M L I U X ...

Страница 299: ...0 123 175 42 182 11 x 18 97 250 250 81 81 230 102 5 140 123 175 42 182 11 x 18 97 Dimension of AC output reactor of 330 A U V W X Y Z A D B C H F G J E K M L I U X Rated Current A B C D E F G H I J K L M A mm 330 290 95 95 250 110 5 155 132 190 45 214 11 x18 106 Note The dimensions of the AC input and output reactors are for reference only ...

Страница 300: ...L 6 1 MD290T45GB 55P RWK 305 90 KL 90 45 0 065 75 KL 7 4 MD290T55GB 75P RWK 305 110 KL 110 55 0 053 90 KL 8 2 MD290T75GB 90P RWK 305 156 KS 156 75 0 038 120 KS 10 7 MD290T90G 110P RWK 305 182 KS 182 90 0 032 140 KS 16 MD290T110G 132P RWK 305 230 KS 230 110 0 026 180 KS 22 MD290T132G 160P RWK 305 280 KS 280 132 0 021 220 KS 29 MD290T160G 200P RWK 305 330 KS 330 160 0 018 240 KS 32 MD290T200G L RWK ...

Страница 301: ...35 100 45 5 x 8 2 5 mm2 17A 125 max 75 max 135 100 55 5 x 8 2 5 mm2 24A 125 max 75 max 135 100 55 5 x 8 4 mm2 32A 155 max 95 max 170 130 56 8 x 12 10 mm2 45A 155 max 110 max 190 130 72 8 x 12 10 mm2 60 and 72A 155 max 125 max 190 130 70 8 x 12 16 mm2 90A 190 max 115 max 225 170 57 8 x 12 35 mm2 110A 190 max 130 max 220 170 67 8 x 12 35 mm2 124A 190 max 180 max 160 170 67 8 x 12 I8 143A 190 max 180...

Страница 302: ...1100A 360 250 310 144 11 x 15 I11 Ƶ Common mode Filter 7KH FRPPRQ PRGH OWHU LV LQVWDOOHG RQ RXWSXW VLGH FORVH WR GULYH WR UHGXFH EHDULQJ current and reduce interference on surrounding devices 7KH IROORZLQJ JXUH VKRZV LQVWDOODWLRQ RI FRPPRQ PRGH OWHU PE W V U Cable length 300 mm Magnetic ring wind three turns 7KH IROORZLQJ JXUH VKRZV SK VLFDO DSSHDUDQFH RI IHUULWH FRUH Common mode Filter Model SN D...

Страница 303: ... 1 MCCB Fuse and Contactor A 1 7 Shielded Cable Ƶ Requirements for Shielded Cable Shielded cable must be used to satisfy EMC requirements of CE marking Shielded FDEOHV DUH FODVVL HG LQWR WKUHH FRQGXFWRU FDEOH DQG IRXU FRQGXFWRU FDEOH I FRQGXFWLYLW RI FDEOH VKLHOG LV QRW VXI FLHQW DGG DQ LQGHSHQGHQW 3 FDEOH RU XVH D IRXU FRQGXFWRU cable of which one phase conductor is PE cable 7KUHH FRQGXFWRU FDEOH...

Страница 304: ...potential Ɣ Filter AC drive and motor should be connected to system machinery or appliance properly with spraying protection at installation part and conductive metal in full contact A 1 8 Solutions to Current Leakage AC drive outputs high speed pulse voltage producing high frequency leakage current during running of the drive Each AC drive produces more than 100 mA leakage current Therefore it is...

Страница 305: ...ge FXUUHQW VXSSUHVVLRQ PHDVXUHV LQVWDOO D OHDNDJH FXUUHQW OWHU LQVWDOO safety capacitor wind ferrite core AC drive interference during running Ɣ Connect motor housing to PE of AC drive Ɣ Connect PE of AC drive to PE of grid Ɣ Wind power input cable with ferrite core Ɣ Add a safety capacitor or ferrite core to interfered signal terminal Ɣ Add an extra common ground Communication interference Ɣ Conn...

Страница 306: ...rive has the cULus mark it indicates that the product complies with the following North American Standards Country HUWL FDWLRQ 1DPH Standard U S UL UL508C Canada cUL C22 2 No 14 13 Note that the motor overtemperature test is not assessed by UL ...

Страница 307: ...ard function parameters Group U includes the monitoring function parameters and extension card communication parameters The parameter description tables in this chapter use the following symbols The symbols in the parameter table are described as follows Symbol Meaning ƿ It is possible to modify the parameter with the drive in the stop or in the Run status ƾ It is not possible to modify the parame...

Страница 308: ...tal setting retentive at power down 2 AI1 3 AI2 4 AI3 5 Pulse reference 6 Multi reference 7 Simple PLC 8 PID reference 9 Serial comms 0 ƾ 110 F0 04 Auxiliary frequency reference setting channel selection 0 Digital setting non retentive at power down 1 Digital setting retentive at power down 2 AI1 3 AI2 4 AI3 5 Pulse reference 6 Multi reference 7 Simple PLC 8 PID reference 9 Serial comms 0 ƾ 131 F0...

Страница 309: ...he default direction 1 Run in the direction reverse to the default direction 0 ƿ 202 F0 10 Max frequency 50 00 to 500 00 Hz 50 00 Hz ƾ 112 F0 11 Setting channel of frequency upper limit 0 Set by F0 12 1 AI1 2 AI2 3 AI3 4 Pulse reference DI5 5 Communication reference 0 ƾ 135 F0 12 Frequency reference upper limit Frequency lower limit F0 14 to max frequency F0 10 50 00 Hz ƿ 135 F0 13 Frequency refer...

Страница 310: ...ommand source frequency source 000 to 999 Terminal control frequency source The same as that of units position Operating panel frequency source 0 Not binding 1 Digital setting 2 AI1 3 AI2 4 AI3 5 Pulse reference DI5 6 Multi reference 7 Simple PLC 8 PID reference 9 Serial comms Serial comms frequency source The same as that of units position 000 ƿ 134 F0 28 Serial port comms protocol 0 Modbus proto...

Страница 311: ...143 Group F3 V F Control Parameters F3 00 V F curve setting 0 to 11 0 ƾ 146 F3 01 Torque boost HG WRUTXH ERRVW 0 1 to 30 Model dependent ƿ 146 F3 02 Cut off frequency of torque boost 0 00 Hz to max frequency 50 00 Hz ƾ 146 F3 03 Multi point V F frequency 1 0 00 Hz to F3 05 0 00 Hz ƾ 146 F3 04 Multi point V F voltage 1 0 0 to 100 0 0 0 ƾ 146 F3 05 Multi point V F frequency 2 F3 03 to F3 07 0 00 Hz ...

Страница 312: ...Frequency gain for voltage limit 0 to 100 30 ƿ 151 F3 25 Voltage gain for voltage limit 0 to 100 30 ƿ 151 F3 26 Frequency rise threshold during voltage limit 0 to 50 Hz 5 Hz ƾ 151 Group F4 Input Terminals F4 00 DI1 function selection 0 No function 1 Forward run FWD 2 Reverser run REV 3 Three wire control 4 Forward jog FJOG 5 Reverse jog RJOG 6 Terminal UP 7 Terminal DOWN 8 Coast to stop 9 Fault re...

Страница 313: ...d 43 PID parameter switchover 8VHU GH QHG IDXOW 8VHU GH QHG IDXOW 47 Emergency stop ES 48 External stop 2 49 Deceleration DC injection braking 50 Clear running time this time 51 Two wire control Three wire control 52 Reverse running prohibited 53 to 59 Reserved 4 ƾ 178 F4 02 DI3 function selection 9 ƾ 178 F4 03 DI4 function selection 12 ƾ 178 F4 04 DI5 function selection 13 ƾ 178 F4 05 DI6 functio...

Страница 314: ... 0 00 V ƿ 114 F4 24 Corresponding percentage of AI curve 3 min input 100 00 to 100 0 0 0 ƿ 114 F4 25 AI curve 3 max input F4 23 to 10 00 V 10 00 V ƿ 114 F4 26 Corresponding percentage of AI curve 3 max input 100 00 to 100 0 100 0 ƿ 114 F4 27 OWHU WLPH 0 00s to 10 00s 0 10s ƿ 116 F4 28 Pulse min input 0 00 kHz to F4 30 0 00 kHz ƿ 118 F4 29 Corresponding percentage of pulse min input 100 00 to 100 0...

Страница 315: ... delay 0 0s to 3600 0s 0 0s ƾ 181 F4 38 DI active mode selection 1 00000 to 11111 DI2 active mode 0 High level active 1 Low level active DI1 active mode 0 High level active 1 Low level active DI3 active mode 0 High level active 1 Low level active DI5 active mode 0 High level active 1 Low level active DI4 active mode 0 High level active 1 Low level active 00000 ƾ 181 F4 39 DI active mode selection ...

Страница 316: ...20 Communication setting 21 Reserved 22 Reserved 23 Zero speed running 2 having output at stop 24 Accumulative power on time reached 25 Frequency level detection 2 26 Frequency 1 reached 27 Frequency 2 reached 28 Current 1 reached 29 Current 2 reached 30 Timing reached 31 AI1 input exceeding limit 32 Load lost 33 Reverse running 34 Zero current 35 IGBT temperature reached 36 Output current exceedi...

Страница 317: ... mode 0 Positive logic active 1 Negative logic active DO2 active mode 0 Positive logic active 1 Negative logic active DO1 active mode 0 Positive logic active 1 Negative logic active 00000 ƿ 185 Group F6 Start Stop Control F6 00 Start mode 0 Direct start 1 Catching a spinning motor 2 Pre excited start 3 SVC quick start 0 ƿ 136 F6 01 Mode of catching a spinning motor 0 From stop frequency 1 From zer...

Страница 318: ...7 Keypad Operation and LED Display F7 00 LED default display check 0 Disabled 1 Enabled 0 ƿ F7 01 MF K key function selection 0 MF K key disabled 1 Switchover from remote control terminal or communication to keypad control 2 Switchover between forward rotation and reverse rotation 3 Forward jog 4 Reverse jog 0 ƾ F7 02 STOP RESET key function 0 STOP RESET key enabled only in keypad control 1 STOP R...

Страница 319: ...ge V Count value Frequency reference Hz DI state AI2 voltage V AI3 voltage V 15 14 12 11 10 9 8 PLC stage Pulse reference kHz Length value Reserved 13 Load speed PID reference Reserved Reserved 33 ƿ 162 F7 06 Load speed display decimal SRLQW FRHI FLHQW 0 001 to 65 000 1 000 ƿ F7 07 Heatsink temperature of inverter IGBT 20 C to 120 C Ɣ F7 08 Product SN Ɣ F7 09 Accumulative running time 0 to 65535 h...

Страница 320: ... zone time 0 0s to 3000 0s 0 0s ƿ 202 F8 13 Reverse RUN selection 0 Disabled 1 Enabled 0 ƿ 202 F8 14 Running mode when frequency reference lower than frequency lower limit 0 Run at frequency reference lower limit 1 Stop 2 Run at zero speed 0 ƿ 135 F8 15 Droop rate 0 0 to 100 0 0 0 to 100 0 correspond to 0 00 to 10 00 on operating panel 0 00 ƿ F8 16 Accumulative power on time threshold 0 to 65000 h...

Страница 321: ...ion width of current 1 0 0 to 300 0 rated motor current 0 0 ƿ 206 F8 40 Detection level of current 2 0 0 to 300 0 rated motor current 100 0 ƿ 206 F8 41 Detection width of current 2 0 0 to 300 0 rated motor current 0 0 ƿ 206 F8 42 Timing function 0 Disabled 1 Enabled 0 ƾ 206 F8 43 Running time setting channel 0 to 3 0 ƾ 206 F8 44 Running time 0 0 to 6500 0 min 0 0 min ƾ 206 F8 45 AI1 input voltage ...

Страница 322: ... on 0 Disabled 1 Enabled 01 ƿ F9 08 Braking unit applied voltage 650 to 800 V 760 V ƾ 151 F9 09 Auto reset times 0 to 20 0 ƿ 155 F9 10 Selection of DO action during auto reset 0 Not act 1 Act 0 ƿ 155 F9 11 Delay of auto reset 0 1s to 100 0s 1 0s ƿ 155 F9 12 Input phase loss pre charge relay protection 0 Disabled 1 Enabled Input phase loss 0 Disabled 1 Enabled Pre charge relay protection 11 ƿ 154 F...

Страница 323: ...e hardware fault 23 Motor short circuited to ground 24 Reserved 25 Reserved 26 Accumulative running time reached 8VHU GH QHG IDXOW 8VHU GH QHG IDXOW 29 Accumulative power on time reached 30 Load loss 31 PID feedback lost during running 40 Pulse by pulse current limit fault 41 Motor switchover fault during running 42 Reserved 43 Reserved 55 Slave fault in master slave control Ɣ F9 16 3rd latest fau...

Страница 324: ...ection action selection 1 00000 to 22222 Input phase loss Err12 Same as that of units position Motor overload Err11 0 Coast to stop 1 Stop according to stop mode 2 Continue to run Output phase loss Err13 Same as that of units position Communication fault Err16 Same as that of units position External fault Err15 Same as that of units position 00000 ƿ 156 F9 48 Fault protection action selection 2 00...

Страница 325: ...equency upon abnormality 0 ƿ 156 F9 55 Backup frequency upon fault 0 0 to 100 0 max frequency 100 0 ƿ 156 F9 56 Type of motor temperature sensor 0 No temperature sensor 1 PT100 2 PT1000 0 ƿ 157 F9 57 Motor overheat protection threshold 0 C to 200 C 110 C ƿ 157 F9 58 Motor overheat pre warning threshold 0 C to 200 C 90 C ƿ 157 F9 59 Power dip ride through function selection 0 Disabled 1 Bus voltage...

Страница 326: ...00s 0 000s ƿ 126 FA 08 PID output limit in reverse direction 0 00 Hz to max frequency 0 00 Hz ƾ 127 FA 09 PID error limit 0 0 to 100 0 0 0 ƿ 127 FA 10 PID differential limit 0 00 to 100 00 0 10 ƿ 127 FA 11 PID reference change time 0 00s to 650 00s 0 00s ƿ 127 FA 12 3 IHHGEDFN OWHU WLPH 0 00s to 60 00s 0 00s ƿ 127 FA 13 3 RXWSXW OWHU WLPH 0 00s to 60 00s 0 00s ƿ 127 FA 14 Reserved FA 15 Proportion...

Страница 327: ...Fb 01 Wobble amplitude 0 0 to 100 0 0 0 ƿ 167 Fb 02 Wobble step 0 0 to 50 0 0 0 ƿ 167 Fb 03 Wobble cycle 0 0s to 3000 0s 10 0s ƿ 167 Fb 04 Triangular wave rising time FRHI FLHQW 0 0 to 100 0 50 0 ƿ 167 Fb 05 Set length 0 to 65535 m 1000 m ƿ 168 Fb 06 Actual length 0 to 65535 m 0 m ƿ 168 Fb 07 Number of pulses per meter 0 1 to 6553 5 100 0 ƿ 168 Fb 08 Set count value 1 to 65535 1000 ƿ 169 Fb 09 Des...

Страница 328: ...tion deceleration time of simple PLC reference 0 0 to 3 0 ƿ 121 FC 20 Running time of simple PLC reference 1 0 0s h to 6553 5s h 0 0s h ƿ 121 FC 21 Acceleration deceleration time of simple PLC reference 1 0 to 3 0 ƿ 121 FC 22 Running time of simple PLC reference 2 0 0s h to 6553 5s h 0 0s h ƿ 121 FC 23 Acceleration deceleration time of simple PLC reference 2 0 to 3 0 ƿ 121 FC 24 Running time of si...

Страница 329: ...time of simple PLC reference 11 0 0s h to 6553 5s h 0 0s h ƿ 121 FC 41 Acceleration deceleration time of simple PLC reference 11 0 to 3 0 ƿ 122 FC 42 Running time of simple PLC reference 12 0 0s h to 6553 5s h 0 0s h ƿ 122 FC 43 Acceleration deceleration time of simple PLC reference 12 0 to 3 0 ƿ 122 FC 44 Running time of simple PLC reference 13 0 0s h to 6553 5s h 0 0s h ƿ 122 FC 45 Acceleration ...

Страница 330: ...data format 8 N 2 1 Even parity check data format 8 E 1 2 Odd parity check data format 8 O 1 3 No check data format 8 N 1 0 ƿ 225 Fd 02 Local address 0 Broadcast address 1 to 247 1 ƿ 225 Fd 03 Response delay 0 to 20 ms 2 ƿ 225 Fd 04 Communication timeout 0 0s invalid 0 1s to 60 0s Valid for Modbus PROFIBUS DP and CANlink 0 0s ƿ 225 Fd 05 Modbus protocol selection and PROFIBUS DP data frame 00 to 3...

Страница 331: ...01 ƿ FE 11 8VHU GH QHG SDUDPHWHU F4 02 ƿ FE 12 8VHU GH QHG SDUDPHWHU F5 04 ƿ FE 13 8VHU GH QHG SDUDPHWHU F5 07 ƿ FE 14 8VHU GH QHG SDUDPHWHU F6 00 ƿ FE 15 8VHU GH QHG SDUDPHWHU F6 10 ƿ FE 16 8VHU GH QHG SDUDPHWHU F0 00 ƿ FE 17 8VHU GH QHG SDUDPHWHU F0 00 ƿ FE 18 8VHU GH QHG SDUDPHWHU F0 00 ƿ FE 19 8VHU GH QHG SDUDPHWHU F0 00 ƿ FE 20 8VHU GH QHG SDUDPHWHU F0 00 ƿ FE 21 8VHU GH QHG SDUDPHWHU F0 00 ƿ...

Страница 332: ... ƿ FP 03 Selection of individualized parameter display 00 to 11 Selection of display of user defined parameters 0 Not displayed 1 Displayed Selection of display of user modified parameters 0 Not displayed 1 Displayed 00 ƿ FP 04 Selection of parameter PRGL FDWLRQ 0 Disabled 1 Enabled 0 ƿ Group A1 Virtual DI DO A1 00 VDI1 function selection 0 No function 1 Forward run FWD 2 Reverser run REV 3 Three ...

Страница 333: ...DI5 31 Reserved 32 Immediate DC injection braking 33 External fault normally closed input UHTXHQF PRGL FDWLRQ enabled 35 PID operation direction reverse 36 External stop 1 37 Command source switchover 2 38 PID integral disabled 39 Switchover between main frequency reference and preset frequency 40 Switchover between auxiliary frequency reference and preset frequency 41 Motor selection 42 Reserved ...

Страница 334: ...ctive 1 Active VDI5 0 Inactive 1 Active VDI4 0 Inactive 1 Active 00000 ƾ 186 A1 07 Function selection for AI1 used as DI 0 No function 1 Forward run FWD 2 Reverser run REV 3 Three wire control 4 Forward jog FJOG 5 Reverse jog RJOG 6 Terminal UP 7 Terminal DOWN 8 Coast to stop 9 Fault reset RESET 10 RUN disabled 11 External fault normally open input 12 Multi reference terminal 1 13 Multi reference ...

Страница 335: ...lly closed input UHTXHQF PRGL FDWLRQ enabled 35 PID operation direction reverse 36 External stop 1 37 Command source switchover 2 38 PID integral disabled 39 Switchover between main frequency reference and preset frequency 40 Switchover between auxiliary frequency reference and preset frequency 41 Motor selection 42 Reserved 43 PID parameter switchover 8VHU GH QHG IDXOW 8VHU GH QHG IDXOW 47 Emerge...

Страница 336: ...verload pending 8 Set count value reached 9 Designated count value reached 10 Length reached 11 PLC cycle completed 12 Accumulative running time reached 13 Frequency limited 15 Ready for RUN 16 AI1 AI2 17 Frequency upper limit reached 18 Frequency lower limit reached no output at stop 19 Undervoltage 20 Communication setting 21 Reserved 22 Reserved 23 Zero speed running 2 having output at stop 24 ...

Страница 337: ...1 21 VDO active mode selection 00000 to 11111 VDO2 0 Positive logic active 1 Negative logic active VDO1 0 Positive logic active 1 Negative logic active VDO3 0 Positive logic active 1 Negative logic active VDO5 0 Positive logic active 1 Negative logic active VDO4 0 Positive logic active 1 Negative logic active 00000 ƿ 188 Group A2 Motor 2 Parameters A2 00 Motor type selection 0 to 1 0 ƾ 170 A2 01 R...

Страница 338: ... 2 control mode 2 V F control 2 ƾ A2 63 Motor 2 acceleration deceleration time selection 0 The same motor 1 2 Acceleration deceleration time 2 3 Acceleration deceleration time 3 4 Acceleration deceleration time 4 0 ƿ A2 64 Motor 2 torque boost HG WRUTXH ERRVW 0 1 to 30 0 Model dependent ƿ A2 66 Motor 2 oscillation suppression gain 0 to 100 40 ƿ Group A5 Control Optimization A5 00 DPWM switchover f...

Страница 339: ... 5 min input 10 00 V to A6 10 10 00 V ƿ 115 A6 09 Corresponding percentage of AI curve 5 min input 100 0 to 100 0 100 0 ƿ 115 A6 10 FXUYH LQÀH LRQ LQSXW A6 08 to A6 12 3 00 V ƿ 115 A6 11 Corresponding percentage of AI FXUYH LQÀH LRQ LQSXW 100 0 to 100 0 30 0 ƿ 115 A6 12 FXUYH LQÀH LRQ LQSXW A6 10 to A6 14 3 00 V ƿ 115 A6 13 Corresponding percentage of AI FXUYH LQÀH LRQ LQSXW 100 0 to 100 0 30 0 ƿ ...

Страница 340: ...le card control 00000 ƾ 174 A7 02 User programmable card AI3 and AO2 function selection 0 AI3 voltage input AO2 voltage output 1 AI3 voltage input AO2 current output 2 AI3 current input AO2 voltage output 3 AI3 current input AO2 current output 4 AI3 PTC input AO2 voltage output 5 AI3 PTC input AO2 current output 6 AI3 PT100 input AO2 voltage output 7 AI3 PT100 input AO2 current output 0 ƾ 173 A7 0...

Страница 341: ... Whether to alarm when it becomes offline 0 No 1 Yes 011 ƾ 177 A8 03 The slave received data 0 Output frequency 1 Frequency reference 0 ƿ 177 A8 04 Zero offset of received data 100 00 to 100 00 0 00 ƿ 177 A8 05 Gain of received data 10 00 to 10 00 1 00 ƿ 177 A8 06 Point point communication interruption detection time 0 0s to 10 0s 1 0s ƿ 177 A8 07 Master data sending cycle in point point communica...

Страница 342: ... 10 00 to 10 000 V Factory corrected ƿ AC 14 AO1 target voltage 2 10 00 to 10 000 V Factory corrected ƿ AC 15 AO1 measured voltage 2 10 00 to 10 000 V Factory corrected ƿ AC 16 AO2 target voltage 1 10 00 to 10 000 V Factory corrected ƿ AC 17 AO2 measured voltage 1 10 00 to 10 000 V Factory corrected ƿ AC 18 AO2 target voltage 2 10 00 to 10 000 V Factory corrected ƿ AC 19 AO2 measured voltage 2 10 ...

Страница 343: ...reference 0 to 65535 163 U0 16 PID feedback 0 to 65535 163 U0 17 PLC stage U0 18 Pulse reference 0 00 to 20 00 kHz 163 U0 19 Feedback speed 500 0 to 500 0 Hz 163 U0 20 Remaining running time 0 0 to 6500 0 min 163 U0 21 AI1 voltage before correction 0 00 to 10 57 V 164 U0 22 AI2 voltage V current mA before correction 0 00 to 10 57 V 164 U0 23 AI3 voltage before correction 10 57 to 10 57 V 164 U0 24...

Страница 344: ...35 165 U0 62 Current fault code 0 to 99 165 U0 63 Master sending value of point point communication U0 64 Number of slaves 0 to 63 165 U0 66 Communication extension card type 100 CANopen 200 PROFIBUS DP 300 CANlink U0 67 Communication extension card version U0 68 AC drive status read via DP card U0 69 Speed of transmitting DP 0 00 Hz to max frequency U0 70 Motor speed of transmitting DP 0 to rated...

Страница 345: ...178 Control Circuit Wiring 68 Control Performance 146 Cooling Fan 207 Counting 169 Current Detection 206 Current Limit Control 149 Daily Inspection 262 Data Format 218 H QLWLRQ RI RPPXQLFDWLRQ DWD GGUHVV 214 H QLWLRQ RI RPPXQLFDWLRQ 3DUDPHWHU GGUHVVHV 221 H QLWLRQ RI 7HUPV 288 De rating 20 Description of Parameters 102 Description of Peripheral Electrical Devices 230 DI Terminals 178 Digital Outpu...

Страница 346: ... tuning 143 Motor Overheat Protection 157 Motor Overload Protection 153 Mounting Dimensions 25 Mounting in Cabinet 33 Mounting Orientation and Clearance 23 Non Parameter Data 215 Operating Panel Keypad Display 80 Options 228 Output Overcurrent Protection 159 Output Power correction 208 Overall Arrangement of Function Parameters 87 Overcurrent Fast Prevention 159 Parameter Data 214 Parameter Initia...

Страница 347: ...e 136 Stop Mode 139 Storage 270 Symptoms and Diagnostics 282 7HFKQLFDO 6SHFL FDWLRQV 16 Terminal I O Control 103 The Wobble Function 166 Through Hole Mounting 30 Through hole Mounting Bracket 257 Timing Function 206 Torque Boost 149 Troubleshooting 272 Troubleshooting During Trial Run 273 Typical System Connection 48 8 HUWL FDWLRQ 305 Undervoltage Overvoltage Threshold 159 User Programmable Card 1...

Страница 348: ...Version Change Record Date of Publication Version Description May 2015 V0 0 First issue September 2016 B00 Add large power rating data F7 10 U29 07 F7 11 U29 16 ...

Страница 349: ......

Страница 350: ......

Отзывы: