2. Mechanical Installation
- 28 -
2
2.4 Installation Method and Procedures
Ƶ
Installation Method
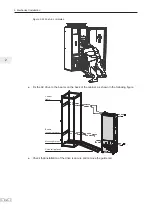
The drive units enclosed in a sheet-metal housing (45 kW and above) have weights of 35 kg or
more. These units have eye bolts that allow a mechanical hoist to support the weight of the unit
GXULQJLQVWDOODWLRQ7RSUHYHQWSHUVRQDOLQMXU\RUGDPDJHWRWKHHTXLSPHQW\RXPXVW¿WDQGXVH
these eye bolts to support the drive during installation.
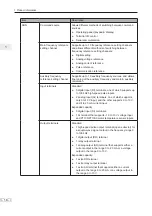
Mounting Method
Applicable Housing
Remark
Backplate
mounting
Plastic housing
Sheet metal housing
The AC drive is mounted directly on the backplate of
the cabinet . It is secured using four screws or bolts at
the corners of the backplate.
Through hole
mounting
Plastic housing
Sheet metal housing
It requires a cut-out in the backplate. The housing
must be secured in place by using the through-hole
mounting bracket and then be lifted into the cut-out.
The drives of MD290T200G to MD290T450G and MD290T220P to MD290T500P support
mounting in cabinet only.
Mounting Method
Applicable Model
Remark
Mounting in
cabinet
MD290T200G to
MD290T450G and
MD290T220P to
MD290T500P
,WUHTXLUHVLQVWDOODWLRQRI¿[LQJEHDPERWWRPPRXQWLQJ
EUDFNHWDQGJXLGHUDLO¿UVW7KH$&GULYHFDQEHWKHQ
pushed into the cabinet and secured.
2.4.1 Backplate Mounting
Note
It is very important that you identify correct mounting hole locations and diameters
RIWKHGULYH\RXDUHLQVWDOOLQJ$QGFKHFNWKDW\RXKDYHLGHQWL¿HGFRUUHFWGLPHQVLRQV
before you start to drill the mounting holes.
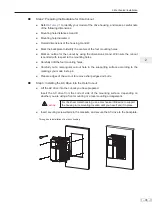
The backplate mounting process is as follows:
1. Select a suitable location. See recommendations in
2.1 Installation Environment
.
CAUTION
Check that there are no items of equipment, cables or pipes behind mounting
surface that might be damaged when you drill mounting holes.
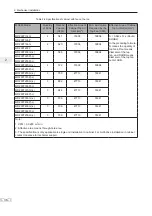
2. Measure and mark the drilling centers for the four mounting holes according to the
dimensions shown in
Table 2-1
for your model of the drive.
3. Carefully drill the four mounting holes at the correct diameter as shown in
Table 2-1
for your
model of the drive.
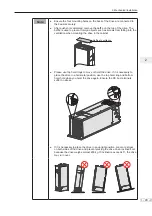
4. If necessary, lift the drive to the installation location. Hold it in correct position until there are
¿[LQJVLQSODFHWRVHFXUHLWVDIHO\
$GGORFNLQJZDVKHUVDQGÀDWZDVKHUVWRWKHVHFXULQJEROWVRUVFUHZVLQVHUWWKHPWKURXJK
the four mounting holes in the housing, and tighten them to secure the housing to the
backplate.
Содержание MD290 Series
Страница 1: ......
Страница 79: ...3 Electrical Installation 78 3 ...
Страница 80: ...4 Operating Panel Keypad Display 4 1 Introduction 80 4 2 Inbuilt LED Operating Panel 80 ...
Страница 92: ...5 Quick Setup 5 1 Get Familiar With Operating Panel 92 5 2 Setup Flowchart 93 ...
Страница 227: ...7 Interfaces and Communication 226 7 ...
Страница 285: ...10 Troubleshooting 284 11 ...
Страница 349: ......
Страница 350: ......


