8. Peripherals and Options
- 248 -
8
Ɣ
Use of CANlink bus
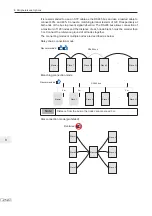
The CANlink bus topology is shown as follows:
&$1+ &$1/
Set J2 to match
terminal resistor
&*1'
&$1/
&$1+
&$1/
CANlink bus
&20
MD290
MD38CAN1
terminal
resistor
&$1+ &$1/ &*1'
MD290
MD38CAN1
&$1+
MD290
MD38CAN1
120
¡
terminal
resistor
120
¡
Set J2 to match
terminal resistor
&*1'
-
It is recommended to use an STP cable as the CAN bus and use a twisted cable to
FRQQHFW&$1+DQG&$1/&RQQHFWDPDWFKLQJWHUPLQDOUHVLVWRURIȍUHVSHFWLYHO\
DWERWKHQGVRIWKHEXVWRSUHYHQWVLJQDOUHÀHFWLRQ7KH&$1EXVDOORZVFRQQHFWLRQRI
a maximum of 64 nodes and the distance of each node branch must be smaller than
0.3 m. Connect the reference ground of all nodes together.
CANH
CANL
COM
Run the twisted cable and cable
connected to COM closely.
CANH
CANL
COM
Connect the shield to COM
CANH
CANL
COM
Twist the other unused cables into
one rope and connect it to COM.
CANH
CANL
COM
Twist the other unused cables into
one rope and connect it to COM.
Connect the shield to PE.
1. Self-prepared single-core cable
2. Twin-core STP cable
3. Multi-core twisted pair cable (non-shielded)
4. Multi-core STP cable
Ɣ
CANlink Transmission Distance
The transmission distance of the CANlink bus is directly related to the baud rate and
communication cable. The relationship between the maximum transmission distance
of the CANlink bus and the baud rate is shown in the following table.
No.
Max. Transmission Distance
Baud Rate
Number of Nodes
Cable Diameter
1
25 m
1 Mbps
64
0.205 mm
2
2
95 m
500 kbps
64
0.34 mm
2
3
560 m
100 kbps
64
0. 5 mm
2
4
1100 m
50 kbps
64
0.75 mm
2
Содержание MD290 Series
Страница 1: ......
Страница 79: ...3 Electrical Installation 78 3 ...
Страница 80: ...4 Operating Panel Keypad Display 4 1 Introduction 80 4 2 Inbuilt LED Operating Panel 80 ...
Страница 92: ...5 Quick Setup 5 1 Get Familiar With Operating Panel 92 5 2 Setup Flowchart 93 ...
Страница 227: ...7 Interfaces and Communication 226 7 ...
Страница 285: ...10 Troubleshooting 284 11 ...
Страница 349: ......
Страница 350: ......


