18
i3-TRNG-CAMS-Ax45RM_65RM-UM.indd
Rev. 161107
4. Turn on your Annexxus camera.
5. Launch the CD that came with your Annexxus camera and double-click
“
AnnexxusConfigurationTool.msi
” file to install Annexxus Configuration Tool
(ACT) application. ACT application discovers all Annexxus cameras connected to
your network.
6. Follow the ACT installation instructions until the application has been successfully
installed on your SRX-Pro Server.
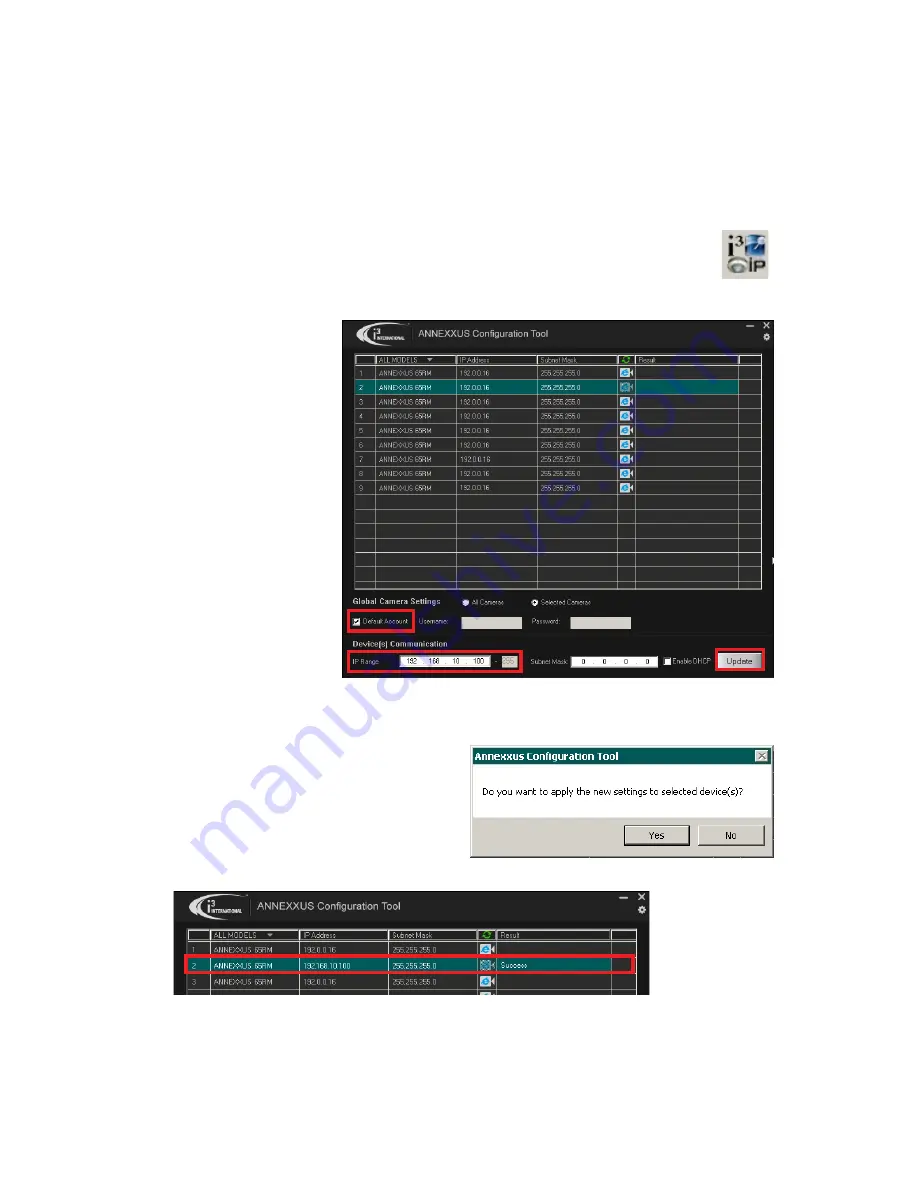
7. Double-click i3 Annexxus Configuration Tool icon on the Desktop to launch
the ACT application. Accept the ACT license agreement.
8. ANNEXXUS Configuration Tool window will display a list of active network
cameras.
9. Select the desired
Annexxus camera in
the list (left-click).
10. In the
Device(s)
Communication
area, enter the new
IP Range (address)
and Subnet Mask of
the camera. The new
camera IP address
must match the IP
range of your SRX-Pro
LAN or NIC1 card
(see Step 2).
E.g. If your SRX-Pro
Server’s IP address is
192.138.10.122, change your Annexxus camera’s IP address to 192.138.10.XXX.
Remember: Annexxus Cameras cannot share an IP address, each camera requires
its own unique IP address.
11. Make sure the
Default Account
checkbox is checked off.
12. Click
Update
. Then click
Yes
in the
confirmation window.
13. Wait a few moments for a successful confirmation message.
14. Repeat Steps 9-13 for all detected Annexxus cameras in the ACT application OR
Select multiple cameras (Ctrl + left-click) and enter IP range to assign IP addresses
sequentially to the selected cameras.


