24
ADH-Series | Version 1.02
Operation
Never remove safety devices, covers or limit switches
before operation.
After assembly and adjustments are complete, the pla-
ner-thicknesser can be tested.
Step 1: Turn on the power supply on the main control
panel.
Step 2: Press the start button.
Step 3: If there is a problem, press the stop button.
The the planer-thicknesser should run smoothly with
little or no vibration or friction.
Examine and correct the source of any interference be-
fore further use:
Step 1: DO NOT attempt to inspect or adjust the planer-
thicknesser for sources of interference during
operation.
Step 2: Wait until the planer is switched off and all wor-
king parts are at a complete standstill.
Step 3: Disconnect the power plug.
Step 4: Correct the fault.
8.4 Changing mode of operation
8.5 Thicknesser operations
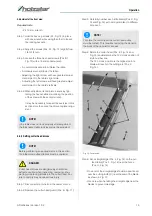
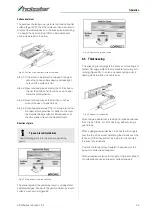
Correct operating position
The operator must be positioned offset to the infeed ta-
ble (see Fig. 19).
Fig. 19: Correct operating position
Step 1: At the start of the cut, the left hand holds the work-
piece firmly against the infeed table and fence
while the right hand pushes the workpiece in a
smooth, even motion toward the cutter head.
Step 2: After the cut is under way, the new surface rests
firmly on the outfeed table. The left hand is
transferred to the outfeed side (Figure 19) and
presses down on this part of the workpiece, at
the same time maintaining flat contact with the
fence. The right hand presses the workpiece for-
ward and before the right hand reaches the cut-
ter head it should be moved to the work on the
outfeed table.
ATTENTION!
When changing the operating mode (planer to thick-
nesser and back) the machine must be turned off
and at a complete standstill.
ATTENTION!
- Observe general safety instructions.
- Observe the direction of rotation of the machine.
- Cover the cutter head with the blade guard (when
machining a workpiece, push it on only as far as
necessary).
- Only machine short or small workpieces with a tool,
e.g. a guide rod.
- Check workpieces for foreign bodies and defects,
e.g. nails, adhesions, cracks, metal objects or other
foreign bodies.
- In the case of conical surfaces, first work with a
small infeed.
- If the machine comes to a sudden standstill, e.g.
power failure, belt breakage or similar, stop work
immediately.
Содержание 5904026
Страница 36: ...36 ADH Series Version 1 02 Spare parts Spare parts drawing 2 Fig 27 Spare parts drawing 2 ADH 26 C ...
Страница 37: ...Spare parts ADH Series Version 1 02 37 Spare parts drawing 3 Fig 28 Spare parts drawing 3 ADH 26 C ...
Страница 38: ...38 ADH Series Version 1 02 Spare parts Spare parts drawing 4 Fig 29 Spare parts drawing 4 ADH 26 C ...
Страница 39: ...Spare parts ADH Series Version 1 02 39 Spare parts drawing 5 Fig 30 Spare parts drawing 5 ADH 26 C ...
Страница 40: ...40 ADH Series Version 1 02 Spare parts Spare parts drawing 6 Fig 31 Spare parts drawing 6 ADH 26 C ...
Страница 41: ...Spare parts ADH Series Version 1 02 41 Spare parts drawing 7 Fig 32 Spare parts drawing 7 ADH 26 C ...
Страница 43: ...Spare parts ADH Series Version 1 02 43 Spare parts drawing 2 Fig 34 Spare parts drawing 2 ADH 31 C ...
Страница 44: ...44 ADH Series Version 1 02 Spare parts Spare parts drawing 3 Fig 35 Spare parts drawing 3 ADH 31 C ...
Страница 45: ...Spare parts ADH Series Version 1 02 45 Spare parts drawing 4 Fig 36 Spare parts drawing 4 ADH 31 C ...
Страница 46: ...46 ADH Series Version 1 02 Spare parts Spare parts drawing 5 Fig 37 Spare parts drawing 5 ADH 31 C ...
Страница 47: ...Spare parts ADH Series Version 1 02 47 Spare parts drawing 6 Fig 38 Spare parts drawing 6 ADH 31 C ...
Страница 49: ...Spare parts ADH Series Version 1 02 49 Spare parts drawing 2 Fig 40 Spare parts drawing 2 ADH 41 C ...
Страница 50: ...50 ADH Series Version 1 02 Spare parts Spare parts drawing 3 Fig 41 Spare parts drawing 3 ADH 41 C ...
Страница 51: ...Spare parts ADH Series Version 1 02 51 Spare parts drawing 4 Fig 42 Spare parts drawing 4 ADH 41 C ...
Страница 52: ...52 ADH Series Version 1 02 Spare parts Spare parts drawing 5 Fig 43 Spare parts drawing 5 ADH 41 C ...
Страница 53: ...Spare parts ADH Series Version 1 02 53 Spare parts drawing 6 Fig 44 Spare parts drawing 6 ADH 41 C ...
Страница 54: ...54 ADH Series Version 1 02 Spare parts Spare parts drawing 7 Fig 45 Spare parts drawing 7 ADH 41 C ...
Страница 57: ...Notes ADH Series Version 1 02 57 15 Notes ...
Страница 58: ...www holzstar de ...

