background image

66

Operation

3.4  Water Blasting System Startup

The Procedure to shift the truck and skid from 

transport mode to work mode and activate the 

water blasting systems is the same for trucks with 

a manual or automatic transmission. 

Make sure the truck is maneuvered into position 

and aligned at the starting point of the removal 

job before configuring the truck for work mode.

Truck startup and configuring the Hog Arm, 

Hog  Head  and  vacuum  separator  for  work 

mode:

1.  Be sure the truck transmission is in NEUTRAL 

and the park brake is set. 

2.  Turn the skid main circuit breaker ON.
3.  Remove the lock pin in the Hog Arm slide track 

and pull the arm and slide assembly OUT to 

the full out/work position.  

4. 

Align the hole in the fitting on the track with 

the hole in the frame boss and insert the lock 

pin to secure the arm and slide assembly in 

work position.  

5.  Make sure all switches and speed dials are in 

the OFF position or set at 0.

6.  Start truck engine and allow the engine to run 

at idle speed.

OPERATE 

MODE

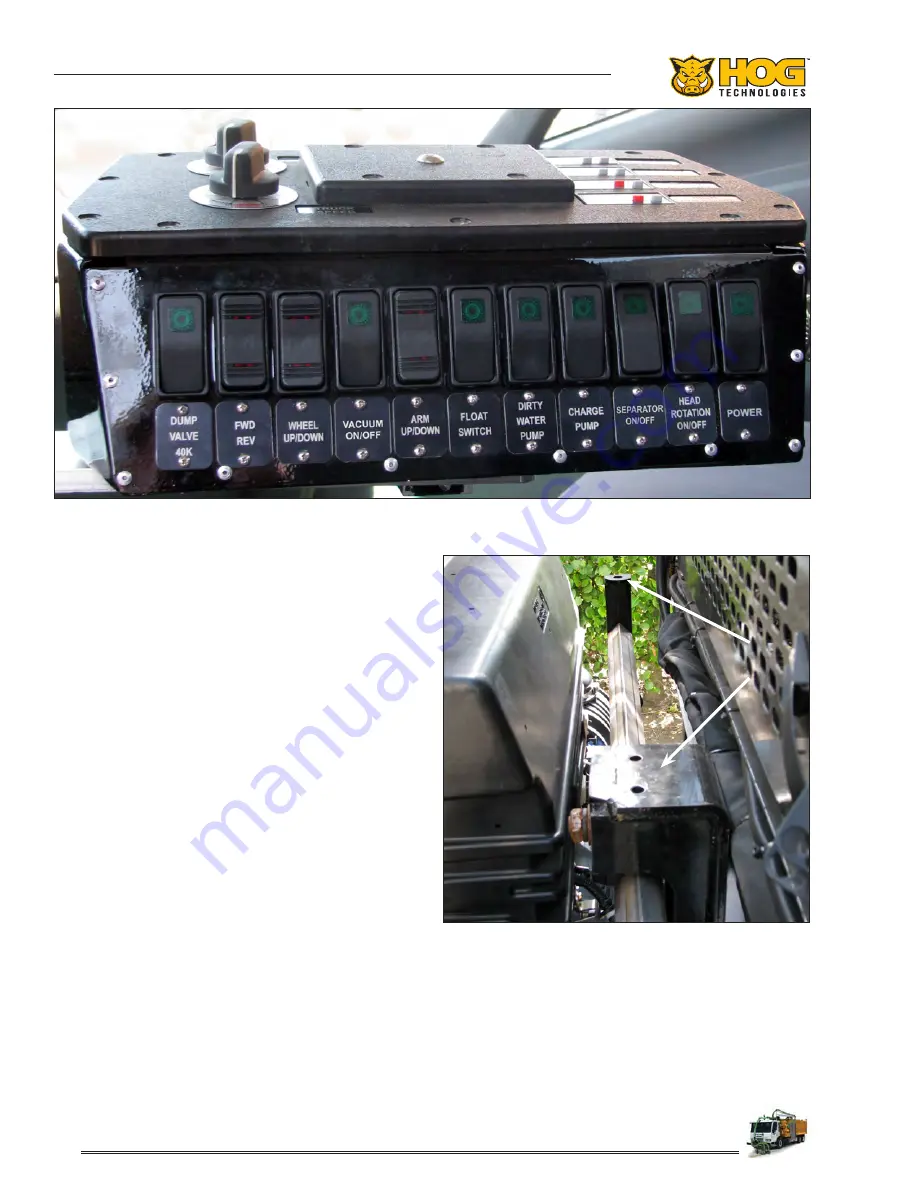
Console Switch Panel

Track Fitting & Frame Boss Safety Pin Holes

7.  Turn the truck PTO switch ON to activate the 

hydraulic system. Verify the red LED light in 

the PTO switch panel is lit.

8.  Activate the POWER switch on the console 

switch panel. Verify the Green LED light in the 

switch is lit.

Содержание Stripe Hog SK2000

Страница 1: ...SE Slater Street Stuart FL 34997 1 877 HOG ROAD 001 772 223 7393 WWW STRIPEHOGSUPPORT COM SK2000 Stripe Hog Integrated Model Operation Manual...

Страница 2: ...2...

Страница 3: ...36 2 7 High Pressure Hoses Connections Fittings 43 2 8 Debris Recovery System 45 2 9 Remote Blasting Tool Connection 53 2 10 Electrical System 54 2 11 Hydraulic System Truck PTO 59 2 12 Hydrostatic Dr...

Страница 4: ...ump Scheduled Maintenance 101 5 6 Checking UHP Pump Oil Level Changing Crankcase Oil 103 5 7 High Pressure Pump UNI VALVE Service 106 5 8 High Pressure Pump Stuffing Box Packing Replacement 110 5 9 Ul...

Страница 5: ...Pre Op Checklist 150 Appendix 4 Nozzle Spray Bar Configuration Nozzle Configuration Chart 151 Spray BAR Configuration Charts 152 Nozzle Calculation Sheet 157 Appendix 5 Glossary of Terms Water Blastin...

Страница 6: ...6 NOTES...

Страница 7: ...designed to be used by operators trained by Hog Technologies During the training experience your team will be given the basic knowledge and skills necessary to maintain operate troubleshoot and repai...

Страница 8: ...not be liable for damage abnormal wear or consequential damage to their sys tem components resulting from the use of replacement components that are not furnished by Hog Technologies Hog Technologies...

Страница 9: ...Y OR PRODUCT AND PROPERTY DAMAGE WARNING HAZARDS OR UNSAFE PRACTICES WHICH COULD RESULT IN SEVERE PERSONAL INJURY OR DEATH DANGER Indicates a hazardous situation which if not avoided will result in de...

Страница 10: ...operation installation and maintenance of this equipment and provided with adequate supervision Before attempting to connect operate or repair this equipment thoroughly read these instructions and an...

Страница 11: ...y is first Only set up to work in areas properly protected from traffic and other hazards Individuals being struck by vehicles or mobile equipment lead to many work zone fatali ties or injuries Work z...

Страница 12: ...ior to use Do not use any item that is in questionable condition Use only components which are marked with the recommended operating pressure Never exceed the operating pressure of the weakest compone...

Страница 13: ...before making any required repairs or adjustments CAUTION TO AVOID POSSIBLE INJURY AND DAMAGE TO EQUIPMENT Use only thoroughly trained personnel to perform maintenance or repairs ALWAYS test all comp...

Страница 14: ...s clogged immediately disen gage pump Remove any clogged nozzles and replace with new nozzles Any particles of the smallest size will clog nozzles Clogged nozzles can create excessive pressure in pump...

Страница 15: ...tressed or stretched Check Dump Valve Water Hose Any hose used for returning dumped water back to the pump or vacuum line must have a large enough diameter and psi strength so that poten tially danger...

Страница 16: ...should include stabilization and a thorough neurovascular examination X rays can be used to asses subcutaneous air and foreign distant from the site of the injury Injuries to extremities can involve...

Страница 17: ...of the optional HT1000 Ground Hog when the job requires the extended reach and or additional maneuverability The operation and maintenance requirements for the truck engine drive train and chassis com...

Страница 18: ...k The fuel tank should filled at the start of each shift The auxiliary engine DC electrical system is equipped with an onboard battery circuit protec tion and charging system It is totally isolated fr...

Страница 19: ...the charge water pump A site tube pro vides a quick view of the water level from outside the truck during filling operations An expandable bladder inside the freshwater tank provides a reservoir for...

Страница 20: ...4 valve on the driver side provides drainage for the wastewater bladder A large man way hatch on the top of the tank provides access to the interior of the tank or wastewater bladder for inspection o...

Страница 21: ...ater pump is engaged while this valve is closed or there is no water in the clean water tank you will not be able to achieve required UHP charge pressure and the charge pump impeller or UHP pump will...

Страница 22: ...efore water blasting opera tions resume Notice The UHP pump can cavitate if the charge water pressure drops below 25 PSI 1 7 Bar Cavitation can cause severe damage to the UHP pump and should never be...

Страница 23: ...ughly flush the filter canisters and charge water system when the filters are changed and before activating the Ultra High Pressure sys tem A purge valve located on the low pressure charge water side...

Страница 24: ...immediately shutdown the water blasting system if the charge water pressure drops below 30 psi 2 1 BAR to protect the charge water pump from running dry and protect the UHP pump from damage due to ove...

Страница 25: ...ra High Pressure pump is controlled by pump RPM plunger diameter length of stroke and num ber of plungers Once the Ultra High Pressure pump is engaged it continually displaces water provided by the ch...

Страница 26: ...ge water pump is turned off or fails the UHP pump must be shutdown immediately by press ing the EMERGENCY STOP button on the auxiliary engine control panel in the cab When setting pressure ALWAYS ensu...

Страница 27: ...usually high spikes in pressure Rupture discs are designed to burst and imme diately relieve pressure if the water pressure in the Ultra High Pressure system exceeds the disc burst rating The rupture...

Страница 28: ...ing valve on each line controls the flow of water to the stuffing box The flow of water to the stuffing boxes should be checked at the beginning of each shift and periodically during operation This sh...

Страница 29: ...mp box and other internal components are accessed by removing the sump box lid It is im portant to periodically remove the lid to inspect the switch and clean out accumulated debris that can restrict...

Страница 30: ...c motor that rotates the spray bar in the blasting head The truck must be running with the PTO engaged before the hydraulic system will operate Refer to the Startup procedure in the Operation section...

Страница 31: ...rm cannot be raised up or down while in float mode WARNING ACTIVATING FLOAT MODE WHEN THE Blasting head IS OFF THE GROUND OR WITH ARM IN THE UPRIGHT POSITION WILL RELEASE HYDRAULIC PRESSURE AND CAUSE...

Страница 32: ...e pavement In the work position the arm and blasting head are in full view of the operator Refer to the Operation section for additional in structions on operating the Hog Arm slide track system CAUTI...

Страница 33: ...ered and the blasting head articulation hinge pin before the blasting head can be com pletely lowered to the pavement Notice The hydraulic system must be engaged and the Hog Arm raised to relieve the...

Страница 34: ...figurations to accommodate differ ent water blasting operations Special brackets with jam bolts and nuts secure the spray heads and other tubular head plate components in the desired position The spra...

Страница 35: ...each shift and the wheel castors should be inspected for damage and ex cessive wear daily The castors and wheels should be greased daily for maximum life expectancy Refer to the Operation and Maintena...

Страница 36: ...el nut must 1 Swivel Nut 2 Swivel Seal Weep Hole 3 Thru shaft Cover 4 Grease Fitting 5 Speed Sensor 6 Brass Backup Ring 7 Swivel Seal 1 3 4 5 2 6 7 Thru shaft Motor Components Swivel Seal Brass Backup...

Страница 37: ...ess steel and available in various sizes ranging from six inches to thirty six inches Aggressive and non aggressive spray patterns are available for all heads Spray bar selection is determined by requ...

Страница 38: ...and or nozzle con figuration for your project at 877 HOG ROAD Refer to the Maintenance section of this manual for instructions to install or replace spray bars and nozzles NOTICE AFTER INSTALLATION O...

Страница 39: ...when the operator notices a loss in pres sure or a change in performance while blasting If visual inspection of the nozzle spray pattern indicates that the pattern is not in the 1 4 quality range as...

Страница 40: ...edure in the Maintenance section of this manual for detailed instructions for replacing nozzles Nozzles typically last 12 16 hours of blast time however you can experience shorter or longer nozzle lif...

Страница 41: ...comes more experienced nozzle selection becomes easier You can also contact Hog Technologies Customer Support toll free at 877 HOG ROAD for assistance in select ing the proper spray bar and nozzle con...

Страница 42: ...ows is compressed enough to ensure the seal is always making light contact with the pavement When the boot is installed properly the flexible bellows provide automatic adjustment as the seal wears Ref...

Страница 43: ...e freely The swivel seal has a life expectancy of approximately 12 to 16 hours depending on the quality of water All high pressure hoses fittings and connections have weep holes Water leaking from a w...

Страница 44: ...e has been kinked or subjected to a radius tighter than its minimum bend radius D Hose has been crushed or stretched When replacing or connecting fittings or hoses always inspect the threads and use a...

Страница 45: ...road construction sites debris recovery is required to remove excess water and debris from the road surface to expedite the repainting process Paint crews are generally on location to apply new line...

Страница 46: ...o the maintenance matrix in the maintenance section of this manual Vacuum Hoses Flexible easy to change hoses equipped with quick connect cam lock fittings provide airflow for the debris recovery syst...

Страница 47: ...the bearings daily or using grease other than the grease specified by Hog Technologies and the blower manufacturer will void the warranty Blower airflow is expelled through a silencer con nected to th...

Страница 48: ...draulic motor activated by the SEPARATOR switch in the control panel The rubber wiper blades provide an nearly air tight vacuum seal for the system and continuously transfer recovered debris and water...

Страница 49: ...ating Always make sure the system is completely shutdown by reducing engine speed to idle and TURNING OFF the VACUUM AND SEPARATOR SWITCHES before OPENING THE SEPARATOR The vacuum filter is a pleated...

Страница 50: ...rectly by gravity through ball valves and fittings on each side of the sump The filter bag is biodegradable and designed to slide out of the tank with the debris during dump ing When installing a new...

Страница 51: ...water from the sump to the wastewater bladder The automatic float switch is mounted on the side of the sump When wastewater in the sump reaches a predetermined level the float switch will activate th...

Страница 52: ...nk lift the passenger side causing the tank to tilt for easy dumping The tank is designed with enough ground clearance to empty into most industrial dumpsters The hydraulic rams are controlled by the...

Страница 53: ...cuum Control Harness Connection An electrical harness that runs from the outlet plug on the skid to a plug on the tool connects the control switch levers on the tool with the water blasting control sy...

Страница 54: ...ed with onboard circuit breakers and or fuses that protect the controller ECM charging circuit and other engine electrical components Refer to the auxiliary en gine operation manual for more informati...

Страница 55: ...lown fuse with a fuse of a different color or higher am perage in an attempt to correct a circuit that is causing the fuse to blow Using a higher amperage fuse can cause the circuit to overheat which...

Страница 56: ...rator drum is rotating CHARGE PUMP Activates the solenoid valve that supplies pres surized hydraulic fluid to power the charge water pump A green LED light in the switch indicates the charge pump is a...

Страница 57: ...ximum speed Rotat ing the dial clockwise increases speed Rotating it counterclockwise reduces speed Setting the Head Rotation dial to 0 will stop the rotation of the spray bar TRUCK SPEED The Truck Sp...

Страница 58: ...trol harness plugs into the grey junction box located near the TANK SEPA RATOR switch on the driver side of the skid The remote control switches perform different func tions depending on the mode sele...

Страница 59: ...ydraulic Circuit and Pump The truck powered hydraulic pump is mounted to the truck transmission When activated by the PTO switch in the cab it provides high pressure fluid to the hydraulic powered wat...

Страница 60: ...nts in the water blasting hydraulic system The solenoid valves are a cartridge type design that are easily replaced in the event of a failure Labeled pressure gauges near the manifold moni tor system...

Страница 61: ...each routine service inter val Remember that the hydraulic system can be severely damaged if it runs low on fluid Protect the hoses from contact with sharp objects or kinks Never operate the hydraulic...

Страница 62: ...VE WHEEL Hydrostatic Drive On Steep Grades The hydrostatic drive is designed to move the vehicle uphill on a maximum grade of 10 or less depending on pavement conditions and other factors If an uphill...

Страница 63: ...on The inspection should be conducted in an orderly and consistent fashion to ensure all critical points are inspected each time Do not operate the unit until all questionable components are repaired...

Страница 64: ...s and Hog Head thru shaft bearings are greased with the specified lubricants 15 Check all controls switches and lights for proper operation 16 Make sure the Mobile Spare Parts and Tool Systems are com...

Страница 65: ...release the cam locks and disconnect the fill hose from the fitting 8 Remove the fill hose from the water source and drain the hose 9 Store the hose in a clean safe location CAUTION Operators must al...

Страница 66: ...id main circuit breaker ON 3 Remove the lock pin in the Hog Arm slide track and pull the arm and slide assembly OUT to the full out work position 4 Align the hole in the fitting on the track with the...

Страница 67: ...safety pin 12 Remove the Hog Arm safety pin and slowly lower the arm until it is horizontal 13 Lift the forward Hog Head caster wheel support slightly to take the load off the articulation hinge safe...

Страница 68: ...pump and validate pressure 35 70 psi 2 4 4 8 BAR 5 Start the auxiliary engine CAUTION THE UHP PUMP IS DIRECTLY DRIVEN BY THE AUXILIARY ENGINEAND WILL BE DAMAGED IF THEAUXILIARY ENGINE IS STARTED WITH...

Страница 69: ...ng Blasting Pressure Verifying UHP System Operation Maximum blasting pressure 40 000 psi 2758 BAR is typically achieved with the auxiliary en gine operating at 2350 RPM If a different blast ing pressu...

Страница 70: ...M for the desired pressure for reference 12 With the pressure set and the spray bar and nozzles working properly turn the DUMP VALVE 40K switch OFF so no pressure is sup plied to the blasting head 13...

Страница 71: ...desirable in some operations 3 7 Water Blasting Operations Overview Before you start the job you should evaluate the pavement and the material to be removed Choose the appropriate spray bar and nozzle...

Страница 72: ...ement Typically a blast pressure between 32 000 and 38 000 psi is used Check and clean the vacuum filter frequently to ensure strong vacuum pressure while blasting A dirty filter and low vacuum will l...

Страница 73: ...M 4 Make sure the DUMP VALVE 40K switch is OFF to open the dump valve so no pressure is sup plied to the blast head 5 Lower the blast head to the pavement and turn the FLOAT SWITCH to the ON position...

Страница 74: ...e sump Then shutdown the pump system or close the drain valves 6 Open the drain valve for the wastewater blad der on the driver side of the skid and com pletely drain the bladder Then close the valve...

Страница 75: ...f minutes to cool internal engine components 6 Shutdown the auxiliary engine and UHP pump 7 Turn CHARGE PUMP switch OFF 8 Allow the vacuum blower to operate for a couple of minutes after shutting down...

Страница 76: ...GE TO EQUIPMENT To stop all operations immediately use the following procedure 1 Press the Emergency Stop button on the auxiliary engine control panel This will immediately shutdown the UHP pump and h...

Страница 77: ...nd make sure the truck engine speed is set to 2000 RPM with the PTO engaged 1 Shutdown UHP water by turning OFF the DUMP VALVE switch 2 Turn the HEAD ROTATION switch OFF 3 Reduce the auxiliary engine...

Страница 78: ...eze into the waste water bladder Open the wastewater bladder drain valve until antifreeze flows from the valve Then close the valve 14 Pour 5 gallons of antifreeze into the debris cage sump Activate t...

Страница 79: ...cal shift 10 Micron Filter The filter should be replaced at the start of each shift and may require replacement during the shift if poor quality water is used and low charge water pressure is indicate...

Страница 80: ...lade Loosen the bolts and re move the old blade Install the new blade and tighten the bolts Clean The Vacuum Filter The filter should be cleaned at the start of each shift and may require cleaning dur...

Страница 81: ...tems are described in this section of the manual The frequency for maintaining general maintenance items will vary depending on the quality of the clean water supply the overall condition of the water...

Страница 82: ...rsal Joints 8 Debris Cage Tilt Cylinder Bearings 3 Ball Valves 9 Debris Cage Tilt Hinges 4 Hog Arm Lift Cylinder Bearings 10 Debris Cage Door Hinges 5 Thru shaft Motor Bearings 11 Separator Tilt Cylin...

Страница 83: ...ION 1 Vacuum Separator Lid Latches Hinge 4 Ball Valves 2 Vacuum Separator Tilt Cylinder Bearings 5 Hydro Static Drive Wheel Lift Cylinder Bearings 3 Kunkle Valve 6 Silencer Exhaust Flapper Hinges Stri...

Страница 84: ...dard factory setting Clearance for obstacles The standoff should always be set high enough to provide enough clearance for the shroud and spray bar to clear obstacles permanently attached in the pave...

Страница 85: ...level 7 Cross check the measurement by placing the straight edge across the other wheels Read just the castor wheels as required to level the blast head 8 Install the spray bar protector and gasket 9...

Страница 86: ...r blasting system is shut down and the truck is in the service posi tion 2 Close the clean water supply valve and bleed pressure from the charge water system 3 Remove filter canister lid and retainer...

Страница 87: ...remove debris and con taminants with clean fresh water 5 Apply a thin coat of anti sieze to the filter retainer bolt threads 6 Insert the new filter and retainer bolt into the filter canister Hand ti...

Страница 88: ...The truck engine must be at idle 2 Open the clean water supply valve and turn the POWER and CHARGE PUMP switches ON to activate the charge water pump 3 While the charge pump is running open the discha...

Страница 89: ...Deactivate the hydraulic system and place the truck in the service position 3 Loosen the wear boot clamp on the blast head 4 Work the existing boot off the blasting head shroud 5 Slide the new boot on...

Страница 90: ...rning it counterclockwise 10 Remove the felt seal Then clean the dirt shield and shroud 11 Place a new felt seal on the dirt shield and apply a light coating of anti sieze to the thru shaft threads 12...

Страница 91: ...pattern in dicates that the pattern is not in the 1 4 quality range as indicated on the Nozzle Quality Guide the nozzle must be replaced Typical Spray Bar With Protector Installed Spray Bar Protector...

Страница 92: ...by following the steps in the Start Up Procedure 13 With the truck and auxiliary engine at idle set the Head Rotation speed dial to 0 14 Make sure all personnel are well clear of the blasting head the...

Страница 93: ...and the other to turn the rupture disc cap to remove the rupture disc cap as sembly from the base 3 Remove the hold down ring from the base Item 4 in drawing below and set it in a clean safe location...

Страница 94: ...to replace the seal 1 Lower the Hog Arm and blasting head to the pavement 1 Make sure the water blasting system is shut down and the truck is in the service position 2 Loosen the swivel nut on the top...

Страница 95: ...icone grease on the O ring for the swivel seal and on the swivel tit This provides lubrication for the seal and swivel tit at startup when the swivel seal connection and thru shaft are dry 9 Install t...

Страница 96: ...position 2 Release the clamps and swing the separator lid open 3 Remove the wing nut that secures the vacuum filter to the lid and remove the filter 4 Use a detergent degreaser to cut the oil and grea...

Страница 97: ...perating conditions Units used in extremely dirty conditions high temperatures or other severe duty applications will require more frequent service CAUTION THE scheduled MAINTENANCE PROCEDURES IN THIS...

Страница 98: ...vacuum system Moni tor the operation of the drum and make sure the wiper blades are in good condition and sealing properly Inspect the drum and blades for damage and excessive wear Monthly 200 Hours...

Страница 99: ...enance Check the crankcase reduction gear oil level Check the coolant level Inspect the alternator water pump belt Make sure it is in good condition and adjusted prop erly 300 Hour Maintenance Perform...

Страница 100: ...e making sure it is not in contact with sharp edges or near a source of heat that could damage the hose Install anti chaffing or heat deflectors to pro tect the hose if necessary 7 Remove the caps and...

Страница 101: ...s valves and seals for leaks and proper operation Repair or replace leaking or malfunctioning components before operating the system Make sure cooling water is flowing to the plunger packing seals whe...

Страница 102: ...rmation Important Make sure to install the safety plug in crank case drain valve when oil draining is com plete The safety plug prevents crankcase oil from draining if the valve is accidentally opened...

Страница 103: ...fference in the oil level while the pump is operating and when it Crankcase Oil Level Pump Running Crankcase Oil Level Pump Shutdown 5 To 8 Hours is shutdown It takes 5 to 8 hours for oil in the upper...

Страница 104: ...ately on the sight gauge When the breather port at the top of sump is used oil is added to the upper sump and it can take up to several hours before the oil will drain to the main sump and the correct...

Страница 105: ...removed We recommend that the back plate fill port be used to fill the crankcase whenever possible The oil will be added directly to the main oil sump and the level will register immediately on the si...

Страница 106: ...HIGH PRESSURE valve SEALS ARE LEAKING Removing UNI VALVES 1 Make sure the water blasting system is shut down with the truck in the service position 2 Remove the valves using a 2 lb hammer and 7 8 All...

Страница 107: ...the lapping procedure Lapping a valve to the seat creates a unique suc tion valve to UNI VALVE cartridge seat seal If the valve is moved to another cartridge it must be lapped to that seat for a prope...

Страница 108: ...ees counterclockwise on the valve cartridge seat A 7 Each 180 degree clockwise 180 degree coun terclockwise movement is considered one rotation Complete 5 rotations 8 Rotate valve cartridge A 90 degre...

Страница 109: ...s perfectly smooth with a consistent color 14 Alternate grit sizes every 3 or 4 cycles until lapping is complete The final cycle should always be completed with 600 grit compound 15 Follow the same pr...

Страница 110: ...shaft end of the pump This will provide the clearance required to remove the gland nut and plunger 1 Plunger Coupling Bolts 4 Stuffing Boxes 2 Pony Rods 5 Power Frame 3 Glandnuts 2 1 4 3 1 1 2 3 3 4 4...

Страница 111: ...against the guide bushing 13 Carefully install the plunger packing and gland nut assembly into the stuffing box 14 Hand tighten the gland nut Then insert the Jetstream Tool into the gland nut and hit...

Страница 112: ...4 Make sure both water supply valves are open and all personnel are clear of all water blasting components Activate the truck and engage the PTO to activate the hydraulic system fol lowing the steps...

Страница 113: ...1 Stuffing Box Seal 12c 26465 Nipple 1 Power end component included in drawing for convenience Not included with new fluid ends 2 O Ring also included with gland nut PUMPS FLUID ENDS 40 000 PSI Fluid...

Страница 114: ...nd lubricated every 200 hours to keep it operating properly Replace components as required Dump Valve Repair Hydraulically operated 1 Remove diffuser tube 2 with cartridge 3 Remove cartridge 3 from sl...

Страница 115: ...thin areas that could allow vacuumed water or debris to get into the vacuum blower or silencer Clean secure filtration is necessary to keep your vacuum blower in good operating condition Replace if ne...

Страница 116: ...breather and overflow plugs before they are removed This will reduce the possibility of dirt and debris from enter ing the gear case when the fill plugs are removed Checking The Gear Case Oil Level 1...

Страница 117: ...e plug to specifications Refilling the gear case 1 Clean the area around the breather plug on the top of the gear case and remove the plug 2 Make sure the drain valve is closed and the safety plug is...

Страница 118: ...ck cab The life of the hoses in these areas can be ex tended by rotating the hoses 1200 every 200 hours Vacuum hoses should be inspected daily and replaced as needed Make sure the water blasting syste...

Страница 119: ...g Head back until it rests against the arm 3 Make sure the water blasting system is shut down with the truck in the service position 4 Remove the vacuum hose from the shroud 5 Remove the spray bar pro...

Страница 120: ...TOOLS TO TIGHTEN THE DIRT SHIELD If the dirt shield IS TIGHTENED more than hand tight it WILL cause the spray bar to rotate SLOWLY OR not ROTATE AT ALL 7 With the dirt shield installed tighten the shr...

Страница 121: ...enter the system and should be changed every 200 hours or more frequently if necessary Inspect the cooling fins for the oil cooler and clean as necessary The cooler is critical in maintaining acceptab...

Страница 122: ...is serviced Use the following procedure to replace the filter 1 Use a filter wrench and rotate the filter coun terclockwise to remove it 2 Lubricate the seal on the new filter with hy draulic fluid 3...

Страница 123: ...nents from freezing 35 to 40 US gallons 132 to 152 liters of premixed antifreeze at a 50 50 water antifreeze ratio is re quired to properly winterize the UHP and vacuum systems Make sure you have enou...

Страница 124: ...he pump briefly to pump out any remaining water Then close the valve 12 Remove the wastewater transfer pump strainer and run the pump briefly to drain the pump hoses Then clean and reinstall the strai...

Страница 125: ...of 50 50 antifreeze mixture into the debris cage sump Activate the wastewater transfer pump until antifreeze flows from the hose fitting in the wastewater bladder for 20 or 30 seconds Then turn OFF th...

Страница 126: ...clear water is flowing from the spray bar NOTICE If you are intending to reuse the recovered ANTIFREEZE make sure to test it and make sure the Antifreeze mixture has not become diluted to the point w...

Страница 127: ...motors are properly broken in and will provide trouble free operation there are situations where the bearing preload will need to be reset after the truck has been operating in the field for a period...

Страница 128: ...ied in your Truck Tool Kit 1 6 mm Allen Wrench Supplies Anti Seize Grease Gun and Mobile Poly Rex EM Grease Rags or Paper Towels 9396K21 O ring Supplied in Spare Parts Kit Notice Use anti seize compou...

Страница 129: ...High Pressure Hose Remove the high pressure hose from the top of the thru shaft motor by turning the hand nut at the base of the hose counterclockwise If the hand nut is too tight to turn by hand use...

Страница 130: ...the thrust housing until it is free Figure 5 Note that the O ring seal in the thrust housing cap will provide some resistance until it is clear of the thrust housing The cap will tend to pop slightly...

Страница 131: ...t the gland nut for wear damage or worn O ring inside Replace the O ring if it shows signs of wear or is damaged Check the swivel tit as sembly for wear and damage then set it in a safe clean location...

Страница 132: ...full turns Hold the thru shaft firmly with the 3 4 19 mm open end wrench and use the spanner tool to hand tighten the seal nut until it is snug Do not overtighten Do not allow the 3 4 wrench to move...

Страница 133: ...rance between each of them and the speed sensor To adjust the sensor loosen both nuts on the sensor and turn the sensor with your fingers to the correct depth then tighten both nuts Recheck the washer...

Страница 134: ...ne and shoulder on the swivel tit and install the brass compression washer While holding the thru shaft with the 3 4 19 mm open end wrench install the swivel tit gland nut and hand tighten Then use a...

Страница 135: ...d Grease the Thru Shaft Bearings Apply anti seize to the threads on the top of the thrust housing cap flush the hose with low pres sure and install the high pressure water hose Hand tighten the swivel...

Страница 136: ...rning at maximum RPM make sure all personnel are well clear of the spray head and apply full water pressure Run the thru shaft motor for another 15 minutes Figure 20 When testing is complete and with...

Страница 137: ...ING RADIAL DOUBLE SEAL LOWER HOUSING 30 1 60952 RING INTERNAL RETAINING STEEL 31 4 67048 HELICAL INSERT 3 8 16 SS 32 1 68290 PROXIMITY SWITCH METALIC 33 1 70153 001 FABRICATION WASHER COUNTER THRU SHA...

Страница 138: ...25 1 60160 SEAL 31 X 52 X 7MM 26 1 60161 SEAL 25 X 52 X 8MM 27 1 60266 001 WASHER BRASS COMPRESSION SWIVEL TIT 375in ID x 625in OD x 025in Thick Rockwell B77 28 1 60950 BEARING ANGULAR CONTACT BALL 20...

Страница 139: ...00 3 43 3 62 5 65 2 13 7 00 D C B A A B C D 1 2 3 4 5 6 7 8 8 7 6 5 4 2 1 SIZE B ENGINEERING PART NUMBER REV 20025 001C H DRAWN DG DG CHECKED DG ENG APPR WGT 20 42 LBS SCALE 1 3 SHEET 3 OF 4 DESCRIPT...

Страница 140: ...1 68290 PROXIMITY SWITCH METALIC OBJECT W MALE PLUG 3 WIRE 8MM DIA SS 1 5MM Range 33 1 70153 001 FABRICATION WASHER COUNTER THRU SHAFT HOG HEAD 34 1 70837 NUT JAM 3 4 16 SS 35 1 71155 001 WRENCH 3 4...

Страница 141: ...s or yearly ISO VG 320 Roots Oil High Temp Synthetic changed Dresser Roots Blower Pulley End Bearings Grease Fittings Daily 2 pumps Each Fitting Shell GADUS S2 U1000 2 Grease Howden Roots Vacuum Blowe...

Страница 142: ...142 NOTES...

Страница 143: ...ar case is low on oil Add oil to gear case There is an internal problem with the pump Repair the pump Hog Arm Hog Head Hog arm won t raise Float mode activated Disengage float function Hydraulics not...

Страница 144: ...Valve or valve seals worn or damaged Replace valve seal or valve Water dripping from weep hole on thru shaft motor high pressure hose connection Swivel nut is loose Hand tighten swivel nut Swivel seal...

Страница 145: ...mum operating RPM to bleed system and remove air lock Low charge water pressure Refer to low charge water pressure problems One or more UHP pump stuffing box seals are leaking Replace leaking seal or...

Страница 146: ...acuum hose plugged with debris Hit hose with dead blow hammer to breakup debris Replace hose if necessary Vacuum system relief valve sticks open Debris in relief valve is causing it to stick Clean and...

Страница 147: ...147 Appendix 2 Tools Spare Parts...

Страница 148: ...148 Tools Spare Parts...

Страница 149: ...149 Appendix 3 Daily Report Pre Op Checklist 1 877 HOG ROAD WWW STRIPEHOGSUPPORT COM 60...

Страница 150: ...mage F F Inspect Electrical Box Operational Testing General F F Truck Engine Operation F F Filling Hose And Wrench Onboard F F Auxiliary Engine Operation F F Accident Incident Decals F F All Switches...

Страница 151: ...151 Nozzle Configuration Chart Appendix 4 Nozzle Spray Bar Configuration 1 877 HOG ROAD WWW STRIPEHOGSUPPORT COM Hog Technologies SPRAY BAR NOZZLE CONFIGURATION CHARTS FOR ALL STRIPE HOG MODELS...

Страница 152: ...PPORT COM 63 09 09 11 11 09 09 11 11 6 14 Nozzle Spray Bar 4 lines Most Aggressive 4 54 GPM 36K PSI 4 8 GPM 40K PSI 13 11 P 11 11 P 11 13 6 14 Nozzle Spray Bar 4 lines Medium Aggressive 4 48 GPM 36K P...

Страница 153: ...WW STRIPEHOGSUPPORT COM 64 P 11 09 09 11 11 11 11 09 09 09 11 09 09 11 11 11 11 09 09 11 P P 09 09 09 P 13 13 09 13 13 8 Medium Aggressive Set Up 4 46 GPM 36K 4 73 GPM 40K PSI 8 Most Aggressive Set Up...

Страница 154: ...ggressive Set Up 4 48 GPM 36K PSI 4 74 GPM 40K PSI 8 10 16 Nozzle Most Aggressive Set Up 4 88 GPM 36K PSI 5 16 GPM 40K PSI 8 10 16 Nozzle Most Aggressive Set Up 4 80 GPM 36K PSI 5 10 GPM 40K PSI 11 09...

Страница 155: ...ve Set Up 4 61 GPM 36K PSI 4 88 GPM 40K PSI 14 Medium Aggressive Set Up 4 64 GPM 36K PSI 4 91 GPM 40K PSI 14 Most Aggressive Set Up 4 68 GPM 36K PSI 4 94 GPM 40K PSI P 11 11 09 09 07 09 09 09 11 11 13...

Страница 156: ...Curing Compound Removal 30K to 33K PSI 8 10 16 Nozzle Curing Compound Removal Set Up Set Up 25K 35K PSI 5 5 5 5 5 5 11 11 11 11 11 11 11 11 09 09 09 09 07 07 07 07 07 07 07 07 07 07 07 07 07 07 07 07...

Страница 157: ...157 Spray Bar Nozzle Configuration 1 877 HOG ROAD WWW STRIPEHOGSUPPORT COM 68 Nozzle Calculation Sheet...

Страница 158: ...158 NOTES...

Страница 159: ...PSI at which a component will rupture Manual Bypass Valve Located on the ultra high pressure pump and used to manually adjust pressure Cam Lock Connector Installed at the end of each vacuum hose fitt...

Страница 160: ...y the ultra high pressure pump Head Rotation Speed Dial Controls the speed of the blast heads when operating in manual mode Hg Symbol that indicates inches mercury Used to measure vacuum air flow Maxi...

Страница 161: ...ice to protect equipment from over pressurization Shroud The stainless steel circular component that protects the spray head from debris Shutoff Cartridge Component of the diverter valve that shuts of...

Страница 162: ...Ultra High Pressure Pump UHP Pump Piston type positive displacement pump that supplies ultra high water pressure to the spray bars UNI VALVE Separates the high and low pressure water in the Ultra High...

Страница 163: ...e Department stands ready to answer your questions and provide technical assistance 24 hours a day 7 days a week Customer Service can also assist you with part orders Always contact Hog Technologies C...

Страница 164: ...pe Hog please login or register 001 772 223 7393 This number that will find an available customer support representative 24 7 We are excited to take your call any hour of the day Please don t hesitate...

Страница 165: ......

Страница 166: ...Print Date 02 19 2019 Rev 0 3920 SE Commerce Ave Stuart Florida 34997 001 772 214 1714 P 001 772 223 5461 F www hogtechnologies com...

Отзывы: