


3. OPERATION
3-1
CHAPTER 3 OPERATION
3.1 Before Turning On the Power
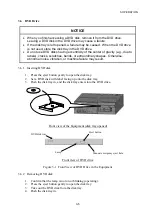
WARNING
Ensure required installation clearance around the Equipment. If the airway of
the Equipment is blocked, the internal temperature rises and the Equipment may
burn out or fail. (See Subsection 1.2.2, “Installation conditions”.)
Confirm that the input power voltage of the Equipment is within the rated range.
When an actual input voltage is found close to the upper or lower limit of the rated
range, the input power setting may be abnormal. In this case, ask the management
person in charge of power facility to inspect it.
Confirm that the airway at the air inlet (front) and the air outlet (rear) of the Equipment
is not blocked.
Confirm that the I/O cable connectors on the Equipment are not loose.
3.2 Starting Up the Equipment
The Equipment can be started up by the following operation.
1. Confirm that the power cord plug is connected to the outlet.
2. In the status above, confirm that the DRIVE/STBY (Drive Access/Standby) lamp is lit.
3. Turn on the externally-procured display unit (customer’s responsibility).
4. Press the Power switch (see Section 2.1, “External Views of Operator Access Areas”).
5. When the power-on sequence is completed, the DRIVE/STBY lamp turns off and the
STATUS lamp turns on. On HF-W2000 Model 35, the STATUS lamp turns on red
when powered and changes to green when the OS is started up and the system starts
running. On HF-W2000 Model 30, the STATUS lamp turns on green while powered.
6. After the OS is started up, set up the Equipment according to Chapter 1, “Initial Setup
of the Equipment” in
HF-W2000 Model 35/30 Setup Guide
. (This step is necessary
only once when you first start up the Equipment after purchase.)
After the above operation, the Equipment automatically performs the start-up operation up
to the logon screen display.
For details of power control over LAN, when enabled, see Section 3.7, “Power Control
over LAN”.
Содержание HF-W2000 30
Страница 1: ...WIN 62 0060 08 ...
Страница 2: ...WIN 62 0060 08 ...
Страница 21: ...This Page Intentionally Left Blank ...
Страница 29: ...This Page Intentionally Left Blank ...
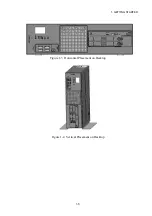
Страница 34: ...1 GETTING STARTED 1 5 Figure 1 3 Horizontal Placement on Desktop Figure 1 4 Vertical Placement on Desktop ...
Страница 125: ...This Page Intentionally Left Blank ...
Страница 165: ...7 MAINTENANCE ACTIONS 7 32 MEMO ...
Страница 189: ...9 RAID1 9 16 MEMO ...
Страница 227: ...10 SOFTWARE RAID1 10 38 MEMO ...


