FALTVERDECK
8
FV 02/16
www.hasebikes.com
Zweites Schutzblech für 16“ Rad montieren (Trix und
Lepus Comfort)
Damit Sie bei Regen trocken bleiben, sollte das vordere Schutz-
blech besonders lang und mit einem Spritzschutz ausgestattet
sein. Außerdem kollidiert die Befestigung der vorderen Beleuch-
tung mit dem Regenverdeck. Deshalb sollte das vordere Schutz-
blech mit einem zweiten ergänzt werden. Auf dem zweiten
Schutzblech ist die Lampenbefestigung weiter vorne angebracht,
so dass genügend Platz zum Anbringen des Regenverdecks vor-
handen ist.
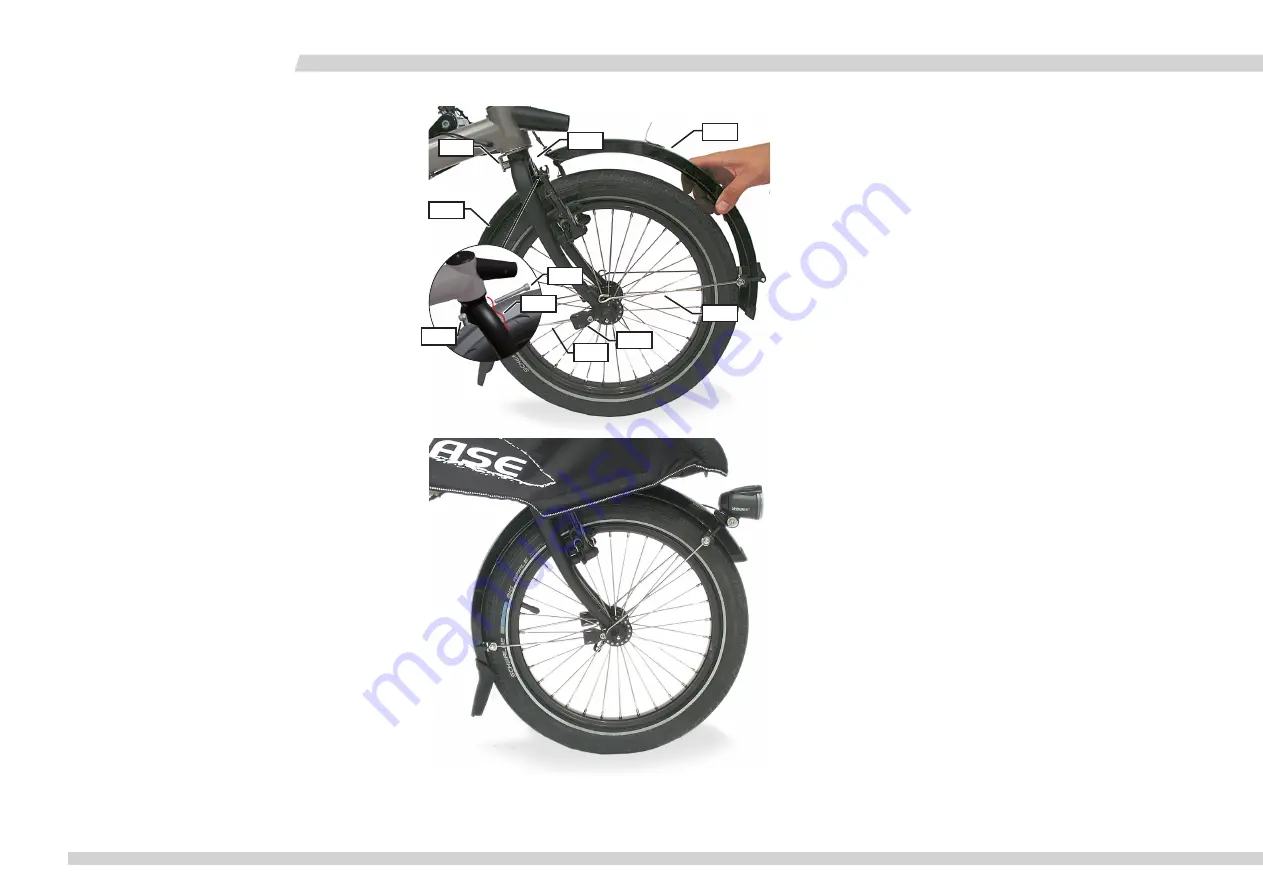
1. Schrauben Sie die Schrauben (2) des vorhandenen Schutz-
bleches mit einem Innensechskantschlüssel 4 mm vom
unteren Teil der Gabel ab.
2. Schrauben Sie die Schraube (3) von der Mutter (4) mit einem
Innensechskantschlüssel 5 mm und einem Gabelschlüssel 10
mm am oberen Teil der Gabel ab.
3. Nehmen Sie das Schutzblech (5) und auch die eventuell vor-
handene Lampenbefestigung ab.
4. Sägen Sie das vordere Teil des abgenommenen Schutzbleches
(5) an der vorderen Gabelkante (8) ab.
5. Schrauben Sie das zuvor abgesägte Schutzblech (5) zusammen
mit dem zweiten Schutzblech (6) mit der Schraube (3) und
der Mutter (4) mit einem Innensechskantschlüssel 5 mm und
einem Gabelschlüssel 10 mm an das obere Teil der Gabel.
6. Schrauben Sie die Schutzblechstreben (7) beider Schutzbleche
mit einem Innensechskantschlüssel 4 mm an das untere Teil
der Gabel fest.
Mounting a second fender for the 16” wheel (Trix and
Lepus Comfort)
In order to keep the rider dry in rainy conditions, the front fend-
er should be especially long and include a splashguard. Further-
more, the headlight mount collides with the fairing. Therefore,
a second front fender should be mounted. The headlight mount
is positioned further forward on the second fender, leaving suffi-
cient space for the fairing mount.
1. Using a 4mm Allen key, remove the bolts (2) that fasten the
existing fender to the lower part of the fork.
2. Using a 5mm Allen key and a 10mm open-end wrench,
remove the bolt (3) from the nut (4) on the top part of the
fork.
3. Remove the fender (5) and the headlight mount, if applicable.
4. Saw off the front section of the removed fender (5) at the
front edge of the mount (8).
5. Using a 5mm Allen key and a 10mm open-end wrench, fasten
the rear section of the shortened fender (5), together with
the second fender (6), to the top part of the fork with the
bolt (3) and nut (4).
6. Fasten the fender stays (7) of both fenders to the lower part
of the fork, using a 4mm Allen key.
6
3
4
5
4
7
8
2
7
Montage
/ Mounting
3


