


Section 4
♦
Operating the CMN-41
54
CMN-41 Series Installation and Operation Handbook
Copyright © 2009, Harris Corporation
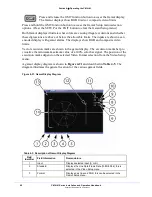
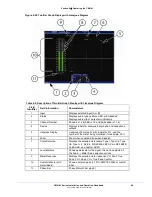
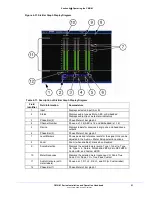
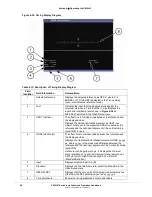
Table 4-13. Description of Sixteen Bar Graph Display Diagram
Field
Identifier
Field Information
Nomenclature
16
Phase Bar (1)
Phase Meter of bar graph 1
17
Phase Bar (2)
Phase Meter of bar graph 2
Expanding the Audio Display
Press the ZOOM button to access the audio zoom feature. The range of
the zoom is dependent on the selections made in the ZOOM CENTER
and ZOOM RANGE menu. Press and hold the ZOOM button to access
this menu.
•
Zoom Center
: Adjustable from +20 dB to –60 dB in 1 dB steps. The default is the
Reference Level setting. The zoom center adjustment is restricted by Audio Scale,
Reference Level, and Zoom Range selections.
•
Zoom Range
: Adjustable from 4 dB to 20 dB in 2 dB steps. The default is 10 dB.
The Zoom Range adjustment is restricted by Audio Scale, Reference Level, and
Zoom Center selections.
NOTE
: Zoom must be enabled to view the new adjustments.
Audio Mapping
The Audio Mapping matrix is used to assign any audio input to a meter and/or
headphone output. See page 74 for more information.
Audio Setup
Press and hold the AUD button to access the global Audio Setup menu. For more
information on the global Audio Setup menu, see page 68. For descriptions of Audio
Setup menu selection options, see page 80.
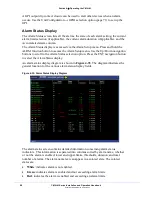
Alarm Display
Press and release the ALRM function button for the alarm display. Press
and hold the ALRM function button to access the Alarm Setup menu.
The default alarm display is the Alarm Log. For information on
individual alarms, see “Setting Alarms” on page 89.
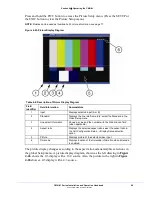
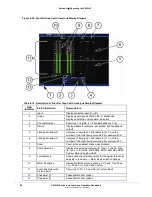
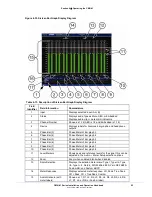
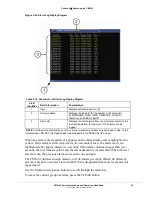
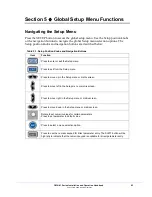
Alarm Log Display
The Alarm Log display lists all the alarms, the date, time, time code, duration, and
peak value. The alarm list begins with the most recent alarm and can hold a maximum
of 100 alarms.
NOTE
: The Alarm Log display is the default alarm display. The Alarm Status display is accessed via the
Alarm Setup menu.
An Alarm Log display diagram is shown in
Figure 4-34
and described in
Table 4-14
.
The diagram illustrates the general location for the various alarm fields.