Operation
4–5
Operator Controls and Indicators
Color Change Control
The current working recipe can be modified using the
arrow keys
and the enter key
on the
Operator Station.
Key
Function
Increase
Arrow
Press to increase the recipe value by one
increment each time the key is pressed.
Decrease
Arrow
Press to decrease the recipe value by
one increment each time the key is
pressed.
Return
Press to send the new recipe information
to the controller. The enter key also trig-
gers a color change if one of the Inte-
grated Color Change modes is selected.
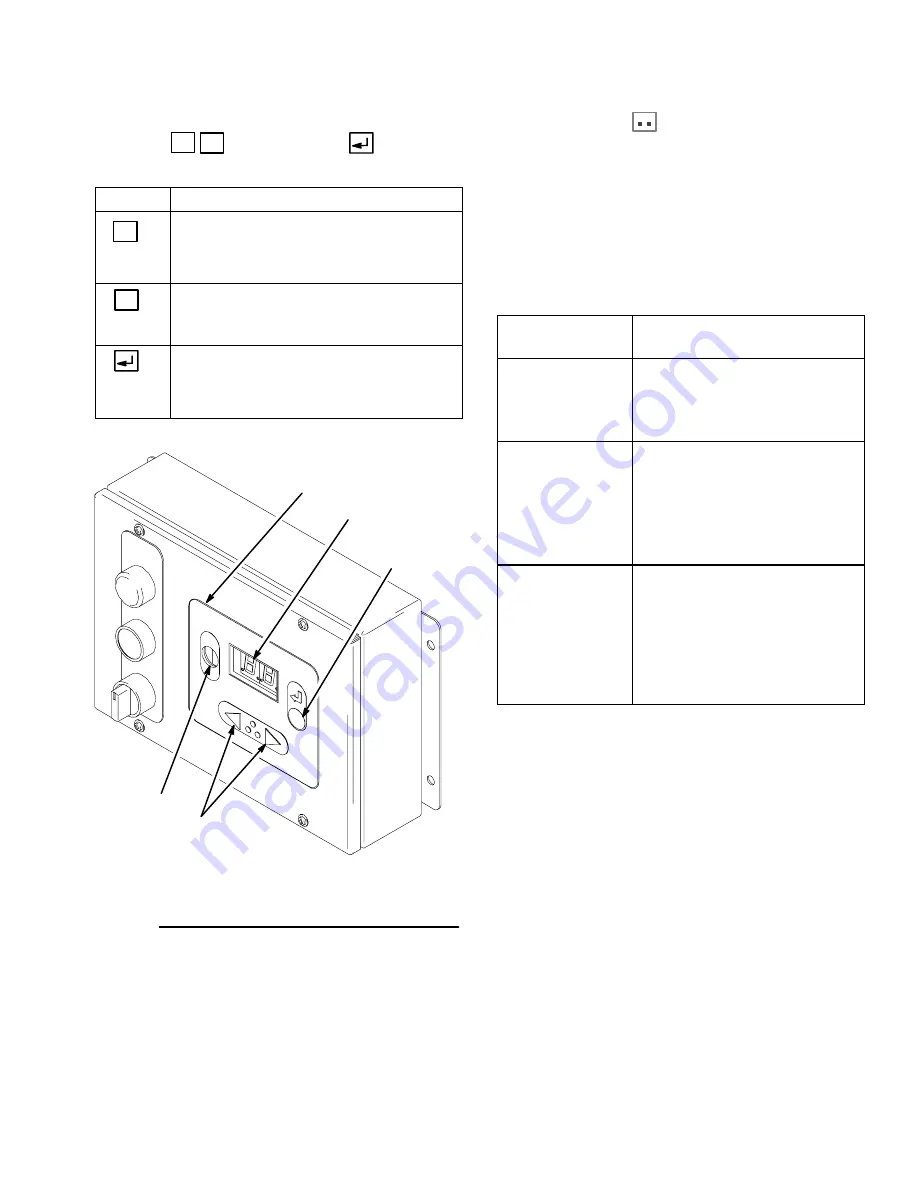
Operator Station
with Color Change Control
Fig. 4.3
Color Change Control
Display
Return
Key
Arrow
Keys
Color
Change
Active
Light
When a new recipe is selected using the arrow keys,
two blinking periods
appear on the display, indicat-
ing the new recipe information has been input, but the
enter key has not been pressed. The user has 5
seconds to press the enter key and accept the new
recipe before the display returns to the old recipe.
The function of the Color Change Control key entries is
dependent on which color change mode has been
selected; see the table below. See page 8–21 for
instructions on selecting the color change mode.
Color Change
Mode
Function of Key Entries
No Color
Change:
A new recipe may be selected
immediately by changing the
recipe value with the arrow keys
and pressing the enter key.
Integrated Color
Change On:
Selecting a new recipe with the
arrow keys and pressing the
enter key will start an integrated
color change. The green “
Color
Change Active
” light
on the
Operator Station will blink until
the color change is finished.
Integrated Color
Change On With
Queue:
Pressing the enter key will trig-
ger the next integrated color
change from the queue. The
arrow keys are not active in this
mode. The green “
Color Change
Active
” light
on the Operator
Station will blink until the color
change is finished.
Содержание PrecisionMix ii
Страница 6: ...6 ...
Страница 7: ...1 1 Warnings Warnings 1 ...
Страница 8: ...1 2 Warnings ...
Страница 11: ...Overview 2 1 Overview 2 ...
Страница 12: ...2 2 Overview ...
Страница 15: ...Overview 2 5 ...
Страница 31: ...Installation 3 1 Installation 3 ...
Страница 32: ...Installation 3 2 ...
Страница 58: ...Installation 3 28 Notes ...
Страница 63: ...Installation 3 33 Power up Checklist Fig 3 23 CP Interface Step 5 Step 6 Step 4 Step 7 Step 10 ...
Страница 67: ...Operation 4 1 Operation 4 ...
Страница 68: ...Operation 4 2 ...
Страница 83: ...Operation 4 17 Notes ...
Страница 90: ...Operation 4 24 ...
Страница 91: ...Screen Map 5 1 Screen Map 5 ...
Страница 92: ...5 2 Screen Map ...
Страница 94: ...5 4 Screen Map ...
Страница 95: ...Run Monitor 6 1 Run Monitor 6 ...
Страница 96: ...Run Monitor 6 2 ...
Страница 103: ...Totalizers 7 1 Totalizers 7 ...
Страница 104: ...Totalizers 7 2 ...
Страница 108: ...Totalizers 7 6 ...
Страница 109: ...System Configuration 8 1 System Configuration 8 ...
Страница 110: ...System Configuration 8 2 ...
Страница 138: ...System Configuration 8 30 PrecisionMix II 3K Robotic Interface Integrated Color Change TI0494 Fig 8 1 ...
Страница 142: ...System Configuration 8 34 ...
Страница 143: ...Recipe Setup 9 1 Recipe Setup 9 ...
Страница 144: ...Recipe Setup 9 2 ...
Страница 165: ...10 1 Troubleshooting Troubleshooting 10 ...
Страница 166: ...10 2 Troubleshooting ...
Страница 182: ...10 18 Troubleshooting ...
Страница 183: ...11 1 Service Service 11 ...
Страница 184: ...11 2 Service ...
Страница 192: ...11 10 Service ...
Страница 193: ...12 1 Parts Parts 12 ...
Страница 194: ...12 2 Parts ...
Страница 207: ...12 15 Parts Notes ...
Страница 228: ...12 36 Parts ...
Страница 229: ...13 1 Utilities Software Utilities Software 13 ...
Страница 230: ...13 2 Utilities Software ...
Страница 254: ...13 26 Utilities Software ...
Страница 255: ...14 1 Technical Data Technical Data 14 ...
Страница 256: ...14 2 Technical Data ...
Страница 259: ...14 5 Technical Data Notes ...


