11-6
Service
Service
Replacing the Power Supply
1.
Turn the PrecisionMix II 3K power switch (D) to off.
See Fig. 11.3.
2.
Turn off the main power to the PrecisionMix II 3K
controller.
3.
Open the controller door.
4.
Disconnect the 6 wires from the power supply.
5.
Pull down the clips (C), holding the power supply in
place. Remove the power supply from the din rail.
6.
Install the new power supply and push up the clips.
7.
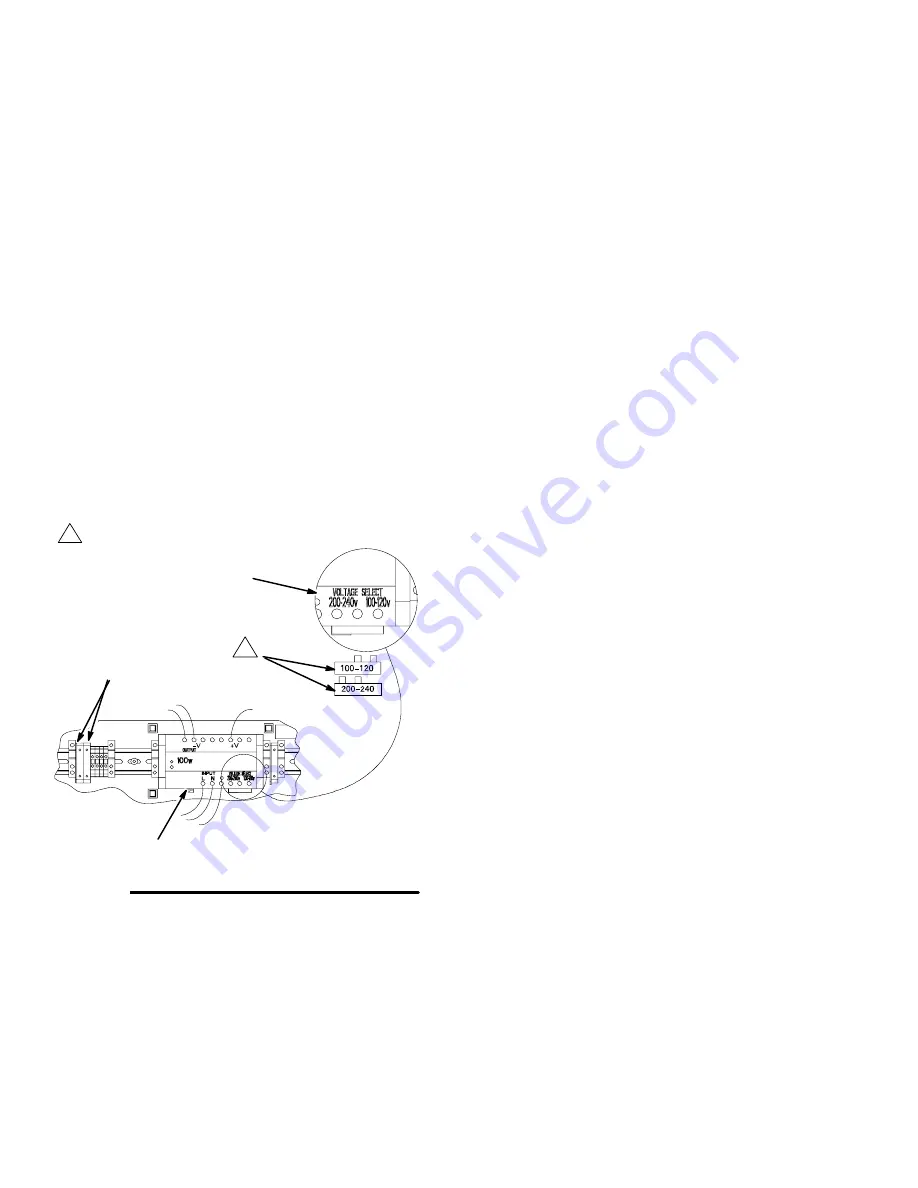
Locate the power supply jumper (J). See Fig. 11.6.
8.
Make sure the jumper (J) is installed for the correct
voltage (100–120 or 200–240 Vac). The voltage
setting is visible on the front of the jumper.
9.
Reconnect the 6 wires to the power supply.
8992A
Fig. 11.6
1
To change the power supply voltage, rotate the jumper 180
and reinsert it in the terminals.
J
1
F
C
Changing the Power Supply Voltage
To change the power supply voltage from 100–120 Vac
to 200–240 Vac or the reverse, follow this procedure.
1.
Turn the PrecisionMix II 3K power switch (D) to off.
See Fig. 11.3.
2.
Turn off the main power to the PrecisionMix II 3K
controller.
3.
Open the controller door.
4.
Loosen the terminal screws and remove the
jumper (J). See Fig. 11.6.
5.
Rotate the jumper 180
and reinsert it in the
terminals. Tighten the terminal screws.
6.
Change to the proper power supply fuses as
instructed below.
Replacing Power Supply Fuses
1.
Turn the PrecisionMix II 3K power switch (D) to off.
See Fig. 11.3.
2.
Turn off the main power to the PrecisionMix II 3K
controller.
3.
Open the controller door.
4.
Remove the two fuses from the fuse holders (F).
See Fig. 11.6. Install the two new fuses.
If the power supply is 100–120 Vac, use Part
No. 114835 4 Amp. Fuses.
If the power supply is 200–240 Vac, use Part
No. 114788 2 Amp. Fuses.
Содержание PrecisionMix ii
Страница 6: ...6 ...
Страница 7: ...1 1 Warnings Warnings 1 ...
Страница 8: ...1 2 Warnings ...
Страница 11: ...Overview 2 1 Overview 2 ...
Страница 12: ...2 2 Overview ...
Страница 15: ...Overview 2 5 ...
Страница 31: ...Installation 3 1 Installation 3 ...
Страница 32: ...Installation 3 2 ...
Страница 58: ...Installation 3 28 Notes ...
Страница 63: ...Installation 3 33 Power up Checklist Fig 3 23 CP Interface Step 5 Step 6 Step 4 Step 7 Step 10 ...
Страница 67: ...Operation 4 1 Operation 4 ...
Страница 68: ...Operation 4 2 ...
Страница 83: ...Operation 4 17 Notes ...
Страница 90: ...Operation 4 24 ...
Страница 91: ...Screen Map 5 1 Screen Map 5 ...
Страница 92: ...5 2 Screen Map ...
Страница 94: ...5 4 Screen Map ...
Страница 95: ...Run Monitor 6 1 Run Monitor 6 ...
Страница 96: ...Run Monitor 6 2 ...
Страница 103: ...Totalizers 7 1 Totalizers 7 ...
Страница 104: ...Totalizers 7 2 ...
Страница 108: ...Totalizers 7 6 ...
Страница 109: ...System Configuration 8 1 System Configuration 8 ...
Страница 110: ...System Configuration 8 2 ...
Страница 138: ...System Configuration 8 30 PrecisionMix II 3K Robotic Interface Integrated Color Change TI0494 Fig 8 1 ...
Страница 142: ...System Configuration 8 34 ...
Страница 143: ...Recipe Setup 9 1 Recipe Setup 9 ...
Страница 144: ...Recipe Setup 9 2 ...
Страница 165: ...10 1 Troubleshooting Troubleshooting 10 ...
Страница 166: ...10 2 Troubleshooting ...
Страница 182: ...10 18 Troubleshooting ...
Страница 183: ...11 1 Service Service 11 ...
Страница 184: ...11 2 Service ...
Страница 192: ...11 10 Service ...
Страница 193: ...12 1 Parts Parts 12 ...
Страница 194: ...12 2 Parts ...
Страница 207: ...12 15 Parts Notes ...
Страница 228: ...12 36 Parts ...
Страница 229: ...13 1 Utilities Software Utilities Software 13 ...
Страница 230: ...13 2 Utilities Software ...
Страница 254: ...13 26 Utilities Software ...
Страница 255: ...14 1 Technical Data Technical Data 14 ...
Страница 256: ...14 2 Technical Data ...
Страница 259: ...14 5 Technical Data Notes ...


