


Getting Started
39
2
2.1.2 Assigning an IP Address
By default, GV-Fisheye Camera that are connected to LAN without a DHCP server, are
assigned with the static IP address
192.168.0.10
. Follow the steps below to assign a new IP
address to avoid IP conflict with other GeoVision devices.
Note:
1. The computer used to set the IP address must be under the same network with the
camera.
2. If your router supports the DHCP server, the camera will obtain a dynamic IP
address from the DHCP server each time it connects to the LAN, instead of using
192.168.0.10. The default setting for automatic IP assignment is not available for
GV-FE2301 / 421 / 4301 / 521 and GV-FER521 using firmware V1.06 or earlier.
1. Open your web browser, and type the default IP address
http://192.168.0.10
2. In both Login and Password fields, type the default value
admin
. Click
Apply
.
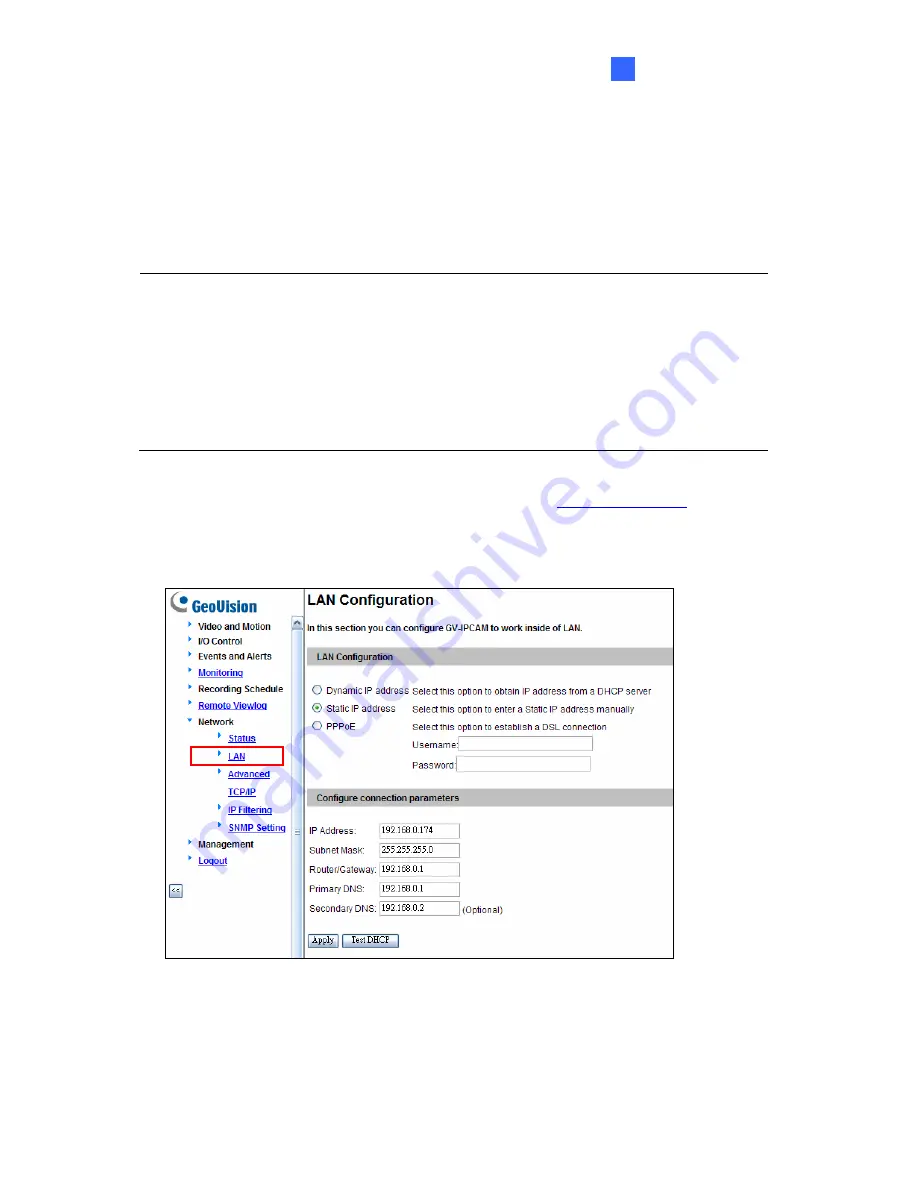
3. In the left menu, select
Network
and then
LAN
to begin the network settings.
Figure 2-4
4. Select
Static IP address
. Type IP Address, Subnet Mask, Router/Gateway, Primary DNS
and Secondary DNS
in the
Configure connection parameters
section.
5. Click
Apply
. The camera is now accessible by entering the assigned IP address on the
Web browser.
Содержание GV-Fisheye
Страница 47: ...Introduction 33 1 5 Secure the PoE converter to the ceiling with 3 self prepared screws Figure 1 30 ...
Страница 52: ...38 4 The login page appears Figure 2 3 5 Type the default ID and password admin and click Apply to login ...
Страница 71: ...Accessing the Camera 57 3 Note The I O Control function is only supported by GV FE2301 421 4301 521 ...
Страница 89: ...Administrator Mode 75 4 4 1 1 Video Settings Figure 4 2A ...
Страница 90: ...76 Figure 4 2B ...
Страница 145: ...Administrator Mode 131 4 Figure 4 38 2 ...
Страница 146: ...132 4 8 5 Tools This section allows you to execute certain system operations and view the firmware version Figure 4 39 ...


