


__________________________________________________________________________
Cirrus Perspective™ Line Maintenance Manual
Page 6-5
190-00920-00
Rev.
E
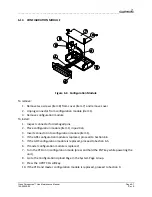
To
remove:
1.
Gain
access
to
the
desired
servo(s).
2.
Disconnect
the
servo
harness
connector.
3.
Use
a
socket
or
open
‐
wrench
to
loosen
and
remove
the
servo
attachment
bolts.
Remove
the
Pitch
‐
Trim
servo
bracket
to
access
all
the
Pitch
‐
Trim
servo
attachment
bolts.
4.
Carefully
remove
the
servo
and
place
a
protective
cover
on
the
output
gear.
5.
Place
a
protective
cover
over
the
GSM
85A
servo
mount.
WARNING
The
servo
motor
and
servo
mount
must
fit
flush
together
with
no
gaps
before
tightening
the
mounting
bolts.
Do
not
under
any
circumstances
try
to
close
the
gap
by
tightening
the
mounting
bolts
or
damage
will
occur
to
the
servo
mount
requiring
replacement.
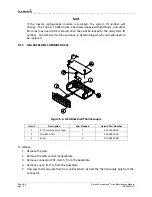
To
install:
1.
Inspect
the
output
gear
for
abnormal
wear
or
the
absence
of
grease.
If
grease
is
required,
refer
to
Section
9
and
grease
the
gear.
2.
Carefully
place
the
servo
into
the
servo
mount,
ensuring
proper
orientation
and
alignment.
3.
Fasten
the
servo
to
the
servo
mount
using
the
existing
hardware.
4.
Inspect
the
harness
connectors
and
check
that
no
pins
are
bent
or
otherwise
damaged.
Connect
the
harness
and
secure
it
appropriately.
6.12
GTA
82
PITCH
TRIM
ADAPTER
To
remove:
1.
Remove
four
screws
securing
the
GTA
82
adapter
to
the
panel.
Refer
to
aircraft
installation
drawings
for
the
exact
location
of
the
Trim
Adapter.
2.
Disconnect
servo
connector.
3.
Remove
unit.
To
install:
1.
Set
unit
in
place.
2.
Install
four
screws.
Do
not
over
‐
tighten.
3.
Connect
servo
connector.
4.
Load
software,
load
certification
gains,
and
test
the
GTA
82.


