Basic Operation
43
11
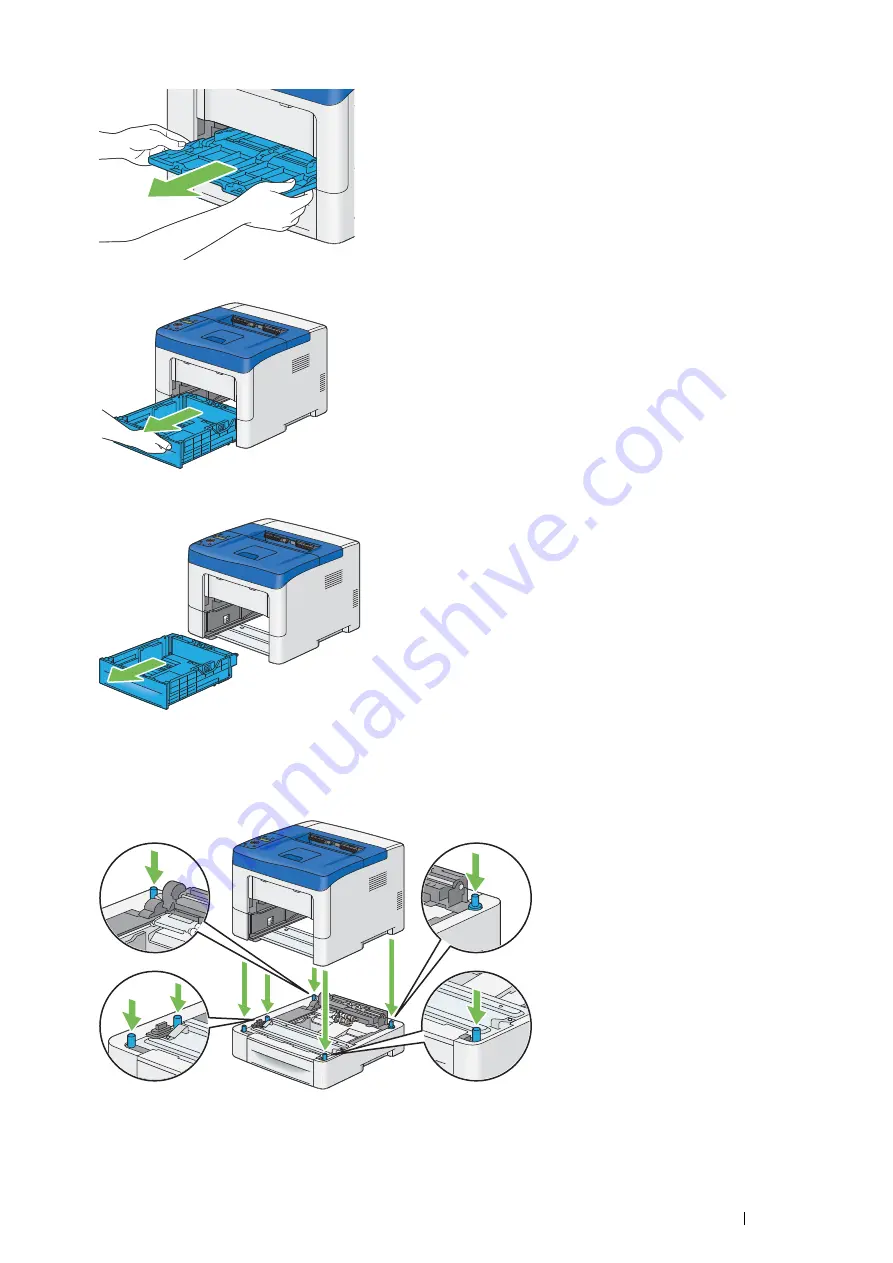
Grasp both sides of the bypass tray, and then pull the bypass tray from the printer.
12
Pull the standard 550 sheet tray out of the printer about 200 mm.
13
Hold the standard 550 sheet tray with both hands, and remove it from the printer.
14
Lift the printer and align the five guide pins of the optional 550 sheet feeder with the holes at the bottom of the
printer. Gently lower the printer onto the optional 550 sheet feeder.
IMPORTANT:
•
Be careful not to pinch your fingers when lowering the printer onto the optional 550 sheet feeder.
Содержание DocuPrint P455 D
Страница 1: ...DocuPrint P455 d User Guide ...
Страница 4: ...4 Preface ...
Страница 10: ...10 Contents ...
Страница 68: ...68 Printer Management Software ...
Страница 106: ...106 Printer Connection and Software Installation 3 Click Wireless Network Kit b g n 4 Click Start wireless settings ...
Страница 107: ...Printer Connection and Software Installation 107 5 Click Wireless Configuration 6 Select Wizard and then click Next ...
Страница 114: ...114 Printer Connection and Software Installation ...
Страница 160: ...160 Printing Basics ...
Страница 200: ...200 Using the Operator Panel Menus ...
Страница 211: ...Troubleshooting 211 10 Press down the levers on both sides of the fusing unit and then close the rear door ...
Страница 252: ...252 Maintenance 8 Insert the bypass tray into the printer push until it stops and close the cover ...
Страница 259: ...Maintenance 259 5 Grasp the handle on the top of the drum cartridge with the other hand and then pull it out completely ...
Страница 269: ...Maintenance 269 8 Pull the tab toward you and pull the nudger roll upward to remove it from the shaft ...
Страница 294: ...294 Contacting Fuji Xerox ...
Страница 301: ......
Страница 302: ...DocuPrint P455 d User Guide Fuji Xerox Co Ltd ME5893E2 1 Edition 1 June 2012 Copyright 2012 by Fuji Xerox Co Ltd ...


