Maintenance
263
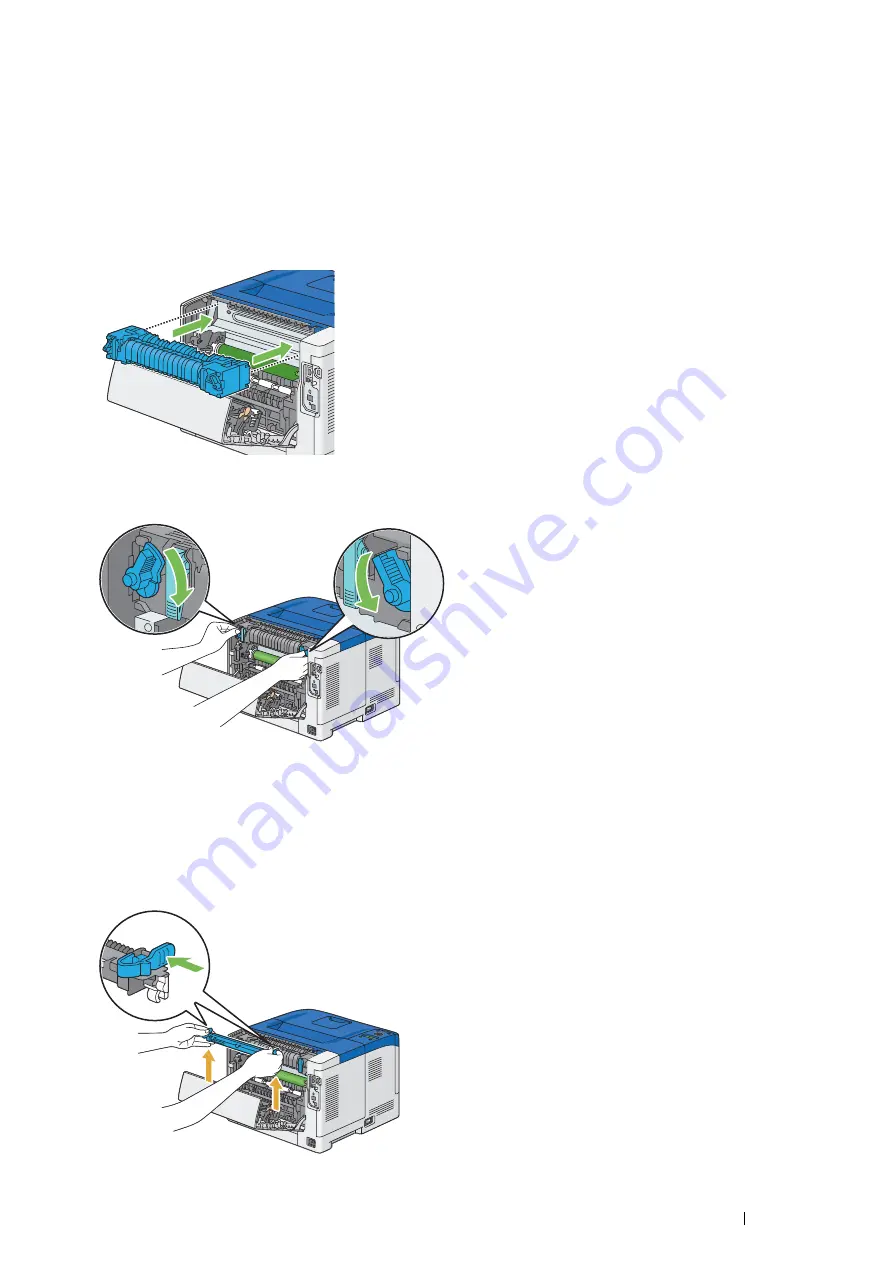
Installing a Fusing Unit
1
Unpack a new fusing unit.
2
Remove the packing material from the fusing unit.
3
Insert the fusing unit into the printer until it clicks.
NOTE:
•
Hold both sides of the fusing unit with your hands.
•
Make sure that the fusing unit is firmly set in the slots and cannot be moved easily.
4
Lower the two gray levers to lock the fusing unit.
NOTE:
•
After replacing the fusing unit, initialize its life counter. For details, see
"Resetting the Counter of the Fusing Unit" on
Removing the Transfer Unit
1
Push the tabs on both sides of the transfer unit inward, and then lift it out of the printer.
Содержание DocuPrint P455 D
Страница 1: ...DocuPrint P455 d User Guide ...
Страница 4: ...4 Preface ...
Страница 10: ...10 Contents ...
Страница 68: ...68 Printer Management Software ...
Страница 106: ...106 Printer Connection and Software Installation 3 Click Wireless Network Kit b g n 4 Click Start wireless settings ...
Страница 107: ...Printer Connection and Software Installation 107 5 Click Wireless Configuration 6 Select Wizard and then click Next ...
Страница 114: ...114 Printer Connection and Software Installation ...
Страница 160: ...160 Printing Basics ...
Страница 200: ...200 Using the Operator Panel Menus ...
Страница 211: ...Troubleshooting 211 10 Press down the levers on both sides of the fusing unit and then close the rear door ...
Страница 252: ...252 Maintenance 8 Insert the bypass tray into the printer push until it stops and close the cover ...
Страница 259: ...Maintenance 259 5 Grasp the handle on the top of the drum cartridge with the other hand and then pull it out completely ...
Страница 269: ...Maintenance 269 8 Pull the tab toward you and pull the nudger roll upward to remove it from the shaft ...
Страница 294: ...294 Contacting Fuji Xerox ...
Страница 301: ......
Страница 302: ...DocuPrint P455 d User Guide Fuji Xerox Co Ltd ME5893E2 1 Edition 1 June 2012 Copyright 2012 by Fuji Xerox Co Ltd ...


