25.3 Selection Order Batch Change
25-15
25
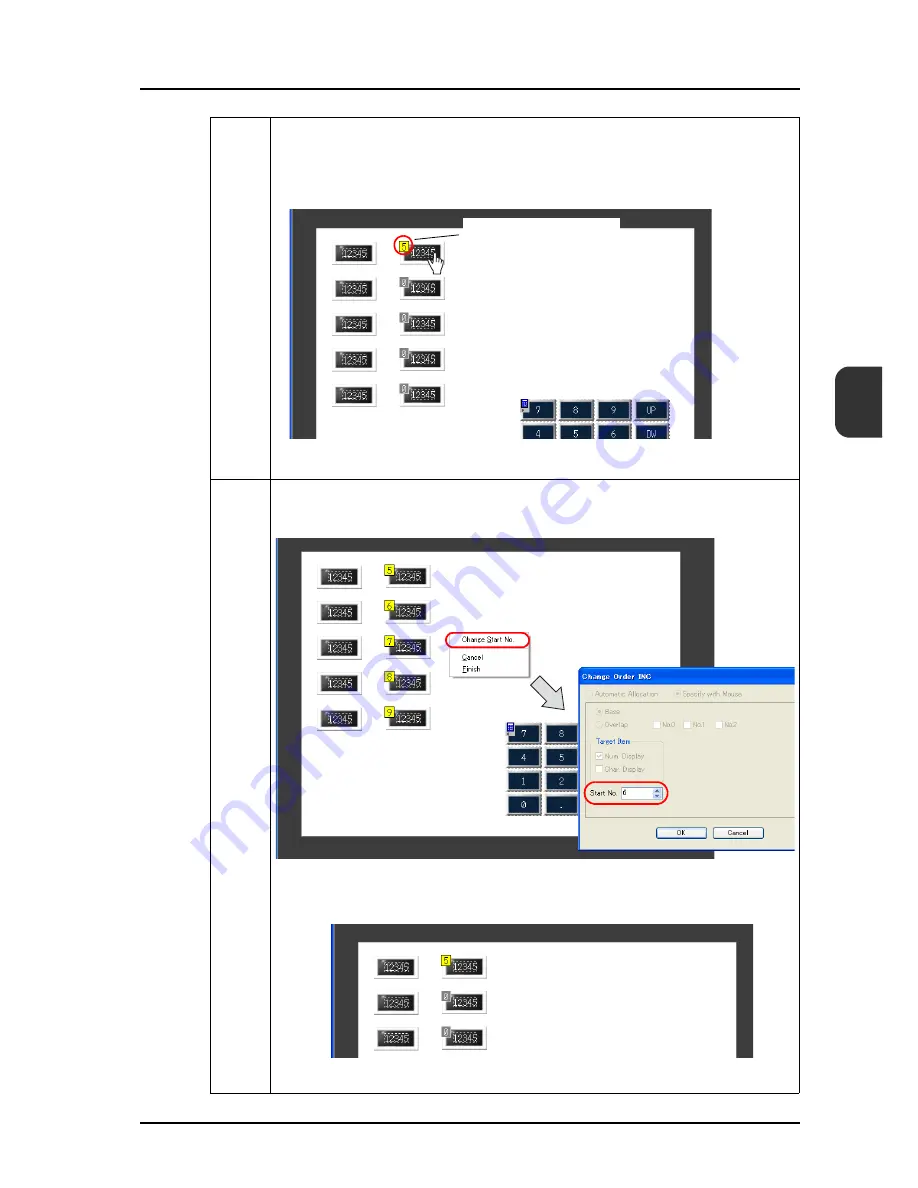
Step 7
The following window is displayed.*
Selection order numbers appear at the top-left corners of the numerical data display parts
([Function: Entry Target]). Click the numerical data display parts one by one to set their
order numbers. Once an order number has been set at the top-left corner of a data
display part, the number turns yellow.
* This window is provided solely for setting selection order numbers of display
parts. To exit, select [Finish] or [Cancel] from the right-click menu.
Step 8
When changing the start number of selection order, select [Change Start No.] from the
right-click menu. Select your desired number for [Start No.] and click [OK].
Now order numbers starting from the newly specified number are allocated.*
* Even if the top-left numbers are confirmed (in yellow), changing the [Start No.]
restores the numbers starting from [Star No.] to the unconfirmed status (in
gray).
Example: [Start No. 6]
When entirely re-setting the selection order numbers, click [Cancel] from the
right-click menu. Perform the previous steps again from step 1.
Click
Order INC
Confirmed: In yellow
Unconfirmed: In gray
Selection order Nos. 6 to 9 are
restored to the status before
change, showing “0” in gray.
Содержание MONITOUCH V8 SERIES
Страница 1: ...Reference Additional Functions V8series...
Страница 57: ...2 Global Overlap 2 12 Please use this page freely...
Страница 101: ...7 2 Panel Meter Extended 7 18 Please use this page freely...
Страница 123: ...9 2 Acknowledge Function 9 18 Please use this page freely...
Страница 127: ...10 RGB Display touch switch emulation 10 4 Please use this page freely...
Страница 187: ...14 3 Addition of Titles to a CSV File Sampling Data 14 20 Please use this page freely...
Страница 199: ...15 Item Show Hide Function 15 12 Please use this page freely...
Страница 211: ...16 FTP Server 16 12 With Explorer or Internet Explorer To log out close Explorer Click the close button to log out...
Страница 213: ...16 FTP Server 16 14 ls command This command is used to display the names of files and folders...
Страница 221: ...16 FTP Server 16 22 Please use this page freely...
Страница 233: ...17 2 Two Ethernet Ports 17 12 Please use this page freely...
Страница 241: ...18 Network Camera 18 8 5 The Live view window is displayed...
Страница 261: ...18 Network Camera 18 28 Please use this page freely...
Страница 327: ...20 MES Interface Function 20 38 6 The table is created...
Страница 369: ...22 Security Function 22 12 Please use this page freely...
Страница 429: ...24 Tag 24 24 Please use this page freely...
Страница 491: ...26 6 USB FDD Floppy Disk Drive 26 14 Please use this page freely...
Страница 503: ...27 Ladder Transfer via USB or Ethernet 27 12 Please use this page freely...


