


- 21 -
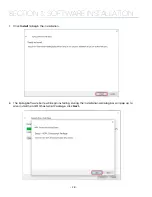
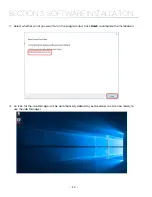
SECTION 2: GETTING STARTED
USB Cable Setup
1.
Once your machine is booted up, select the
Settings
button in the upper right corner of the
touchpad.
2.
Select
USB
in the settings list.
3.
Under the USB sub menu, press
“IP Address”
and the IP Address will be
169.254.7.2
4.
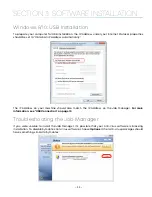
This will be the IP Address you use in the Job Manager when you set up your machine. For more
information, see
“Using the Epilog Job Manager” on page 35.
Note:
If you do not see an option for either the Network IP Address or USB IP Address in the
Settings menu, make sure the Ethernet or USB cord you are using is connected fully to both
your computer and the laser.
7. Sign Up for Driver Updates and Register Your
System
Go to www.epiloglaser.com/register and register your system. You can also sign up for our monthly
e-newsletter, quarterly customer printed newsletter, and sign up for driver update notifications.
Содержание Fusion Pro 32
Страница 2: ......
Страница 6: ......
Страница 13: ...The following diagrams show the location of each specific label Fusion Pro 32 7 SECTION 1 SAFETY ...
Страница 14: ...Fusion Pro 48 8 SECTION 1 SAFETY ...
Страница 15: ... 9 SECTION 1 SAFETY ...
Страница 18: ......
Страница 28: ......
Страница 60: ......
Страница 98: ......
Страница 108: ......
Страница 132: ......
Страница 162: ......
Страница 184: ......
Страница 202: ......
Страница 214: ......
Страница 216: ......
Страница 242: ......


