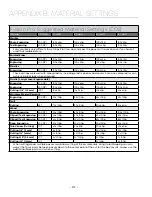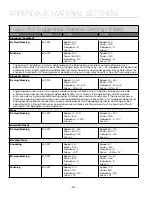
Fusion Pro Suggested Material Settings (Fiber)
Material
DPI/Freq.
30 watt
50 watt
Powder Coating
Etching/Marking
600 DPI
Speed: 20 - 25%
Power: 100%
Frequency: 100%
Focus: +.05 to .07”
Speed: 25 - 30%
Power: 100%
Frequency: 100%
Focus: +.05 to .07”
Two to three passes are suggested (one pass to ablate the powder coating, 2nd or 3rd pass to polish up the
metal underneath). A little less power, higher frequency and less focus adjustment will be required for the
2nd or 3rd pass, depending on the base metal. The idea is to ablate then polish. An alternative to running two
or more passes is to run one pass and then use a common cleaner such as Simple Green or a citric-based
cleaner with short, stiff bristle brush to scrub out the residual material remaining in the mark area. If using this
technique, it may be necessary to raise or lower the marking table from around 0.07” to 0.10”.
• These are only guidelines:
Brightness or darkness of a mark is a matter of personal preference and
can be very dependent of the type of material being marked. As such, there is no “correct” setting.
Working with the four different fiber settings becomes fairly intuitive in a very short period of time
for most users. If you have a material that is not listed, try to compare it to similar materials listed
and use those settings as your starting point.
• Speed Settings:
The speed setting scale of 1% to 100% is not linear – i.e. 100% speed will not be twice
as fast as 50% speed. This non-linear scale is very useful in compensating for the different factors
that affect engraving time.
• Power Settings:
The power settings are linear – i.e. 50% power is half as much as 100% power.
• General Metal Engraving / Base Settings:
In the world of metals the grade, type, hardness and
chemical composition are endless. Metal alloys are engineered for specific applications and have
their own strengths and weaknesses. Metals can be engraved at just about any settings. Of course,
there are many variables to consider for metal engraving. The lasers wattage, hardness of metal,
desired mark (etch, polish, anneal) and the required time/contrast/depth will have to be considered
when deciding on the final settings.
• General Annealing Settings:
Producing an annealed mark is very dependent on the material being
out of focus. Run the laser at slow speed and full power then adjust the focus while the machine is
running until you achieve the annealed mark you need.
• Test your material:
If you do not achieve the results you are looking for with the recommended
settings, try resending the job and start by changing only one variable at a time. Changing only one
variable at a time will help to determine the correct setting for your material.
• Laser settings can sometimes be confusing because many materials can be marked over such a
broad range of settings. If you have difficulty in finding the correct setting you can send a sample
to the Epilog Laser Applications lab. We will determine if the material can be marked and provide
appropriate setting for your laser.
To print a copy of these settings to keep next to your laser, go to
- 216 -
APPENDIX B: MATERIAL SETTINGS
Содержание Fusion Pro 32
Страница 2: ......
Страница 6: ......
Страница 13: ...The following diagrams show the location of each specific label Fusion Pro 32 7 SECTION 1 SAFETY ...
Страница 14: ...Fusion Pro 48 8 SECTION 1 SAFETY ...
Страница 15: ... 9 SECTION 1 SAFETY ...
Страница 18: ......
Страница 28: ......
Страница 60: ......
Страница 98: ......
Страница 108: ......
Страница 132: ......
Страница 162: ......
Страница 184: ......
Страница 202: ......
Страница 214: ......
Страница 216: ......
Страница 242: ......


