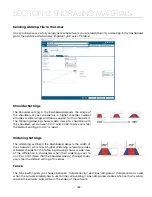
The male image should be produced without the use of outlines around the text or graphics. Add a .007
to .010 inch (0.178 mm to 0.254 mm) outline to the text and graphics of the female die. This outline creates
a large enough void between the male and female dies to emboss paper without tearing.
Apply a .001 outline around the seal to define the outside edge of the seal. Use the Combined Mode to
first raster engrave the seal and then vector cut out the seal.
Plastic Engraving/Cutting
There are two types of available engraving plastics: rotary plastics and laserable plastics. Rotary
plastics are designed for rotary engraving systems that use a mechanical spinning bit to remove
material. Therefore, the depth of the top layer or “cap sheet” was designed to make it easy to rotary
engrave. Cap sheet thickness was approximately .010 inches (0.254 mm) thick and laser engraving was
nearly impossible because by the time you applied enough power to get through the cap sheet the laser
melted and deformed the plastic.
Laserable plastics have been developed with a thinner cap sheet that is .002” to .003” (0.051 mm to 0.076
mm) thick, providing much better engraving and cutting characteristics. These plastics are commonly
referred to as micro laminates; micro-surfaced, or simply laser engraveable plastics. These plastics are
generally very easy to engrave with a laser since they all have similar characteristics.
Because there is such a broad range of plastics it is necessary to experiment to determine if a particular
type of plastic is laser compatible. Different color plastics, even if they are from the same manufacturer,
will have unique speed and power settings. Use the guidelines in this manual as a starting point when
determining the correct speed and power settings. If you do not get acceptable initial results with the
recommended speed and power settings, start experimenting by first changing only the power setting.
If adjusting the power setting does not work, start over and adjust only the speed setting. Once you have
acceptable results, record those settings for that particular plastic so that you do not have to repeat the
experimentation process.
Plastic Engraving Techniques
• Always remove the clear protective cover layer before engraving.
• Once you have the correct speed and power settings you can improve your engraving results even
more by taking the focus lens out of focus (lower the table) by about 1/16 (1.5 mm) of an inch. This
technique enlarges the focus beam a little bit and provides more beam overlap on each pass of
the laser. The greater overlap produces a smoother engraved surface on the plastic and eliminates
the grooves that you sometimes see when engraving plastic.
• With some plastics it is best to engrave using two passes. The first pass cuts through the cap layer
and the second pass cleans away the residue that some plastics leave behind.
• Another technique that can be useful is to mask the plastic before engraving with transfer or
masking tape. This will prevent a buildup of residue on the plastic surface. Misting the transfer tape
with water will reduce heat buildup and melting on sensitive plastics.
- 185 -
SECTION 12: ENGRAVING MATERIALS
Содержание Fusion Pro 32
Страница 2: ......
Страница 6: ......
Страница 13: ...The following diagrams show the location of each specific label Fusion Pro 32 7 SECTION 1 SAFETY ...
Страница 14: ...Fusion Pro 48 8 SECTION 1 SAFETY ...
Страница 15: ... 9 SECTION 1 SAFETY ...
Страница 18: ......
Страница 28: ......
Страница 60: ......
Страница 98: ......
Страница 108: ......
Страница 132: ......
Страница 162: ......
Страница 184: ......
Страница 202: ......
Страница 214: ......
Страница 216: ......
Страница 242: ......

