Outside Vector Method:
This techniques is by far the most
preferred method of defining the area to be engraved away.
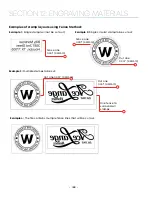
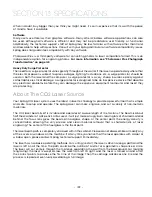
This technique uses a closed outline to define the area to be
engraved away. This image shows the stair-step outline of a
Fence enclosing the logo to be stamped. The laser will
engrave away only the background area outlined by the
Fence, leaving the logo standing.
This method is useful because it allows you to be very precise
about how much background you are going to engrave
away, saving time and material. The outside vector must be
0.003” or less thick, and can be any closed polygon or ellipse. You can even place several stamps within
one outside vector.
When a job is sent to the Dashboard, hairlines are
automatically split from all other objects into a vector
process. The paths in this vector process are used to
determine the fence.
Bounding Box Method:
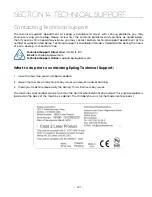
When you select this method, the
bounds of the artwork are used as the fence. The laser will
engrave away the entire background of the bounds, leaving
the logo standing.
Cutting Out the Stamp:
If you are using the
Outside Vector
Method
, any shape inside of the outer-most path will be cut
as long as it has a line weight of 0.003” (0.075 mm) or less. Also,
any shape that isn’t closed, and therefore cannot be part of the fence, will also be cut if it is a vector
process. If you are using the
Bounding Box Method
, all paths in the vector process will be cut.
Creating a Perforated Cut:
To create a perforated cut around the stamp that will allow the stamp to be
pulled away from the rubber, in the print driver set the vector frequency to 1 or 2. This keeps the stamp
attached to the rubber sheet and makes cleaning easy while allowing the user to easily remove the
stamp from the sheet.
This can also be done by creating dashed and dotted lines in CorelDRAW or most other
artwork applications.
Plastic Vector Cutting Techniques
• Use a Vector Cutting Table to elevate the plastic before cutting. Air Assist will greatly reduce flaming
when cutting plastic.
• Vectoring plastics is similar to vectoring other materials. First, experiment to determine if the plastic
can be cut with the laser. Plastics that are up to 1/16 inch thick can usually be cut in a single pass.
Thicker plastics may need two passes.
• As with engraving, it is sometimes necessary to mask and dampen the plastic before cutting. Even
masking and wetting both front and backsides of the plastic is desirable on sensitive plastics that
have very low melting points.
•
WARNING!
Never leave your laser unattended when vector cutting plastics! Plastic can
be very flammable.
Read the full “FIRE WARNING” on page 1 of the manual.
•
WARNING!
Do not engrave PVC (Polyvinyl Chloride). PVC will destroy the optics and
mechanics of your Epilog system. Cutting or engraving PVC will void your warranty.
The only way to find out if there is PVC in your plastic is to the check the
manufacturer’s Material Safety Data Sheet (MSDS).
Rubber Stamps
The Dashboard includes settings for producing rubber stamps. Unique stamp attributes – shoulders,
widening and more – are controlled in the Advanced tab of the Dashboard after setting the engrave
type to “Stamp”.
Creating Your Layout for Stamps
Set up your artwork in Corel so that your computer image looks like the image that you want to stamp.
Areas to be stamped (the raised areas on the stamp) should be black, with the area to be removed white.
You will need to mirror your graphic in your graphic software.
The artwork for a stamp file needs to be set up so that the background of the image will be engraved
away and the words and letters remain standing. The two ways of setting up a stamp file are determined
by the method you use to define the area that is to be engraved away.
- 187 -
SECTION 12: ENGRAVING MATERIALS
Содержание Fusion Pro 32
Страница 2: ......
Страница 6: ......
Страница 13: ...The following diagrams show the location of each specific label Fusion Pro 32 7 SECTION 1 SAFETY ...
Страница 14: ...Fusion Pro 48 8 SECTION 1 SAFETY ...
Страница 15: ... 9 SECTION 1 SAFETY ...
Страница 18: ......
Страница 28: ......
Страница 60: ......
Страница 98: ......
Страница 108: ......
Страница 132: ......
Страница 162: ......
Страница 184: ......
Страница 202: ......
Страница 214: ......
Страница 216: ......
Страница 242: ......

