


1. Set up a custom page size in your graphic software that will accommodate the length and
circumference of your cylinder. To set up your page, measure the length of the cylinder you are
engraving. Use this as the minimum size of the horizontal dimension of your page. Measure the
diameter of your cylinder and multiply this number by Pi (3.1416) to determine the circumference of
the cylinder. Use the circumference as the minimum size of the vertical dimension of your page. The
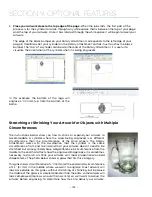
actual size of the page is not overly important. If you have a cylinder that’s 5.23” long with a
circumference of 2.3”, use a page that’s slightly larger, say, 6” x 3”.
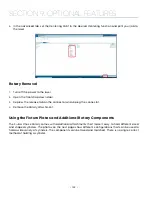
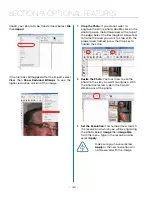
This image shows a page size of 6” x 3”. The gray inner rectangle represents the cylinder that is 5.23” x 2.3”.
Ensure your work fits within the cylinder size.
2. Place your artwork anywhere within the grey area of the page and Print to the Epilog Dashboard.
It is not overly important where you place the artwork in the grey area of the page. Your artwork
will be positioned by using the Centering Point function in the Dashboard’s Advanced tab and
centering the carriage over your cylinder.
3. Set your laser processes in the Preview tab.
- 141 -
SECTION 9: OPTIONAL FEATURES
Содержание Fusion Pro 32
Страница 2: ......
Страница 6: ......
Страница 13: ...The following diagrams show the location of each specific label Fusion Pro 32 7 SECTION 1 SAFETY ...
Страница 14: ...Fusion Pro 48 8 SECTION 1 SAFETY ...
Страница 15: ... 9 SECTION 1 SAFETY ...
Страница 18: ......
Страница 28: ......
Страница 60: ......
Страница 98: ......
Страница 108: ......
Страница 132: ......
Страница 162: ......
Страница 184: ......
Страница 202: ......
Страница 214: ......
Страница 216: ......
Страница 242: ......


