background image

64 

Phone:(910) 392

2490 

Fax: (910) 392

2123 

416 Landmark Drive 
Wilmington, NC 28412 

www.easterninstruments.com


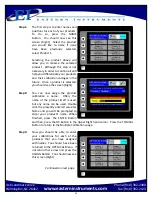
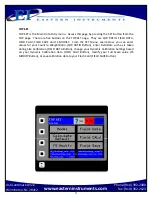
The Mul ple Calibra on Screens op on allows you to run more than one product through 
your meter without having to recalibrate each  me the product is switched.  This op on      
allows you to store up to 8 product calibra ons at one  me.  To access the op on once it has 
been purchased, press the MULTIPLE CAL 
Bu on from the TOP.OPT page, accessed by 
pressing the OPTIONS bu on from the TOP 
Menu.  You will now be at the screen shown 
below. 


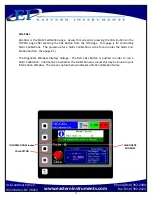
From this screen, you are able to di

eren ate 

your di

erent products by assigning them 

names and Dynamic Calibra ons  that  are    
speci

fi

c to each product.  You can also choose 

the Calibra on you will be using from this 
menu. 
 
 
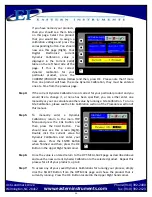
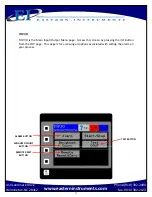
Please note that the 

fi

rst  me the Mul ple  Cal

ibra on Op on is selected, the screen to the 
right may be displayed unless the op on was 
ordered prior to shipment in which case the 
op on would be unlocked at the factory.  If you 
have purchased the op on, you will receive a 7

digit password.  Enter the password when 

prompted to unlock the Mul ple Calibra on 
Op on.  If you have not purchased the op on 
and would like too, or if you are having prob

lems unlocking the op on, please contact East

ern Instruments for assistance. 


Setup of Mul ple Calibra on Screens (Op onal) 


Содержание CentriFlow

Страница 1: ...Wilmington NC 28412 www easterninstruments com CENTRIFEEDER ELECTRONICS FOR USE WITH CENTRIFEEDER with Integrated Control Valve ICV or AUXILIARY FEEDER REV 4 17 VERSION 6 5 0 SOFTWARE Copyright 2017 E...

Страница 2: ...r with ICV 13 Wiring the Remote Electronics Cable at Meter Module Auxiliary Control 14 Wiring Customer Connec ons at the Electronics Enclosure 15 Start Stop Control Auxiliary Feeder Only 16 Posi on Se...

Страница 3: ...View 56 View Logs 56 19 Changing the IP Address 59 20 Example of Establishing Communica on to PLC ControlLogix Unit 61 21 Tag Mapping 62 SCREEN GUIDE 22 Setup of Mul ple Calibra on 64 23 HMI Screen Gu...

Страница 4: ...proper protec on for your hands when servicing or maintaining your equipment The electrical panel digital electronics should be closed and the safety latch engaged at all mes except during installa on...

Страница 5: ...ntrol valve and does not act as an isola on valve A secondary isola on valve is recommended to be installed before the Cen triFeeder s control valve in order to isolate the CentriFeeder from flow duri...

Страница 6: ...with the CentriFeeder Meter The cables should be cut to the exact length required Do not coil the cables It is required that the Remote Electronics Cable be run through its own grounded metallic condu...

Страница 7: ...7 Phone 910 392 2490 Fax 910 392 2123 416 Landmark Drive Wilmington NC 28412 www easterninstruments com Electronics Enclosure Dimensional Drawing...

Страница 8: ...gton NC 28412 www easterninstruments com Iden fying Your Components Electronics The Digital Electronics Enclosure contains the HMI the Digital CentriFlow Electronics DCE Power Supply Alarm Relay Power...

Страница 9: ...with the Transducer Cable through the Customer Provided Conduit and Connect to both the Meter and The Digital Electronics as shown The Ground Wire should a ach to both the Ground Screw on the Wago Con...

Страница 10: ...Meter and The Digital Electronics as shown The Ground Wire should a ach to both the Ground Screw on the Wago Connector Mount Above as well as to the Ground Lug within your Digital Electronics Right I...

Страница 11: ...odule Wiring the Customer Connec ons at the Electronics Enclosure Connec ng the Power Electrical Informa on The following DCE digital signals are phototransistor outputs Frequency Flow Rate Propor ona...

Страница 12: ...e Earth Ground Wire 14 gauge is required to be connected to the meter module This ground wire is required for operator safety and for proper opera on This ground must be sup plied from the main plant...

Страница 13: ...will be cut to length and will be wired to the Electronics Enclosure as demon strated in the Wiring the Digital Electronics por on of this manual PLEASE NOTE The Elec tronics Cable MUST be run through...

Страница 14: ...eter module while the other end will be cut to length and will be wired to the Electronics Enclosure as demonstrated in the Wiring the Digi tal Electronics por on of this manual PLEASE NOTE The Electr...

Страница 15: ...lly Open Remote Reset Zero Switch Input Remote Reset Zero Switch Input Remote Start Switch Input Remote Stop Switch Input Remote Electronics Cable Auxiliary Input Remote Start Switch Input Remote Stop...

Страница 16: ...Auxiliary Feeder only You must properly wire your auxiliary controller using the connectors shown For this step the terminals are wired to the indicated terminal using the appropriate 18 gauge three...

Страница 17: ...n the valve in order to determine how open or how closed it is To wire the Posi on Sensor use the White cable provided to wire the terminals on your Customer Connec ons to the corre sponding terminal...

Страница 18: ...rate Wire Green or Green Yellow Wire Separate Wire Ground Terminal 9 Conductor Cable N A Red Wire Black Wire Green Black Wire White Wire Blue Wire Red Black Wire White Black Wire Green Wire Temperatur...

Страница 19: ...espond to a Flow Rate of 12 4 20 4 x 300 150 lb min or 50 of the Electronic Full Scale Flow Rate Since this output is directly related to the Electronic Full Scale Flow Rate any change in Calibra on t...

Страница 20: ...Rate output is customer supplied power 24V local power is also available Using the local power however results in a loss of isola on This Totalizing Pulse Output will output a Voltage Pulse that is r...

Страница 21: ...riFeeder is equipped with a Pulsed Blast System you will need to supply power to the solenoid valve on the side of the meter Using at least an 18 Gauge 3 Conductor Cable not provided connect the solen...

Страница 22: ...URN POWER OFF AT SUPPLY CIRCUIT BREAKER BEFORE WIRING THE POWER TO YOUR DIGITAL ELECTRONICS PACKAGE VAC ONLY can be connected to the Power terminals illustrated below The VAC power is then converted t...

Страница 23: ...allow for movement of the ICV to both open and close To wire the Power Cord for the ICV Control Valve use the Black cable provided to wire the terminals on your Customer Connec ons to the correspondi...

Страница 24: ...behind the Tangen al Cover The use of this air is intended to aid in reducing product buildup on the Pan Arms behind the Tangen al Plate The blast of dry air should reduce buildup and greatly reduce...

Страница 25: ...e Please see local requirements for whether Conduit or SO Cable is required For normal use do not exceed 250 of cable between the solenoid valve and your electronics enclosure OPERATION 1 Set the lowe...

Страница 26: ...u So Key and So Keys 1 thru 4 By pressing the Menu So Key you will be returned to the Main Menu or TOP page The LED Display will give you informa on on your process the status of your Compact Flash Ca...

Страница 27: ...ruments com To power on your digital electronics open the Digital Electronics Enclosure and depress the breaker pushbu ons located on the VAC Power wiring connec ons as shown below Close the Digital E...

Страница 28: ...NC 28412 www easterninstruments com If the menu page is le undisturbed for several minutes the page will automa cally switch to the TOP Run page seen below For more informa on on both the TOP page and...

Страница 29: ...uthoriza on to view These pages are the TOP Menu the TOP RUN or Main Display page and the RUN TREND Plo ng page All other pages require the entry of both a username and password to access Logging On W...

Страница 30: ...C It is recommended to change your password for security purposes upon entering your system however it is im portant to remember your password and to write it down and store it in a secure place as on...

Страница 31: ...using two di erent units PV and Volts The di erence between the two scales is the Dynamic CAL mul plier The nomi nal value is five 5 this value equates to mul plying by one Before beginning the calib...

Страница 32: ...the pan as shown below Be sure that the Test Weight hangs freely from the Calibra on Stud It is also good prac ce to allow the Test Weight to become stable and movement free before proceeding Step 7...

Страница 33: ...he capture point is to the end of the Pan Sec on of the meter the less likely that there will be loss in the measurement sample and therefore less likely that there will be an error in the Calibra on...

Страница 34: ...he weight in the YELLOW block Actual next to the value automa cally entered in STEP 4 Press the YELLOW box to bring up a numeric keypad A er entering the value press the NEXT RUN Bu on to prepare for...

Страница 35: ...a on can be seen on the le side of the page while the current Dynamic calibra on can be seen on the right side of the screen If you would like to change your current se ngs with the se ngs that you ca...

Страница 36: ...t se ng the Maximum Auto Out on the ADV PID2 LIMIT page will only provide an alarm that the signal has passed the Maximum Auto Out threshold To actually limit the upper threshold of the valve you must...

Страница 37: ...aximum Auto Out The Maximum Auto Out should be between 50 and 100 of full scale PLEASE NOTE THAT THIS WILL ONLY SET THE ALARM FOR MAXIMUM AUTO OUT BUT WILL NOT ACTUALLY LIMIT THE UPPER CAPACITY OF THE...

Страница 38: ...on and then press the Control Modifica ons Bu on Now press the Auto Delay Bu on revealing the screen above Selec ng the Auto Delay Time will enable the Auto Output to be held constant for the indicate...

Страница 39: ...o stroke the valve you must access the Posi on Sensor page To access this page press the ADV Bu on from the TOP Main Menu page Then press the PID 2 Tuning Bu on and final ly press the Posi on Sensor B...

Страница 40: ...ed mechanical stop move the valve o the mechanical stop by 1 You are now at the defined Closed Valve posi on Again press the Close Push Bu on The Percent Open value should now be 0 If you move the val...

Страница 41: ...FS Use the heaviest material to calculate the vFS TABLE 1 PID Values For ICV with 2 0 second maximum stroke w PID 2 KP 100 KI 0 and KD 100 If the vFS is other than 100 then mul ply the PID value by th...

Страница 42: ...l Mode allows you to manually input the desired loca on of the valve by entering a val ue for the Manual Output This allows more control of the flow however please note that star ng and stopping the f...

Страница 43: ...point which will ex ceed the flow indicated by your Electronic Full Scale The CentriFeeder will not be dam aged but you will experience an excessive amount of flow through the meter Incremental change...

Страница 44: ...ue should be indicated in the Control Out Display Pressing the Run Stop Bu on will signal to the Integrated Control Valve to access the previously saved Auto Output value and will run in Manual Mode f...

Страница 45: ...een indica ng that Auto Mode is ac vated Changing to Automa c Mode will cause the Manual Output value to be transferred to the Auto Output value Because you are in Automa c Mode the Auto Output value...

Страница 46: ...he total value of this weight overshoot is called the Weight Correc on By determining the Weight Correc on value as well as the target value a precise shut o me for precise and accurate filling can be...

Страница 47: ...the weight correc on if you already know the value from previous runs you can determine the value by com ple ng a single run and entering the overshoot weight over the Bag Fill Target or you can run...

Страница 48: ...arm for a Rate of 20 ton hr Step 1 From the TOP I O page press the ALARM Bu on Details of this page can be found in the HMI Screen Guide in this manual Step 2 You will now be on the I O ALARM page Det...

Страница 49: ...meric keypad and the Target Rate can be changed The maximum value that can be used is Full Scale which is displayed in a dark Blue highlight Step 7 Now return to the I O ALARM page Make sure that the...

Страница 50: ...ep 1 From the TOP I O page press the ALARM Bu on Details of this page can be found in the HMI Screen Guide in this manual Step 2 You will now be on the I O ALARM page Details of this page can be found...

Страница 51: ...u on for your op ons You should now be on the I O WEIGHT OUT page More infor ma on on the two types of Weight Output Pulse and Latch can be found on the I O WEIGHT OUT page in the Screen Guide sec on...

Страница 52: ...ing the Remote Reset Capability Once the switch is wired properly you must enable the Remote Reset To enable the Remote Reset Capability access the I O Menu from the TOP MENU page and click on the REM...

Страница 53: ...te is in progress the Compact Flash card may be cor rupted Data is being wri en to the Compact Flash card when the middle yellow LED light on the front of the HMI panel is flashing Do not turn the pow...

Страница 54: ...igu ra on se ngs Restore Se ngs This allows you to restore the saved configura on se ngs in the event that your se ngs have been changed on the HMI From the TOP MENU page press the COM Bu on to enter...

Страница 55: ...ddress and Subnet Mask for the Digital Electronics has been factory set as IP Address 192 168 2 90 Mask 255 255 255 0 NOTE IF YOUR CENTRIFEEDER WAS SUPPLIED AS PART OF A LARGER SYSTEM OR MULTIPLE UNIT...

Страница 56: ...reen on the Digital Electronics itself In this way all of the features of the HMI can be accessed and used remotely View Logs Selec ng the View Logs op on allows access to the log files stored on the...

Страница 57: ...the third column is the ENGINEERING COUNT The RAW COUNT divided by the C W RATIO equals the ENGINEERINING COUNT The next two columns are both measurements of the full scale but shown in di erent units...

Страница 58: ...nged and what the new se ngs are A typical Userset page can be seen below The MTR Setup Sheet allows data to be loaded to it and to calculate the Standard Devia on and the Percent Error of the Electro...

Страница 59: ...IP Address to your HMI and then to instruct your PLC to accept the signal through your Ethernet connec on Step 1 Install your Ethernet Cable into the RJ45 connec on Ethernet NIC on the back of your H...

Страница 60: ...your IP Address numerically At that me the PREVIOUS and NEXT Arrows will move the cursor back and forth to edit your IP Address Step 4 A er entering the IP Address for your HMI press the ENTER key and...

Страница 61: ...note di er Please set the Comm Format to Data Real Input Size to 10 and Output Size to 9 as shown above Set the Comm Format IP Address and Connec on Parameters as shown in the diagram Configura on dat...

Страница 62: ...ve Stuck is mapped to I Data 9 Commands Transmi ed by the PLC to HMI Op onal There are 9 output tags O Data 0 O Data 6 As shown in the diagram above Remote Reset Resets the total is mapped to O Data 0...

Страница 63: ...ra on and 1 in order to reset the total Reset can be programmed for level or edge triggered from the HMI OPT PLC page The valid values for Remote Zero are 0 for none and 1 to perform the zero calibra...

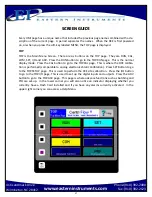
Страница 64: ...e able to di eren ate your di erent products by assigning them names and Dynamic Calibra ons that are specific to each product You can also choose the Calibra on you will be using from this menu Pleas...

Страница 65: ...tages in the future Once a product is selected you should see the screen Right Step 2 You can now assign the product calibra on a name O en the name of the product itself is used but any name can be u...

Страница 66: ...ange it or none has been specified you can either enter one manually or you can calculate another value by running a Site Calibra on To run a Site Calibra on please see the Site Calibra on sec on of t...

Страница 67: ...P RUN page This is the normal display mode Press the CAL bu on to go to the TOP CAL page This is where the DCE calibra on is performed comparable to analog electronics Sta c Calibra on Press SET Bu on...

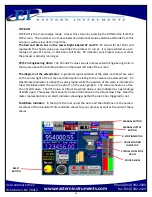
Страница 68: ...side of the screen The diagram of the valve meter A graphical representa on of the valve and meter are seen on the center right of the screen and informa on rela ng to the valve can be viewed here An...

Страница 69: ...page when on the Main RUN screen If this page is selected as the Secondary Page then it can be accessed by pressing the bo om so key when on the Main Menu Learn Mode can be toggled using the LEARN Bu...

Страница 70: ...he CAL CALd page This is where you can perform Dynamic Calibra on Press the SETTINGS Bu on to go to CAL SETTINGS This is where you can view your currently selected se ngs Press the RANGE Bu on in orde...

Страница 71: ...e INFORMATION IP CONFIG FACTORY REMOVE CF and FORMAT CF Press the INFORMATION Bu on to view informa on concerning your So ware s version your IP Address and whether you have a Compact Flash Card insta...

Страница 72: ...SET page They are C W RATIO FIELD DATA FIELD CALd FIELD SAVE and FS MODIFY From the SET Menu seen below you can enter values for your Count to Weight Ra o C W RATIO Bu on enter Field Data such as is t...

Страница 73: ...erninstruments com TOP I O TOP I O is the Main Input Output Menu page Access this screen by pressing the I O Bu on from the TOP page This page is for accessing all op ons associated with se ng the ala...

Страница 74: ...The Red Zero Bu on is pushed in order to run a Zero Calibra on Informa on on whether the calibra on was successful and whether there may be excess product on your Meter Pan may be found in your Infor...

Страница 75: ...TOP page This page is for conduc ng Sta c Calibra ons The procedure for a Sta c Calibra on can be found under the Sta c Cali bra on Sec on See page 21 The Diagnos c Window displays Voltage The Red CAL...

Страница 76: ...edure for a Dynamic Calibra on or Site Calibra on can be found on page 22 The Informa on Window displays helpful informa on regarding the op ons on this screen Pressing the Dynamic Calibra on Bu on Tw...

Страница 77: ...ccess this screen by pressing the RANGE Bu on on the TOP CAL page a er pressing the CAL Bu on from the TOP page This page is for changing the Range of you electronics The Range can be changed to the d...

Страница 78: ...old is from 0 5 of full scale to 4 0 of full scale The Inhibit can be changed by pressing the accompanying Inhibit Bu ons Unless OFF is selected for Inhibit the Total display on the page TOP RUN and t...

Страница 79: ...r For example a me increment of 1 second will filter or average 200 samples of the input sig nal to create the 4 20mA filtered output signal This is because the transducer input sample rate is 200 sam...

Страница 80: ...sing the CAL Bu on from the TOP page This page displays the Elec tronic Full Scale the mass and me units and the C W Ra o The C W Ra o or Count per Weight Ra o is determined by the factory This value...

Страница 81: ...to calcu late the engineering count total from the raw count Your Full Scale value can be changed the units of your Full Scale value can be modified and the number and size of your Transducers can be...

Страница 82: ...g the FIELD DATA CURRENT RUN Bu ons 1 5 you can select which runs will be used during your Site Calibra on calcula on The green RUN SELECTOR INDICATOR lights will be lit green when selected Selec ng c...

Страница 83: ...lated Dynamic Calibra on value under the CALCULATED DYNAMIC CALIBRATION SETTINGS sec on Your current calibra on se ngs will be displayed under the CURRENT DYNAMIC CALIBRATION SETTINGS sec on The CALCU...

Страница 84: ...LCULATE BUTTON is used as a reference guide only and will es mate using your Full Scale value and your flow rate the me taken to reach the target weight and thus an es mate of the me between each puls...

Страница 85: ...n The Target Value for both rate and weight alarms can be set by pressing the TARGET Bu on and entering an appropriate value Pressing the TARGET Bu on will take you to the I O ALARM SP page For more i...

Страница 86: ...t Entry page Access this screen by pressing the TARGET Bu on from the I O ALARM page This page is for changing the values that will trip the alarm You can enter a weight by pressing the WEIGHT ALARM B...

Страница 87: ...m will be tripped for a set dura on of me A Latch Weight Alarm will trip as soon as the Target Weight is reached and will remain tripped or latched un l the Totaliza on count is reset For instruc ons...

Страница 88: ...e remote control control through use of PLC commands Access this screen by first pressing the OPT Bu on from the TOP MENU page Then press the Ethernet IP Bu on Control can be toggled be tween PLC cont...

Страница 89: ...cale It is the value sent to the final control device Control Type Determines how the control output is sent to the final control device Linear Propor onal Bifurca ng Time Propor oning Scalable Time P...

Страница 90: ...e PID Control The independent sum of the propor onal Kp E integral Ki Esum and deriva ve Kd Edelta terms to produce an auto out The Error E is the di erence between the Set point and the Process Varia...

Страница 91: ...r automa c control in engineering units or percent of Electronic Full Scale Virtual Flow Stop Se ng that stops flow without closing the Integrated Control Valve ICV completely and damaging the product...

Страница 92: ...92 Phone 910 392 2490 Fax 910 392 2123 416 Landmark Drive Wilmington NC 28412 www easterninstruments com...

Страница 93: ...93 Phone 910 392 2490 Fax 910 392 2123 416 Landmark Drive Wilmington NC 28412 www easterninstruments com...

Отзывы: