80
www.digiop.com
SECTION 6: CONFIGURING QUEUING APPLICATIONS
3.
Click the
Advanced
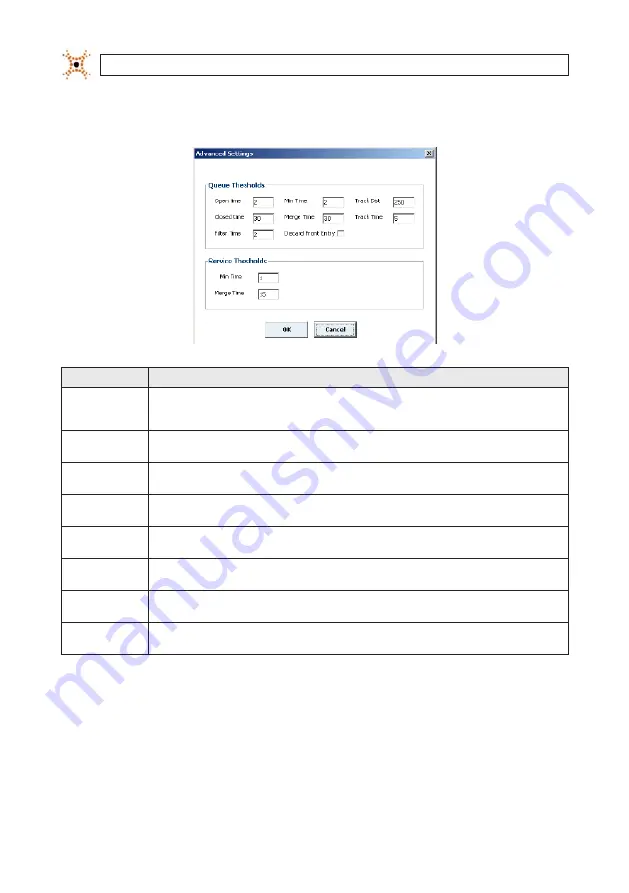
button in the lower right corner of the window. The Advanced settings pop-up appears.
Field
Description
Open Time
Sets the minimum time that person must stand inside the head zone (blue zone) before the queue count area is considered to be
open. After this threshold is exceeded, all tracks that meet the queue constraints and enter the queue count area are included in the
queue length metric. Default: 5 seconds.
Closed Time
Sets the minimum time that the head zone must stay empty before the queue zone will close and stop counting tracks entering the
queue count area. Default: 30 seconds.
Min Time
Sets the minimum time that a person must remain in the queue count area or service area before they can be counted in the queue
length or service time. For queues, tracks must meet Track Dist and Track Time thresholds. Default: 5 seconds (queue)
Merge Time
The minimum time that a person, who has entered a zone, can exit the zone and then re-enter and have their wait time merged into
the queue wait time or service time. See “
Queue Count Area Constraints
”. Default: 30 seconds (queue).
Track Dist
The maximum distance that a person entering the queue must be from a person already in the queue to be counted. See “
Queue
Count Area Constraints
”. Default: 250 centimeters.
Track Time
The minimum time that a person in the queue must be within the Track Dist of another person currently in the queue count area or
head zone before they will be added to the queue length. Default: 5 seconds.
Filter Time
The minimum time for which a track must meet the height and shape constraints to be counted in the queue metrics. DIGIOP®
recommends that this field not be changed by end users.
Discard Front Entry
Discards all queue metrics for tracks that cross the pink exit line prior to appearing in the queue. For example, in a self-checkout
queue, staff may enter the queue from the front to assist customers.
4.
Adjust the settings as required for your installation. For most installations in banking and retail environments, the default
settings are appropriate.
5.
Click
OK
to return to the Queuing tab.
6.
Click
Save
from the Queuing tab to save the changes to memory.
Содержание D3D-2500
Страница 8: ...viii www digiop com...
Страница 116: ...108 www digiop com SECTION 11 USING THE DIGIOP 3D CAMERA WITH DIGIOP ELEMENTS...
Страница 124: ...116 www digiop com...