background image


122 


NOTE:

 All 

ELITE

pro

 XC

 loggers equipped with a Wi-Fi module contain an 

internal

 antenna. An 

external


antenna is optional. You may toggle between the internal and external antenna (if it is available on your 

logger) by selecting the appropriate radio button. 

4)


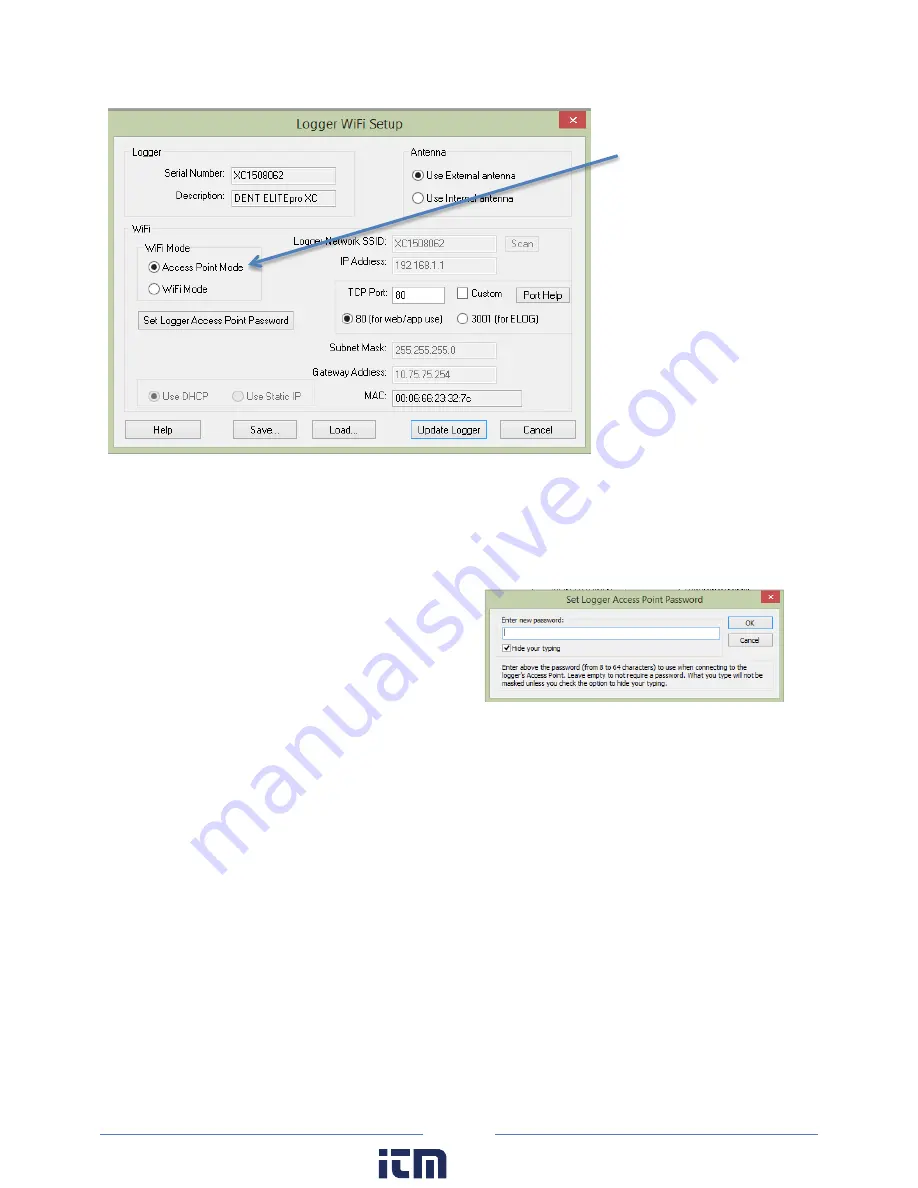
Select the 

Access Point Mode 

radio button in the Wi-Fi Mode section of the dialog box.  

5)


Click 

Set Logger Access Point Password

. The Set 

Logger Access Point Password dialog box displays. 

Enter a password (if desired) for use when 

connecting to the 

ELITE

pro

 access point. If you 

want the access point open (no password 

required), leave the field blank. Click 

OK

6)


Select the TCP Port to use when connecting to the meter.  

NOTE:

 You must select port 80 if you are planning to use the mobile app or web browser. Port 3001 

is not supported by the mobile app but is compatible if you are planning to use only ELOG with the 

web browser. 

7)


Click 

Save Changes

 in the Logger Wi-Fi Setup dialog box. 

ELOG updates the Wi-Fi settings and prompts you to click 

OK

 in order to reset the 

ELITE

pro

 XC

.  

NOTE:

 After the blue COMM LED on the 

ELITE

pro

 XC

 device stops blinking, use the ELOG command 

Logger

 > 

Communication

 > 

About the Connected Logger

 to verify that all entries in the Logger 

Properties dialog box match the values you entered. 

When using Access Point Mode the SSID is based on the logger serial number and the IP address is 

192.168.1.1. 

Access Point Mode 

Radio Button 

www.

.com

[email protected]

1.800.561.8187

Содержание ELITEpro XC

Страница 1: ...Operator s Guide ELITEpro XC and ELOG 15 Software ELITEpro XC ELOG 15 January 12 2016 www com information itm com 1 800 561 8187 ...

Страница 2: ... retrieve data remotely In addition this manual describes the features and functionality of the accompanying software ELOG 15 which is designed to be user friendly intuitive and an easy to use component of your energy measuring projects Thank You for your business Trademarks ELITEpro XC ELOG and PhaseChek are trademarks of DENT Instruments Inc Windows Windows Vista Windows 7 Windows 8 Windows 10 a...

Страница 3: ...ount the ELITEpro XC 20 ELITEpro XC Connections 21 Complete the Wiring Connections 22 CT Connections 22 Connecting Split Core Style Millivolt CTs to a Load 23 Connecting RōCoil CTs to a Load 25 Voltage Connections 26 Analog Channel Connections 26 Current Loop Connection 28 Voltage Connection 29 Power In Out Connection 30 Digital Channel Connections 30 Connecting the USB Cable 33 Other Communicatio...

Страница 4: ...Computer 51 LED Diagnostics 52 PhaseChek LEDs 52 COMM Communications LED 52 Power Measurement Connecting Sensors Configuring Channels 53 Wiring Label Conventions 54 Current Transformer CT Selection 54 CT Selection Examples 56 Connecting CTs and Configuring Channels 56 ELOG Quick Setup Wiring Diagrams 57 Using the ELOG Software 62 ELOG Speed Buttons 62 Keyboard Shortcuts 63 File Menu 64 Edit Menu 6...

Страница 5: ...ing and Installing Firmware 96 Appendix B Unusual Metering Systems 97 3 Phase Delta with a Wild Red Leg 97 2 Element Meters 98 Using The 2 Watt Element 2 Ct Method On A 3 Wire Delta Service 99 Using The 3 Watt Element 3 Ct Method On A 3 Wire Delta Service 100 Appendix C Troubleshooting ELITEpro XC Driver Installation 102 Appendix D AUTOPOLL Unattended Data Collection 106 AutoPoll Menu Options 106 ...

Страница 6: ...118 Wi Fi and Wireless Access Point Connection Optional 121 ELITEpro XC as its own Access Point 121 ELITEpro XC Connected to a Wireless Network 123 Accessing the ELITEpro 125 Troubleshooting Wi Fi Connections 127 ELITEpro Mobile App Optional 127 Bluetooth Optional 128 Cell Modem Connection Optional 130 Appendix G Meter Installation Final Checklist 131 Index 135 www com information itm com 1 800 56...

Страница 7: ...ing batteries at the job site The measurements are stored in on board non volatile memory in a time series format at an interval selected by the user The ELITEpro XC can be mounted anywhere with its magnetic back and is small enough to be secured inside the electrical panel The Windows based ELOG software package is used to set up the meter display metered values and retrieve and analyze the colle...

Страница 8: ...s means of protection SYMBOLS ON EQUIPMENT Denotes caution See manual for a description of the meanings When connecting the ELITEpro XC to an AC load follow these steps in sequence to prevent a shock hazard 1 If possible de energize the circuit to be monitored 2 Connect the CTs to the phases being monitored 3 Connect the voltage leads to the different phases Use proper safety equipment gloves mask...

Страница 9: ...Wiring must meet 600V AC CAT III rating DC VOLTAGES The meter is designed to measure AC voltages for installations up to 600 VAC The meter is also capable of measuring DC voltages up to 600 VDC with the following caveats 1 The internal fuse installed in the meter is not a suitable disconnect for voltages above 80 VDC Customers using the meter for high voltage DC systems must install a UL listed in...

Страница 10: ... may not cause harmful interference and 2 this device must accept any interference received including interference that may cause undesired operation MAINTENANCE There is no required maintenance with the ELITEpro XC Abide by the following items Cleaning No cleaning agents including water shall be used on the ELITEpro XC Battery Life The lithium battery is only used to maintain the date and clock s...

Страница 11: ...yens de protection SYMBOLES DES EQUIPEMENTS Signifie prudence Voir le manuel pour une description de la signification En faisant la connexion du ELITEpro XC à une prise de courant alternatif suivez ces étapes en ordre pour empêcher un risque de choc 1 Décharger le circuit à contrôler 2 Connectez le TC aux phases à surveiller 3 Connectez les fils de tension à des phases différentes Utiliser des équ...

Страница 12: ... ELITEpro est conçu pour mesurer tensions c a pour les installations jusqu à 600 V c a Le ELITEpro est également capable de mesurer les tensions c c jusqu à 600 V c c avec les avertissements suivants 1 Le fusible interne installé dans le ELITEpro n est pas un dispositif de désaccouplage adéquat pour des tensions supérieures à 80 V c c Les clients utilisant la ELITEpro pour haute tension DC système...

Страница 13: ... le courant et a une espérance de vie de plus de 10 ans Contactez DENT Instruments pour le service Pas d accessoires approuvés pour une utilisation avec le ELITEpro XC sauf ceux spécifiés par DENT Instruments dans ses documentations sur les produits et également sur les prix Si le compteur semble endommagé ou défectueux tout d abord déconnecter le pouvoir de l appareil Alors s il vous plaît appele...

Страница 14: ...hase and for system total Analog Measurements 0 10 Volts 0 or 4 20 ma current loop non isolated external power for current loop User scaling for sensor reporting in physical units Accuracy Better than 1 0 2 typical for V A kW kVAR kVA PF Resolution 0 01 Amp 0 1 Volt 1 Watt 1 VAR 1 VA 0 01 Power Factor 0 001 ANALOG LED Indicators Tri colors red green and blue 1 LED to indicate communication 4 LEDs ...

Страница 15: ...on condensing Enclosure ABS plastic 94 V0 flammability rating Weight 340 g 12 ounces excluding sensors and leads Dimensions 69 x 58 x 203 mm 2 7 x 2 2 x 8 0 Minimum System Requirements Operating System Windows 7 32 or 64 bit Windows 8 Windows 10 or Vista 32 or 64 bit Processor Pentium Class 1 GHz or more recommended Hard Drive 50 MB minimum available Communications Port One USB port required for l...

Страница 16: ... Out Terminal Block for Analog Input Connections Logging On Comm LED USB Connection PhaseChek LEDs Magnetic Mounting Feet Ethernet connection Optional Wi Fi External 5 dbi antenna CT Connections Voltage Lead Connections www com information itm com 1 800 561 8187 ...

Страница 17: ...F WARRANTY CORRECTION OF DEFECTS BY REPAIR REPLACEMENT SERVICE OR CREDIT WILL BE AT SELLER S OPTION AND CONSTITUTE FULFILLMENT OF ALL OBLIGATIONS TO BUYER FOR BREACH OF WARRANTY Seller assumes no warranty liability with respect to defects in the product caused by a modification repair installation operation or maintenance of the product by anyone other than Seller or its agent except as described ...

Страница 18: ...ill be brought in Deschutes County in the State of Oregon U S A Any claim except for nonpayment will be brought within one year of product shipment or completion of services and Buyer will be liable for any collection costs or attorney fees E Claims for non conforming orders must be submitted within 30 days from shipment date F These Terms Conditions together with Seller s Order Acknowledgment con...

Страница 19: ... double clicking ELOGInstaller exe 2 Follow the directions on the screen to install the software NOTE When ELOG is installed another program AutoPoll is also installed AutoPoll may be used for unattended and automatic data retrieval from a number of remote loggers where the computer calls the loggers See Appendix D AUTOPOLL Unattended Calling from the PC to the Logger 3 Install the ELITEpro XC Dri...

Страница 20: ...ess than 6 months and must be subject to monthly monitoring by qualified personnel to verify the ELITEpro XC or its wiring have not shifted To remove the logger remove the screw and roll the magnets off the cabinet it is mounted to NOTE For temporary spot load monitoring the four magnets on the back of the ELITEpro XC case can be utilized to hold the logger on unpainted metal The maximum combined ...

Страница 21: ...ed external power supply or for powering external devices Maintain polarity as marked on the case In 6 10 Vdc maximum input of 500 mA Out 6 Vdc output up to 200 mA for powering other external devices USB connector for high speed downloads setup and communication with a computer The ELITEpro XC is also powered from the USB connection If a USB cable is to be used inside an electrical panel it must b...

Страница 22: ...t the CTs to the channel s on the ELITEpro XC labeled CH 1 CH 2 CH 3 and CH 4 The CT leads need to be connected to the terminal block using a small screwdriver For RōCoils also connect the shield bare wires to the right most ground terminal marked S shield 2 Place the CTs on the phase wires of the load to be monitored and corresponding to the phase of the voltage loads The CTs must be placed as fo...

Страница 23: ...r to be measured Make sure the maximum current of the conductor does not exceed the maximum CT rating listed on the CT data sheet 3 Carefully re connect the removable leg while ensuring the CT core alignment matches The conductor should be in the inside of the CT window Repeat Steps 1 3 if you are using more than one CT www com information itm com 1 800 561 8187 ...

Страница 24: ...he ELOG setup table CT2 CT3 and CT4 must also correspond to the appropriate phase as shown in Channels 2 3 and 4 in the ELOG setup table DID YOU KNOW Correct orientation of a CT is required to ensure proper measurement If an arrow is shown on the CT label it should be pointed toward the load Otherwise use the instructions printed on the CT Voltage lead connections Current Transformer connections w...

Страница 25: ... CT Repeat the above three steps if you are using more than one RōCoil CT 4 Connect the CTs brown wire to the negative terminal on the connector See photo below 5 Connect the CTs white wire to the positive terminal on the connector 6 Twist together the bare shield wires from the RōCoils and connect to the S shield terminal that is part of the CH 4 connector This reduces interference and improves a...

Страница 26: ... flows etc The ELITEpro XC has four analog input channels that can be configured for voltage or current input used in any combination among channels The limiting specifications for analog input are shown below Analog Input Technical Specifications MAXIMUM INPUT VOLTAGE 30 VDC Unipolar Measurements Only MAXIMUM INPUT CURRENT 23 ma Note the current limit will be exceeded before 30 volts of applied p...

Страница 27: ...C above 10 volts Damaging currents may flow from the connected sensor in the event of reverse polarity or misconfiguration and this will void your warranty Channel types voltage or current should be configured using the ELOG software prior to connecting external sensors This sequence will prevent the unexpected unpredictable combinations of voltage transducers connected to low impedance loads 499 ...

Страница 28: ...e external current source Current loop sensors will typically be powered from a 24 volt DC supply The ELITEpro XC has four measurement channels The negative terminals of each channel are common to each other and connected to the reference plane for power measurements For this reason it is imperative that the ELITEpro XC be connected as the last component in the current loop rather than the first i...

Страница 29: ... shared between two circuits resulting in a three wire device This economy usually comes at the installer s expense of having to form a junction at the power supply sensor or meter Sensors having four terminals are also popular and are simply connected to the meter by observing the indicated polarity between sensor and meter L1 L2 G Sensor Power Supply Separately Excited Current or Voltage Loop Co...

Страница 30: ...ital channels instead of analog channels on the screen The Digital channels provide users with a way to export kWh kVAh and kVARh pulses to external devices The ports are grounded when closed and floating when open For example if the setup table Digital 1 is configured to output KWh pulses with a Scale of 1 0 Digital channel 1 will output a pulse for each kilowatt hour of energy measured by the me...

Страница 31: ...wo Physical Power Channels or both may be set to 2 This enables users to measure pulse outputs with different data in the Value and Scale described in the following sections 3 Select a parameter kWh kVARh or kVAh to be used as the source for pulses from the Value drop down list The ELITEpro SP is capable of measuring the pulse output for KWh KVAh or KVARh Only one may be measured at a time if a si...

Страница 32: ...in the Name field Choose your Power Channel to measure the desired option from the Value drop down list and enter a scaling factor in the Scale field 4 Click SEND SETUP TABLE to Logger NOTE When logging is turned on or a new setup table is sent pulse outputs start at the integration period relative to the hour that logging starts For example if you have a 5 minute integration period and you turn l...

Страница 33: ... XC If a USB cable is used inside an electrical panel it must be rated to the appropriate voltage or wrapped in an appropriately rated insulating sleeve The DENT supplied cable does not meet this requirement without an insulating sleeve 2 Turn the breaker on Power End Panel Connections USB Port Power In Out www com information itm com 1 800 561 8187 ...

Страница 34: ...t must be rated to the appropriate voltage or wrapped in an appropriately rated insulating sleeve The Coax connector if present is for an optional external Wi Fi antenna NOTE If an antenna is used inside an electrical panel it must be at least 2 away from any live wiring or bus bars An internal Bluetooth antenna is an optional connection Communication Connections External Antenna for WiFi optional...

Страница 35: ...s PC Setup to open the ELOG PC Setup dialog box 3 In the middle section of the dialog box labeled Direct Connect select the Port from the menu that corresponds to the computer s COM port where the USB cable is connected Port Preferences This option is used to hide COM Ports from ELOG to change the order of COM Ports as they appear in the drop down control and the order they are searched when ELOG ...

Страница 36: ...lect Logger Communication Direct Connect to connect the computer to the ELITEpro XC The Logger Connection information displays along the bottom of the window providing a status message as the computer connects to the ELITEpro XC Simultaneously the logger s COMM LED will begin to flash ELOG fills the information fields of the Logger Connection window when the computer establishes communication with...

Страница 37: ...TER CONNECTION Select Logger Communication Terminate Connection to end the connection between the computer and the ELITEpro XC or Use the Disconnect speed button to quickly terminate the connection www com information itm com 1 800 561 8187 ...

Страница 38: ... Sent to any number of loggers Retrieved from an ELITEpro XC modified and saved and resent to the logger CREATE A NEW SETUP TABLE A new setup table can be created for any of the devices compatible with the current version of ELOG 15 This includes a variety of DENT Instruments legacy products in addition to the ELITEpro XC If the logger is not connected and communicating with the computer setup tab...

Страница 39: ...n dialog box displays Select the desired setup table file or navigate to a folder containing additional files The default folder is set to C Users User Name Documents ELOG Setups 4 Select the file name and click Open or Double click the file name to open The setup table file can be reviewed edited and saved to disk or sent to the logger For instructions on sending the file to the logger see Send a...

Страница 40: ...ting Select Logger Retrieve Logger Setup Table The setup table stored in the logger is retrieved and displayed with the name of the file above the ELOG menu bar The file can be modified and saved to disk or resent to the logger NOTE Sections of this window are used in the following text to highlight only those areas under discussion www com information itm com 1 800 561 8187 ...

Страница 41: ... file name The default integration period is fifteen minutes The choices are 1 3 15 30 seconds 1 2 5 10 15 20 and 30 minutes 1 and 12 hours 1 day This tells the logger at what time intervals data is to be stored in the memory For example if the integration period is set for 30 minutes and average watts is being monitored then every 30 minutes the logger records the average power use watts for that...

Страница 42: ...ging is continuous meaning when memory fills the oldest records are replaced with the newest records allowing for long term metering projects When Memory Is Full Logging stops when the memory is full Date mm dd yy Time hh mm ss Logging stops at the designated date and time Time should be set in a 24 hour format e g 2 30 pm should be entered as 14 30 MEMORY CAPACITY ELOG provides a convenient featu...

Страница 43: ...e CT selection list or Select Millivolt and enter the CT Amps the primary current rating of the current transformer and the CT Phase Shift or Select RōCoil NOTE The Millivolt default is 100 amps Enter the value printed on the CT if it is not 100 If RōCoil Rogowski is selected the CT Amps are set to 5 000 and the CT Phase Shift is set to 0 0 and may not be changed All DENT RōCoils regardless of siz...

Страница 44: ...L 200 CT SRL 400 0 10 0 23 0 06 0 06 0 06 Recommended CT Phase Shift Values 3 Click OK 4 Check the Enable THD checkbox if you want total harmonic distortion to appear as a percentage in the Data File Summary report Selecting this option automatically populates any required value field necessary to determine distortion Once the Quick Setup is completed the View Typical Setup button appears in the Q...

Страница 45: ...the channel 4 Enter a name for the channel then select the Voltage References Current Transformers and any Recorded Values NOTE The PT Ratio is used when monitoring voltages greater than 600 VAC maximum rating of the ELITEpro XC Use an instrument grade transformer with low phase shift and high accuracy since errors in the transformer will translate directly into errors in the recorded data The PT ...

Страница 46: ...he CT s recommended values Double click on any image or Select an image and click OK The Recorded Values of a power channel tell the logger what parameters you wish to record and can be configured by selecting any combination of Volts Amps power kW volt amps kVA power factor PF and volt amps reactive kVAR as desired for each channel you turned on For a description of the Recorded Values and their ...

Страница 47: ...needed to measure AC voltages greater than 600V The default is 1 000 Type This is the type of CT connected to the ELITEpro XC Choices are MilliVolt or RōCoil Amps Depends on the type of CT selected Displays the value entered in the CT Size screen Phase Shift Compensate for CT Phase Shift with this setting Default setting is 1 1 degrees Volts Amps KW KVA PF KVAR To record any or all of these values...

Страница 48: ...at the Recorded Values flags of Volts Amps kW kVA PF and kVAR for the individual channels be left on However if maximum use of the memory is required they can be turned off Default recording flags may have the Average checkbox selected in each drop down menu for the Recorded Values 2 Under Calculated Power Channels turn on the channel by selecting Power Sum from the Channel 5 menu Perform the same...

Страница 49: ...he right of the Current Transformers section on the Setup Table are not shown in this graphic ANALOG OUTPUT CHANNELS NOTE Turn the analog channels on off by choosing an option from the drop down list 1 Select Current Voltage Off from the drop down menu for the channel type Additional fields display on the Setup Table screen when an analog channel current or voltage is selected 2 Enter a descriptiv...

Страница 50: ...e average minimum and or maximum record 5 Click Send Setup Table to Logger to load the configuration into the data logger Best practices are to confirm the operation of all sensors Use Logger Display Real Time Values Show as Text or click the Display Real Time Text Values speed button before commissioning the logger for prolonged data logging projects SEND A SETUP TABLE TO THE LOGGER When you ve f...

Страница 51: ...ELOG automatically sends the new setup table to the meter and starts logging or Click Cancel ELOG automatically initiates logging when a setup table is downloaded to the logger unless the Data Logging delayed start time is being used 3 Select Logger Display Real Time Values Show As Text to view the real time values measured by the logger SAVE A SETUP TABLE ON THE COMPUTER When you ve finished sele...

Страница 52: ...tage phase NOTE If the Physical Power Channel CT is turned off in the setup table the corresponding PhaseChek will be dark COMM COMMUNICATIONS LED The ELITEpro XC COMM LED flashes different colors green blue red to indicate that the logger is connected logging information and communicating with the computer Which color indicating which condition is dependent on the version of firmware being used b...

Страница 53: ... on the CT towards the load or as otherwise indicated on the CT All diagrams in this section will show the CT phasing arrow oriented towards the load Always connect the white neutral wire to the neutral bus bar if available or to the L2 or L3 phase if metering a 3 phase 3 wire system with no neutral WARNING Use of this device in a manner for which it is not intended may impair its means of protect...

Страница 54: ...been evaluated to IEC 61010 1 CT HSC 020 X 20A Mini CT HSC 050 X 50A Mini CT HMC 0100 X 100A Midi and the CT HMC 0200 X 200A Midi Though all other CTs provided by DENT Instruments have been tested and certified to the same IEC 61010 1 standard by other Nationally Recognized Testing Laboratories NRTLs the use of any other CT will invalidate the UL Listing of the ELITEpro XC This is simply a decisio...

Страница 55: ...oltages The following table is a list of the UL recognized 61010 1 CTs that can be used to maintain the UL listing High Performance 20A Mini High Performance 50A Mini High Performance 100A Midi High Performance 200A Midi RōCoil Rogowski CT HSC 020 U CT HSC 050 U CT HMC 0100 U CT HMC 0200 U CT RXX 1310 U CT HSC 020 B CT HSC 050 B CT HMC 0100 B CT HMC 0200 B CT RXX A4 U UL Recognized CTs CAUTION DO ...

Страница 56: ...he positive or high side wire and the right pin is the negative or low side Connect DENT Instruments supplied current transformers as follows Split core CTs removable leg and hinged CTs The white CT wire is and the black wire is Clamp on CTs clothes pin type The red lead is the wire and the black lead is the wire RōCoils The white lead is the wire and the brown lead is the wire DID YOU KNOW If a u...

Страница 57: ...en the remaining voltage sense phase wires ELOG QUICK SETUP WIRING DIAGRAMS When a Quick Setup is selected the View Typical Setup button appears in the Quick Setup area of the screen Clicking this button displays a wiring diagram that corresponds to the selected setup showing how to connect the CTs and the voltage leads of the ELITEpro XC The diagram can be printed and carried into the field for e...

Страница 58: ...58 Typical Single Phase 2 Wire Setup Diagram www com information itm com 1 800 561 8187 ...

Страница 59: ...59 Typical Single Phase 3 Wire Setup Diagram www com information itm com 1 800 561 8187 ...

Страница 60: ...60 Typical 3 Phase 3 Wire Delta Setup Diagram www com information itm com 1 800 561 8187 ...

Страница 61: ...61 Typical 3 Phase 4 Wire Wye Setup Diagram www com information itm com 1 800 561 8187 ...

Страница 62: ...to connect between the computer and the ELITEpro XC over a serial or Bluetooth connection use the button instead of the menu commands Logger Communication Connect Via The button toolbar can be toggled on and off by selecting the View Toolbar option A description of each button follows New Create a new Setup Table Logger List Data File download or Graph Open Open an existing Setup Table Logger List...

Страница 63: ...g this option displays the Instantaneous Channel Values screen Retrieve Logger Data Select this option to quickly retrieve logged data from the connected logger Setup PC Quickly access computer setup configurations Create Graph Create a graph from an open data file available under the Data dropdown menu UnZoom Graph Use to back out of an expanded graph Help Topics Opens the ELITEpro XC and ELOG Ma...

Страница 64: ...onnected to a logger ELOG requests the logger be connected from which the new data file will be extracted Graph File contains graphs created from logger data Selecting Graph File opens a folder window where you may choose from already existing data files Choose the one you wish to use to create a graph Logger List File displays groups of loggers used with AutoPoll an automatic data collection appl...

Страница 65: ...file prompting you to select the file type It operates the same whether or not you are connected to a logger The File Save and File Save As functions allow for the saving of an open file of any type Save As allows for saving to a new location or new name The File Export Data File allows you to export a data file to a csv file for use in another application The File Import CSV File allows you to im...

Страница 66: ...rs at the bottom of the screen during connection to a logger and provides information about the logger communication port baud rates etc Refer to Communicate with the ELITEpro XC in Section 1 for more information The Toolbar option enables disables buttons under the main menu The Status Bar option enables disables information at the bottom of the ELOG window www com information itm com 1 800 561 8...

Страница 67: ...me download logger data and set communication parameters Graphing and analysis functions are found under the Data menu Communication Sub Menu Use the options on the Communication sub menu to establish a connection between the computer and the ELITEpro XC www com information itm com 1 800 561 8187 ...

Страница 68: ...oftware will only display features and menus relevant to legacy products unless you connect to a new product See Tools Menu PC Setup for further information Connect via USB or Bluetooth This option is used to connect ELOG to a logger via a direct USB cable connection to the PC or with Bluetooth wireless technology A connect message appears on the screen in the Connection window See Appendix F Deta...

Страница 69: ...e this option to end the connection between the PC and the logger Logger Ethernet Setup Enter the IP Address Local Port Number and if needed the Subnet Mask and Gateway Address to connect the logger to a network via an Ethernet cable This is the same IP address and Port Number you enter in the Network Connect dialog box to connect via Ethernet with ELOG Select Update Logger to send the new Etherne...

Страница 70: ... send the new Wi Fi Setup to the logger or Cancel to close the window without updating the logger Appendix F Detailed Connection Options Logger Web Mobile App LoginPassword Use this option to create a password for accessing your Wi Fi from the web or a mobile device Appendix F Detailed Connection Options www com information itm com 1 800 561 8187 ...

Страница 71: ...k Refresh to retrieve new information for example if the number of records used is changing or OK to close the window AutoPoll AutoPoll is a standalone Windows program supplied with ELOG that may be used for unattended and automatic data retrieval from a number of remote loggers where the PC connects to the loggers A complete description of AutoPoll can be found in Appendix D AUTOPOLL Unattended D...

Страница 72: ...int you may name the data file whatever you wish There are two checkboxes in the lower left of the dialog box to select if you want to add append the data to an existing file and or create an ASCII file of the data When a logger s memory is downloaded the data may be added or appended to an already existing file from the same logger Check the Append New Data To Existing Data File box The name of t...

Страница 73: ...nd can be opened in other applications such as spreadsheets and databases The data is saved to the folder specified in Tools PC Setup Data Files Saved To unless changed in the Select a Directory and A Name window The default data folder is C Users UserName Documents DENT ELOG Data To view a data file use Data Open Data File and then select the desired file Even if not downloaded as a csv file the ...

Страница 74: ...rded by the logger it will be shaded in green as shown in the Real Time Channel Values window see next page For a Power Channel all six power parameters V A kW kVA PF and kVAR are displayed even if only one of the parameters is recorded This feature is useful for verifying correct installation of the logger This screen provides information about The real time data which can be paused for cross cha...

Страница 75: ...wer channels currently turned on in the logger in the Summing Channels To Display section Selecting a power channel activates the Parameters To Display option You can only select one variable at a time to graph This is not like a text display option where parameters are viewed simultaneously This is due to differences in scaling and to reduce clutter on the graph For example you could display kW f...

Страница 76: ...each new reading This always displays the most current data values and the older points slide off the left edge Use Set X and Y Axis to set the scaling and the line type e g linear or logarithmic You can also set the amount of time data is graphed This can vary from 1 second to more than 18 hours 65 000 seconds Note that the X axis scaling is only approximate www com information itm com 1 800 561 ...

Страница 77: ...urements pixels millimeters inches points are used to save the graph Waveform Capture Select Logger Display Real Time Values Waveform Capture to view the actual current voltage and power waveform The first capture is by default channel 1 but you can select different channels logging off or on to view and copy the waveform to the clipboard for pasting into other programs or for printing www com inf...

Страница 78: ... value of the voltage and current for each harmonic may be found in the Harmonic Values section By clicking on the arrow buttons higher and lower order harmonics may be selected Though only the first 31 harmonics are displayed in the graph the Harmonic Values function can be used to view the values up to the 63 harmonics The Waveform Values section provides summary statistics for the overall volta...

Страница 79: ...iod of time the harmonic data is collected Selecting Raw Harmonic Data creates a spreadsheet with the information above and a row of the 31 harmonics for each update of the logger Since the logger updates faster than one time per second selecting this option will create a LOT of data quickly 2 Click OK and the recording begins The Record to PC button now reads Stop Recording on the Harmonics Analy...

Страница 80: ...onverts the UTC time stamps in the logger to the local time zone of PC If two PCs in different time zones open a data file or read the logger clock they will see different times Set the logger s internal clock and date using the following menu option Logger Logger Clock You may change the clock manually or synchronize it to the computer s clock Manually Set Logger Time Use this option to manually ...

Страница 81: ... the user defined one line description stored in the logger The Description Line can help identify the specific logger after the logger is retrieved from the field Logging ON OFF This option starts or stops data collection www com information itm com 1 800 561 8187 ...

Страница 82: ...until you are sure that all information should be deleted from the logger Clear ALL Logger Data Clears all data in the logger memory including Peak Demand and Totals Once deleted it cannot be retrieved Clear ONLY Peak KW KVAR and KVA Demand Clears only the peak demand values kW kVA kVAR Once deleted it cannot be retrieved Clear ONLY KWh KVARh KVAh etc Totals Clears only cumulative totals Once dele...

Страница 83: ...elected for storage Click Browse to set the default folder in which data files are saved Data files are sent to the specified folder when retrieving data files using the Logger Retrieve Data option The Setup Files Saved To sets the default folder in which Setup Tables are saved ELOG will look in this folder first when opening a Setup Table file The Logger Files Saved To sets the default folder in ...

Страница 84: ...u items relevant to the current software and hardware release Select the checkbox and click Save Changes to enable legacy menu items for customers using older legacy products ELITEpro The Enable Auto Launch of ELOG checkbox defaults to enable the Auto Launcher which launches ELOG if not already open when an ELITEpro SP or ELITEpro XC or newer ELITEpro is connected to a USB port When not checked it...

Страница 85: ...file you want to graph Hold down the Control Ctrl key to select multiple parameters or the Shift key to select a continuous group of parameters 3 Use Record Range to define a Starting and Ending range or select the All Records checkbox to display all records available Options default to All Records but unchecking the box enables you to set a smaller range NOTE These are the only options available ...

Страница 86: ...ta cursor on and off with the right mouse button Show graph data points displays the Data Point information above the graph display Show analysis values shows summary statistics minimum maximum average on the graph Use the radio buttons to select one of the following a Use default graph attributes uses the default color font and other graph attributes b Use current graph attributes uses the attrib...

Страница 87: ...lso provides an Export option that enables you to export the graph Choose an option in the Export section to choose a graph type Choose a location to export the graph in the Export Destination area Set the size of the exported graph in the Export Size fields Double clicking the graph also provides a Maximize feature that enables you to increase the visual representation of the graph DID YOU KNOW T...

Страница 88: ...s collected on the graph It directly correlates to the Data Interval timeframe that was selected in the Setup Table File e g 15 seconds 5 minutes 1 hour etc Select the Show analysis values checkbox to display the average maximum and minimum value for each parameter plotted on a graph The values appear to the right of the graph where the graph labels are also shown If desired by unchecking the Show...

Страница 89: ... from Logger command The data is always shown in the same way The left most column is the record number and begins with 1 and continues through all of the data records in the file The second column is the date of the record and the third column is the time of the record The fourth and remaining columns are the data recorded by the logger for each parameter If minimum or maximum values were recorde...

Страница 90: ...e File Open command in the spreadsheet and select All Files in the Files of type drop down list 6 Open the csv data file from the folder you specified for example C Users UserName Documents DENT ELOG Data Import CSV File This feature imports a previously saved csv file into ELOG 15 for use Select the file you wish to import and then choose Open www com information itm com 1 800 561 8187 ...

Страница 91: ...d An example Summary is shown on the next page The sub menu has two functions Data File Summary Provides the start and end times of the data file name in the computer and summary statistics for each channel and parameter that was recorded by the logger The Data File Summary is opened in Microsoft Notepad and can be edited saved printed and or moved into another report www com information itm com 1...

Страница 92: ...on the channels used for collecting the data The Peak Demand report is opened in Microsoft Notepad and can be edited saved printed and or moved into another report NOTE Calculations for peak demand are only available when Channels 5 and 6 are on www com information itm com 1 800 561 8187 ...

Страница 93: ...When located over the last record to be included release the mouse button 3 After selecting a data range click Data Analyze a Selected Data Range and choose the desired Analysis Functions A Sample Data File window displays In this example Maximum Value was chosen Note that when maximum and minimum are selected the date and time of the five 5 greatest maxima or minima are also shown along with the ...

Страница 94: ...ions from this sub menu to display data from a specified range if all data points collected aren t needed for analysis Extract By Date This option provides the beginning and end date and times of the data file Choose new endpoints to trim off unwanted data at the beginning or end of the file Click Ok to display the selected range Extract By Record Number This option provides a File Record Range wi...

Страница 95: ...amp errors Fill Missing Records Fill Missing Records detects gaps in the time sequence of the data shown and fills the missing records with 0 values This feature is useful when data logging has paused such as during a power outage and there are gaps in the time stamp records www com information itm com 1 800 561 8187 ...

Страница 96: ... menu Select Tools Update Logger Firmware The Firmware Update dialog box displays No update is required if your firmware File version and Logger Version are the same Downloading and Installing Firmware To install firmware updates 1 Select Tools Update Logger Firmware The following dialog box displays 2 If necessary click the Browse button to locate the firmware update file 3 Click Update 4 The Upd...

Страница 97: ...97 Appendix B Unusual Metering Systems 3 PHASE DELTA WITH A WILD RED LEG 3 Phase DELTA with a Wild Red Leg Configure the Setup Table as follows www com information itm com 1 800 561 8187 ...

Страница 98: ...o XC is placed on the L2 phase and is backwards Note that the Ch3 CT is jumpered in parallel into Ch4 of the logger Since the 2 Element method is often used on high voltage metering a PT ratio other than one is typical and should be set to whatever the actual PT ratio is www com information itm com 1 800 561 8187 ...

Страница 99: ...londel s Theorem states that the number of watt elements CTs needed to monitor a system is one less than the number of wires in the system This means that a 3 Wire Delta service even though three phase requires only two CTs to meter it as there are only three current carrying conductors The ELITEpro XC uses the 3 CT method for monitoring Delta services as a default because the data is easier to in...

Страница 100: ...ally only or mostly present in the current and not in the voltage Because watts and VARs are calculated as the instantaneous product of volts and amps and because an existing third or fifth harmonic current does not have a corresponding voltage harmonic then the harmonics products are zero Therefore the instantaneous product of volts and amps used to obtain watts and VARs does not include any harm...

Страница 101: ...ase measurements with other meters make sure that the same method of calculating VA and Power Factor is used Connecting the ELITEpro XC to a 3 phase 3 wire Delta load using the 3 element method It is very similar to the 3 phase 4 wire WYE connection Use a CT on each phase and connect the three ELITEpro XC voltage wires to each phase The neutral wire should then be connected to earth ground The Set...

Страница 102: ...t the problem 1 Go to the Device Manager by right clicking My Computer in the Start Menu and selecting Properties Windows 7 Windows XP 2 In the Properties window select Device Manager In Windows 7 and Windows 8 the Device Manager is on the left side of the window In Windows XP select the Hardware tab then select the Device Manager See below Windows 7 www com information itm com 1 800 561 8187 ...

Страница 103: ...103 Windows XP 3 Look for the ELITEpro XC listed in the Device Manager Window www com information itm com 1 800 561 8187 ...

Страница 104: ...ect Install from a list or specific location Advanced and click Next 6 In the next window select Search for driver software in this location and Include Subfolders in the search Click Browse and locate the ELITEpro XC driver folder in the ELOG directory www com information itm com 1 800 561 8187 ...

Страница 105: ...stall In the event that you receive a warning dialog box from Microsoft click Continue to proceed 8 Unplug the ELITEpro XC and plug it back in ELOG 15 should launch and automatically connect to the ELITEpro XC www com information itm com 1 800 561 8187 ...

Страница 106: ...thought of primarily as an automatic dialer After launching AutoPoll you are prompted to first select a Logger List containing the loggers that you wish to access Only one Logger List may be active at a time After selecting the desired Logger List a screen similar to the one below becomes the active window At this point the AutoPoll program is running and may be minimized by clicking on the button...

Страница 107: ...printed Print Setup may also be accessed from this menu Print Preview Allows you to view the document as it will appear on the paper Print Setup Used to select the active printer paper tray source and paper orientation Exit Exits and closes the AutoPoll program Edit Menu Add Logger Adds a new logger to a logger list Remove Logger Removes a selected logger from a logger list Cut Copy Paste Standard...

Страница 108: ...ns Menu Delay Today s Calls Is used to temporarily change the time calls are to be made If the window is minimized AutoPoll operates in the background and the computer may be used for other purposes at the same time AutoPoll is running Use Delay Today s Calls to delay all scheduled calls for the day for up to 24 hours To use click on the buttons to select the length of the delay and then click OK ...

Страница 109: ...ated to the computer including port settings baud rates and more Clicking on PC Setup brings up the following screen The default folder from which Logger Lists may be selected is set here The Direct Connect section shows the port and baud rate of the connected ELITEpro XC The Modem Connect section displays connection information about legacy products Enter an amount of minutes into the Final Delay...

Страница 110: ...atever folder contains the ELOG application program typically C Users UserName Documents DENT ELOG Data The folder where the file is saved may not be changed except by moving the ELOG application too DENT Instruments AutoPoll Event Log File Connecting to logger ELITE on 04 10 14 at 10 54 31 Direct connection to logger ELITE completed Setting clock from 10 54 36 04 10 14 to 10 54 38 04 10 14 for lo...

Страница 111: ...the host computer This information can be used for manual connecting and by the AutoPoll program A Logger List may have as few as one logger in it or hundreds Logger Lists are accessed through the File Open or New Logger List File command Selecting Open will bring up a folder from which to select an existing Logger List to edit or use Selecting New will bring up a blank Logger List as shown below ...

Страница 112: ...baud rate does not need to be set If for a Legacy Logger serial connection set the logger baud rate default is 57600 and PC COM port default is COM 1 to be used For Telephone connection select the baud rate default is 14400 baud and enter the telephone number of the logger modem For a network connection enter the IP address of the logger and the port number default is 3001 Data File Path is the lo...

Страница 113: ...r on going metering projects and only data collected and stored in the logger since the last download is retrieved The new data is appended to the existing data file Create csv File If it is desired to have the downloaded data also be created in a csv Comma Separated Value format for use in other applications such as Excel check this box Creating a csv does not affect the original elog file downlo...

Страница 114: ... AutoPoll first calls the logger AutoPoll then calls the logger at the interval set in Then Call Every The time of the first call happens on the first day that the call out time is encountered after the Logger List has been saved Daily Call Use this option to call the logger every day at the same time Use the Daily Time To Call box to set the hour and minute hh mm that the call is to be made Weekl...

Страница 115: ... System L1 kW L2 kW L3 kW Sum of L1 L2 and L3 phase watt values kWh System L1 kW L2 kW L3 kW of samples in an hour Calculated per waveform sample with a running total of each waveform kWh for the integration period VAR System L1 kVAR L2 kVAR L3 kVAR VARh System L1 kVAR L2 kVAR L3 kVAR of samples in an hour See kWh System WYE notes VA System L1 kVA L2 kVA L3 kVA VAh System L1 kVA L2 kVA L3 kVA of s...

Страница 116: ...verage of L1 L2 and L3 L2 phase to phase voltages kW System L1 kW L3 kW Sum of kW L1 and kW L3 phase watt values kWh System L1kW L3kW of samples in an hour See kWh System WYE notes kVAR System L1 kVAR L3 kVAR kVARh System L1 kVAR L3 kVAR of samples in an hour See kWh System WYE notes kVA System SQRT System kW 2 System kVAR 2 kVAh System SQRT System kW 2 System kVAR 2 Apparent PF System Same as Dis...

Страница 117: ...TEpro XC Hint Look for this USB symbol If a USB cable is used inside an electrical panel it must be rated to the appropriate voltage or wrapped in an appropriately rated insulating sleeve The DENT supplied cable does not meet this requirement without an insulating sleeve 2 ELOG 15 should launch automatically and connect to the logger If it does not click on the icon on the computer desktop 3 The E...

Страница 118: ...the USB cable to a USB port on your computer inserting the other end into the USB port on the ELITEpro XC Hint Look for this USB symbol If a USB cable is used inside an electrical panel it must be rated to the appropriate voltage or wrapped in an appropriately rated insulating sleeve The DENT supplied cable does not meet this requirement without an insulating sleeve 2 ELOG 15 should launch automat...

Страница 119: ... the logger with ELOG as there is no doubt about what IP address to use Dynamic Connection If you want the router to assign an IP address to the meter automatically select Use DHCP This may avoid the need of a network administrator as the router will assign an IP address that does not conflict with any other devices on the network A disadvantage of the DHCP option is that the lease of the IP addre...

Страница 120: ...onnect an Ethernet cable from the network into the Ethernet port on the side of the logger 6 Click the Ethernet or Wi Fi Connection speed button on the toolbar to reconnect via Ethernet The Network Connect dialog box displays 7 Enter the Network IP Address and Port Number if it is not automatically populated Select OK to proceed and establish your Ethernet connection NOTE If you do not know your N...

Страница 121: ...access point or hotspot enables Wi Fi connections where no existing wireless network is available or where access to existing networks is not allowed 1 Set up the logger for Access Point connection Connect the USB cable to a USB port on your computer inserting the other end in the USB port on the ELITEpro XC Hint look for this USB symbol If a USB cable is used inside an electrical panel it must be...

Страница 122: ...he TCP Port to use when connecting to the meter NOTE You must select port 80 if you are planning to use the mobile app or web browser Port 3001 is not supported by the mobile app but is compatible if you are planning to use only ELOG with the web browser 7 Click Save Changes in the Logger Wi Fi Setup dialog box ELOG updates the Wi Fi settings and prompts you to click OK in order to reset the ELITE...

Страница 123: ...to a local area network LAN through a wireless access point or wireless router To set up the logger it must first be configured via a USB connection to a PC running ELOG and may require assistance from someone familiar with the network you want to connect to Below is a diagram of this communication method 1 Set up a Wi Fi logger for connection to a wireless network first Connect the USB cable to a...

Страница 124: ...ton in the Wi Fi Mode section of the dialog box A network administrator may be needed for the next three steps 5 Enter the name of the wireless network in the Wi Fi Network SSID field 6 Click Set Wi Fi Network Password and enter the network s password in the dialog box 7 Click the Use DHCP radio button if your network uses DHCP to assign IP address information or Click the Use Static IP radio butt...

Страница 125: ...ommunication About the Connected Logger to verify that all entries in the Logger Properties dialog box match the values you entered The logger should now be connected to the LAN via a Wi Fi link to the wireless router on the network 10 Click the Ethernet or Wi Fi Connection speed button on the toolbar to connect to the logger from a PC on the network The Network Connect dialog box displays 11 Ente...

Страница 126: ...age appears enter the Web Mobile App Login Password you set in the dialog box in Step A above The default password is 1234 Please note that this is the distinct password used to connect to the wireless access point You can view real time values view or download logged data as an Excel CSV file start stop logging clear the logger memory and view the logger properties Other ELOG functions such as cr...

Страница 127: ...t Bluetooth Wi Fi 16 MB Approximate Download Time 4 Min 12 Min 22 Min 40 Min Range Length of USB cable Length of network cable 10 100ft 40 100ft Access With PC ELOG PC ELOG or Mobile App or Web browser Bluetooth enabled PC ELOG PC ELOG or Mobile App or Web browser ELITEPRO MOBILE APP OPTIONAL The ELITEpro Mobile App provides access to any Ethernet or Wi Fi equipped ELITEpro meter Use this app in a...

Страница 128: ...oth and it may be necessary to purchase a Bluetooth dongle usually a plug in USB device and add it to the PC If purchasing an external Bluetooth dongle ensure that it supports SPP Serial Port Protocol Typically the packaging will indicate if it supports SPP Follow the Bluetooth manufacturer s instructions for installing the Bluetooth device The rest of this discussion assumes that the PC has Bluet...

Страница 129: ...ck on the PC Setup speed button Windows may have assigned two com ports to the Bluetooth link but only one will work for communication The correct port to use is found through trial and error 5 Click on the first Standard Serial over Bluetooth link found in the Direct Connect Port drop down list click Save Changes and attempt to communicate using Direct Serial or Bluetooth Connection speed button ...

Страница 130: ...Windows Control Panel open Devices and Printers and verify that the ELITEpro XC is shown in the Bluetooth devices along with the Bluetooth module in the PC If not reinstall the PC s Bluetooth device and or re pair the PC to the logger 2 If the logger does not appear after repeating the steps ensure that the device is powered and the blue COMM light is flashing 3 If the logger is visible and you ar...

Страница 131: ...cating electrical panel for next visit inside electrical room picture of meter installed along with CT installation and Voltage connection Using ELOG verify the logger setup is correct Is the data Interval set typical is 15 minutes Does Vhigh and Vlow match the voltage phases the CTs are installed on Does the CT Type setting match the CT used Does the CT Amp setting match the CT used Does the CT P...

Страница 132: ...For WYE loads are the phase PF readings relativity close to each other when monitoring a balanced load If available compare to external references within a percent or two no two meters will read exactly the same Digital Voltmeters DVM Does the meter phase voltages match the DVM s Clamp on Amp meters e g Amprobe Do the meter phase currents match the clamp on Amp meter Clamp on Power Meters e g Fluk...

Страница 133: ...0200 CT SCM 0400 CT SCM 0600 1 75 1 50 1 30 1 30 Split Core Large CT SCL 0600 CT SCL 1000 0 00 0 00 Split Core High Accuracy CT SHS 0005 CT SHS 0015 0 50 0 50 Hinge Mini CT HSC 020 CT HSAC 050 0 75 0 75 Hinge MIDI CT HMC 0100 CT HMC 0200 0 12 0 30 Revenue Grade Toroidal Solid Core CT RGT12 0005 CT RGT12 0020 CT RGT12 0050 CT RGT12 0100 0 00 0 00 0 00 0 00 Revenue Grade Split Core CT SRS 005 CT SRS...

Страница 134: ...questions or comments please contact DENT Instruments for assistance DENT Instruments 925 SW Emkay Drive Bend Oregon 97702 USA Phone 541 388 4774 Fax 541 385 9333 www DENTinstruments com www com information itm com 1 800 561 8187 ...

Страница 135: ...nnect via USB or Bluetooth 68 Logger Ethernet Setup 68 PC Setup 68 Terminate Connection 68 communications AutoPoll 108 configuring a power channel 45 creating a CSV file 73 CT selection list 46 CT Connection polarity 56 CT Connections 22 See also CTs millivolt 23 polarity 24 45 UL listings 54 CTs calculating the value 56 commonly available 55 connecting 56 current ratings 55 Phase Shift Values 44 ...

Страница 136: ...uttons 62 status bar 66 toolbar 66 Tools menu 83 View menu 66 window 62 ELOG Data File 64 Enable THD 44 Ethernet 34 69 detailed connection information 118 Export data file 65 exporting data to spreadsheet 89 extracting a range of data 94 F Firmware 84 downloading installing updates 96 Friendly ports 35 G Graph File 64 graphs 75 85 analysis values 88 annotation 88 attributes 88 creating 85 data cur...

Страница 137: ...removal 20 P PC Setup 35 68 83 Phase Shift Values recommended 44 133 PhaseChek 52 Physical Power Channel options 47 polarity 24 45 56 Port preferences 35 friendly ports 35 Power Channel 31 Calculated 48 calculating formulas 115 combining 48 configuring 45 configuring for power measurement 53 delta configuration calculations 116 Digital 31 Physical 47 wye configuration calculations 115 Power In Out...

Страница 138: ... 102 update firmware 84 USB 30 68 detailed connection infomation 117 V voltage connections 26 voltage rating 26 W Waveform capture 77 Web server 126 WiFi 34 69 detailed connection information 121 troubleshooting connections 127 Wiring Connections CTs 22 Wiring Conventions 54 Wiring Diagram 3 Phase 3 Wire Delta 60 3 Phase 4 Wire Wye 61 Single Phase 2 Wire 58 Single Phase 3 Wire 59 Wiring Diagrams q...

Отзывы: