background image

100  DOT 320 User’s Guide 


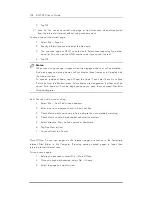
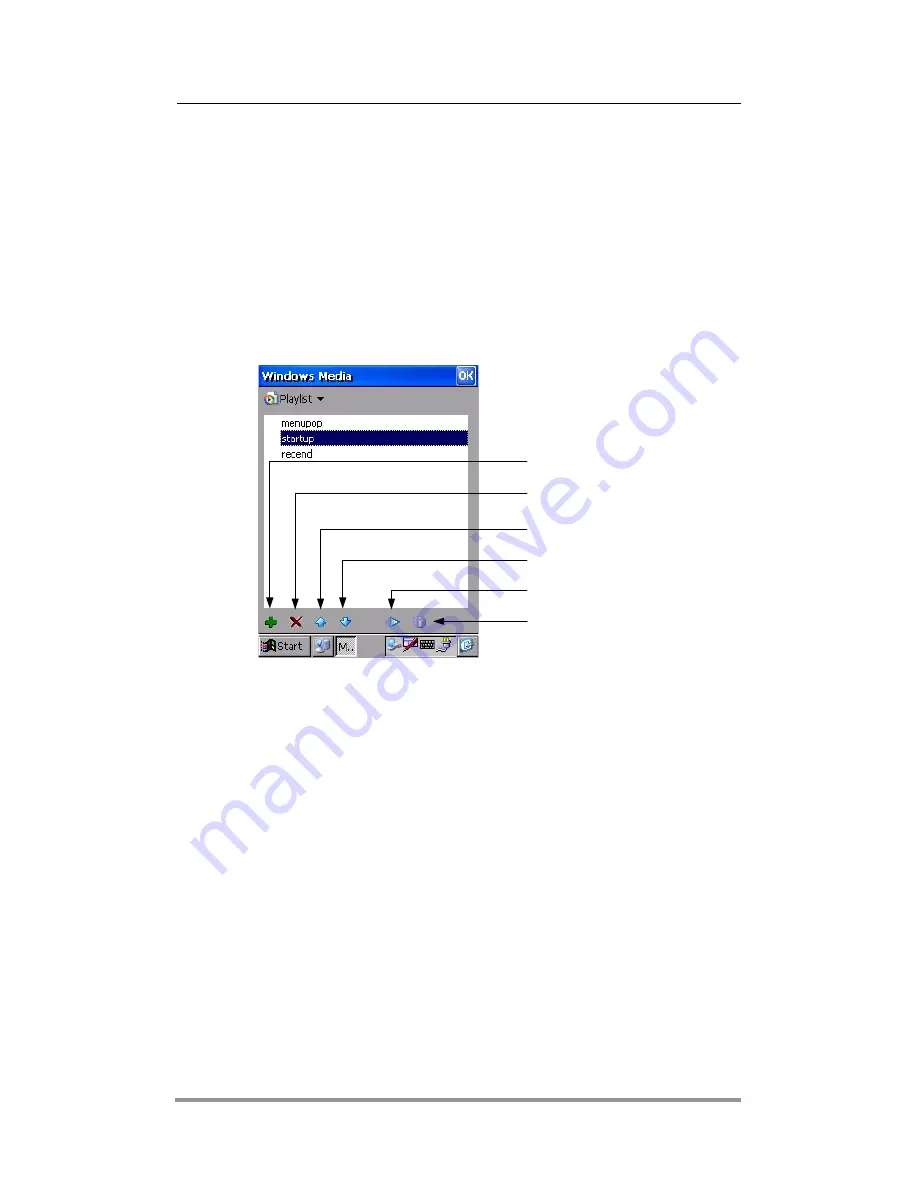
You can edit an existing playlist. 
To edit a playlist: 

1.  Select File > Playlist. 

2.  Tap the name of the playlist and select Organize Playlists. 

3.  Select a playlist to edit. Then tap Rename to rename the playlist. 

4.  Add, delete, or move multimedia file in playlist, select a playlist to edit, then 

contains file list appears. 

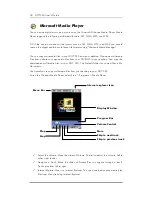
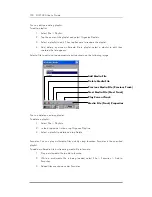
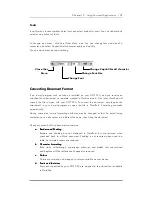
Select a file to edit and tap appropriate button shown on the following image: 


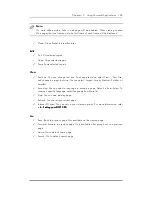
You can delete an existing playlist. 
To delete a playlist: 

1.  Select File > Playlists.   

2.  In the drop-down list box, tap Organize Playlists.   

3.  Select a playlist to delete and tap Delete.   


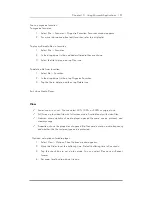
Favorites: You can play multimedia files quickly using favorites. Favorites is the specified 
playlist. 

To add a multimedia file or streaming media file to favorite: 

1.  Play a multimedia file to add to favorite. 

2.  While a multimedia file is being loaded, select File > Favorites > Add to 

Favorites. 

3.  Added files are shown under Favorites. 


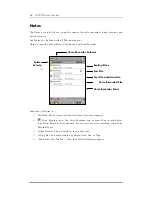
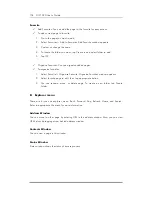
Add Media File 

Delete Media File


Previous Media File (Previous Track)


Next Media File (Next Track)


Play Current Track


Media File (Track) Properties


Содержание DOT 320

Страница 1: ...DOT 320 User s Guide V 1 0 e ...

Страница 2: ...in this product are copyrighted and all rights are reserved Reproduction adaptation or translation of those programs without prior written permission of D O Tel Company is also prohibited Microsoft ActiveSync Windows the windows logo and the windows CE NET log are either registered trademarks or trademarks of Microsoft corporation in the United States and or other countries Microsoft products are ...

Страница 3: ...ct the internal components and could cause fire 5 For safety reasons keep this device out of reach of children or animals to prevent accidents e g a Swallowing stylus pen b There is a risk of permanent eye damage for stylus pen s sharp ends In case of accidents consult a doctor immediately 6 Use only dedicated battery charger Other battery charger could result in fire or injury 1 Do not use in hig...

Страница 4: ...iew of Microsoft Windows CE NET 27 Main Window 28 Taskbar 30 6 Setting your DOT 320 35 Certificates 36 Date Time 37 Dialing 39 Display 40 Input Panel 43 Internet Options 44 Network and Dial up Connections 46 Owner 49 Password 50 PC Connection 51 Power 52 Regional Settings 54 Remove Programs 55 Storage Manager 56 Stylus 57 System 58 Volume Sounds 59 7 Using Personal Information Managers 61 Today 62...

Страница 5: ...acklight 94 Buttons 95 Contrast 96 Menus 96 QStart 96 Task Manager 96 10 Using Microsoft Applications 97 Command Prompt 97 Microsoft Media Player 98 Internet Explorer 103 Microsoft WordPad 107 Transcriber 111 Windows Explorer 123 11 Appendix 127 Specification 127 Troubleshooting 128 Glossary 138 FCC NOTICE 141 ...

Страница 6: ......

Страница 7: ...experience Windows XP skin and function making your important tasks easy and fast Using various applications in DOT 320 you can organize your daily life enjoy multimedia and games check your e mail and access internet anywhere anytime Microsoft ActiveSync increases the power of DOT 320 by allowing you to synchronize the information on your desktop or laptop computer with DOT 320 In this chapter yo...

Страница 8: ...ger DOT 320 Bundle CD Rom with USB driver User s Guide and ActiveSync 3 5 Leather Protector Case extra one stylus pen Using this User s Guide This User s Guide introduces information to use DOT 320 PDA easier and faster for users The information in this document is subject to change without notice for product improvement or specification change ...

Страница 9: ...ows operation system It should follow the Logo Specifications of Microsoft Corporation This Chapter will help you to start your DOT 320 You will be introduced to DOT 320 hardware features and hardware input functions You will also learn how to connect DOT 320 to battery charger and how to use the input button You will be able to easily and comfortably use your DOT 320 This chapter will introduce y...

Страница 10: ...nd other features of DOT 320 Stylus Pen CF type I II extended card Slot Power Button 16 bit Reflective Color TFT LCD Display Navigation Button Speaker Reset Button USB Serial Port Voice Record Button D C Jack Function Buttons Jog Dial LED Indicator Microphone Earphone Jack IrDA Port Sleeve Connector ...

Страница 11: ...ta you should have the ActiveSync installed on Desktop PC You can also connect your DOT 320 to other devices such as Barcode Scanner GPS CCD Camera and Image Scanner using serial port Notification LED Notification LED Notification LED Notification LED LED notifies you the status of your DOT 320 LED Notifications are as follows LED Notification LED Status Description Red Flash Very low battery Oran...

Страница 12: ...d with recording voice or sound press Voice Record Button again while Notes is running After record sound or voice stop record by pressing Voice Record Button again When Notes runs Voice Record Button is used to run or stop recording Hardware Input Functions Input Operation Function Press Instant device on off Power Button Press and Hold Backlight on off Up or Down Move Up or Down Volume Up or Dow...

Страница 13: ...ill be displayed After you enter the correct password DOT 320 will display the Main windows In the Software Reset mode only current running programs will close So you may lose current data or file but saved data and file will be not affected by software reset Hardware Reset When there is a serious problem with DOT 320 which cannot be fixed by software reset you must restart DOT 320 by hardware res...

Страница 14: ...can assign the programs to each function button For more information refer to the 9 Using Utility Programs 9 Using Utility Programs 9 Using Utility Programs 9 Using Utility Programs Function Buttons Buttons Function 1 Press Function 2 Press Hold Today Inbox Contacts Backlight Tasks Task Manager Calendar PIMs Backup Notes Media Player ...

Страница 15: ...er to wall outlet 3 Connect USB cable of docking cradle to the USB Port of your desktop PC 4 Insert your DOT 320 to docking cradle You can charge your DOT 320 and synchronize with your desktop PC For detailed information about synchronization with your desktop PC refer to 4 Connecting to 4 Connecting to 4 Connecting to 4 Connecting to Desktop PC Desktop PC Desktop PC Desktop PC The following illus...

Страница 16: ......

Страница 17: ... bar You can check loading status by this progress bar After loading image the Main window appears Now you can use DOT 320 2 2 2 2 Connect to battery charger Connect to battery charger Connect to battery charger Connect to battery charger Connect Battery charger to the DC jack of your DOT 320 For safe use you must charge DOT 320 more than 3 hours till notification LED color turns to orange before ...

Страница 18: ...matically enter the main windows screen Now you can work with DOT 320 4 4 4 4 Connect D Connect D Connect D Connect DOT320 t OT320 t OT320 t OT320 to Desktop PC o Desktop PC o Desktop PC o Desktop PC If you want to connect to your Desktop and synchronize the files and data connect the USB connector to your Desktop USB port and install your DOT 320 to the Cradle After this run the ActiveSync progra...

Страница 19: ...ze and transfer data and files between DOT 320 and desktop PC This Chapter will show you how to Install Microsoft ActiveSync 3 5 on your Desktop PC Connect DOT 320 to PC by USB cable and docking cradle Install USB Driver Establish a partnership between DOT 320 and PC Synchronize data between DOT 320 and PC Browse files on DOT 320 from PC Transfer files between DOT 320 and PC ...

Страница 20: ...indows Millennium Edition Windows NT Workstation 4 0 with SP6 or later or Windows 98 Application Microsoft Outlook 98 or later required for synchronization to the desktop or portable computer for e mail calendar contacts tasks and notes Outlook 2002 recommended Internet Explorer Microsoft Internet Explorer 4 01 SP1 or later Hard Disk More than 65 MB of available hard disk space actual requirements...

Страница 21: ... install DOT 320 driver 1 When connecting your DOT 320 to cradle for the fist time after installing ActiveSync Found New Hardware Wizard Found New Hardware Wizard Found New Hardware Wizard Found New Hardware Wizard appears Check Install from a list or Install from a list or Install from a list or Install from a list or specific location Advances specific location Advances specific location Advance...

Страница 22: ...driver to ins t search I will choose the driver to ins t search I will choose the driver to install tall tall tall then click Next Next Next Next 3 Found New Hardware Wizard Found New Hardware Wizard Found New Hardware Wizard Found New Hardware Wizard shows found hardware Click Have Disk Have Disk Have Disk Have Disk ...

Страница 23: ...ars Click Browse Browse Browse Browse and select folder which contains driver Note Before proceeding to the next step make sure your DOT 320 bundle CD ROM is in your CD drive The proper driver of Anchor USB EZ Link Cable for DOT 320 is in Driver folder in bundle CD ROM 5 Select WCEUSBSH INF and click Open Open Open Open ...

Страница 24: ... 6 Anchor USB EZ Link Cable driver will be installed in your desktop PC 7 In installing procedure you will see the Windows XP compatibility warning message Click Continue Anyway Continue Anyway Continue Anyway Continue Anyway ...

Страница 25: ...pleting the Found New Hardware Wizard Completing the Found New Hardware Wizard Completing the Found New Hardware Wizard Completing the Found New Hardware Wizard appears Click Finish Finish Finish Finish to complete installation of USB driver ...

Страница 26: ...upport OS Desktop PC operating system Connection Method Windows 95 Windows 98 Windows 2000 Windows NT USB No Yes Yes No Serial Yes Yes Yes Yes Infrared Yes Yes Yes No To use a cradle connect using a cradle between desktop PC and DOT 320 by following these steps 1 Connect the DC plug from battery charger to the DC jack on the cradle and plug the battery charger into a wall outlet 2 Connect the USB ...

Страница 27: ...izard starts automatically 2 Enter the device name and click Next Next Next Next 3 If your DOT 320 already has a partnership with another desktop computer and you no longer want to use it select Yes I want to synchronize with only this Yes I want to synchronize with only this Yes I want to synchronize with only this Yes I want to synchronize with only this computer computer computer computer in th...

Страница 28: ...320 User s Guide 5 Click Finish Finish Finish Finish to complete setup Upon completing setup a partnership between desktop PC and your DOT 320 ActiveSync will synchronize the selected information automatically ...

Страница 29: ... do anything automatically To synchronize while in this mode click Sync Synchronization compares the data on your DOT 320 with the data on your desktop PC and updates both computers with the most recent information You can synchronize any files on your DOT 320 with the corresponding files on your desktop PC such as PIMs Data and e mail messages Resolving synchronization conflicts If a problem or c...

Страница 30: ... ActiveSync and on your mobile device 1 Connect your DOT 320 to your desktop computer and synchronize 2 If you have unresolved items on the Tools menu click Resolve items 3 Follow the directions on the screen Dialog boxes presented to resolve items differ depending on the reason why the item could not be synchronized Browsing DOT 320 contents from desktop PC While DOT 320 is connected to a desktop...

Страница 31: ... any Explorer window When you double click a folder in the Mobile Devices folder it may take a few seconds for the folder to open While browsing you can cut paste and copy files and data by simply dragging the file icons to folders In your desktop PC you can access to DOT 320 contents using window explorer When you select Files when setting up a partnership WindowsCE My Documents appears in your m...

Страница 32: ......

Страница 33: ...s Chapter will help you familiarize with the Microsoft Windows CE NET the operating system of DOT 320 This chapter will introduce aspects of Microsoft Windows CE NET such as Using the main window Using Navigation Bar Control Using the Settings ...

Страница 34: ... cut paste files and data create new folder and set properties by R Button Menu You can see the shortcuts of main programs of Microsoft Windows CE NET My Computer My Computer My Computer My Computer showing your DOT 320 structure You can see folders and files in your DOT 320 Recycle Bin Recycle Bin Recycle Bin Recycle Bin Deleting completely or restoring deleted files and data This folder stores t...

Страница 35: ...e these to My Document Also you can read and modify these files and data on My Documents folder Transcriber Transcriber Transcriber Transcriber Recognition of your handwriting input characters As an alternative or companion to a keyboard you can input handwriting characters using Transcriber Upon Tapping Transcriber a Transcriber Help window appears After closing the transcriber help window by tap...

Страница 36: ... Start Icon Start Icon is the starting point of DOT 320 applications Upon Tapping the Start Menu you will see the Programs Favorites Documents Settings Help and Run You can directly execute the programs of your DOT 320 Start Icon of Windows CE NET is the same as the Start button on your desktop PC Windows Start icon Taskbar ...

Страница 37: ...ing 9 Using 9 Using 9 Using Utility Utility Utility Utility Programs Programs Programs Programs You can set general appearance options of taskbar and clear Documents history Soft Keyboard When DOT 320 starts you can see soft keyboard icon on taskbar Tap soft keyboard icon then soft keyboard appears You can input characters numbers and symbols by tapping proper key on soft keyboard Functions of the...

Страница 38: ...plication You can use rotation in My Computer Media Player My Document Internet Explorer Microsoft WordPad Viewer and PIMs Note 1 In display rotation mode only software keyboard can be used to input characters 2 Rotate window under running any application provides rotation application may appear not to fit window IR Send_Receive Run Infrared Communication using OBEX Object Exchange Protocol OBEX f...

Страница 39: ...on to transfer Files or Data 5 File Browsing window appears Select a file to transfer then tap OK 1 Click Send At The bottom on IrDA Window File Data Sending message appears Completed sending File Message appears when transfer completes 2 When transferring files or data from other device to DOT 320 Receiving Status Message appears Received file is saved in My Computer Received Files directory 3 Cl...

Страница 40: ...s area of DOT320 taskbar Status Icons on Taskbar ICON Description Battery capacity is critical level Battery capacity is low Battery capacity is very low External AC power source is connected Connected to Desktop PC by USB Quick Link Icon Show Network connection status ...

Страница 41: ...an set up your DOT 320 in Control Panel Tap Setting Control Panel then Control Panel window appears You can change view mode Large Icon Small Icon and Details You can also arrange icons in the View menu Control Panel is as follows ...

Страница 42: ... or modify by the drop down list My Certificates contains your personal certificates to identify yourself Other Authorities intermediate certificate authorities that help establish a chain of trust Trusted Authorities lists the top level certificates for authorities 4 To add a certificate or associated private key to the selected store tap Import and select the way to import certificate or key You...

Страница 43: ...using the arrows on either side of the month or the month label shown upon tapping month 2 Select the date from the calendar 3 Set the time by entering in the Current Time box 4 Select your location from the Time Zone drop down list 5 Tap Apply to save changes Clock You can set the time of Home and Visiting 1 Choose Home or Visiting 2 Set Region by drop down list 3 Set year month and day from the ...

Страница 44: ...n set alarm following these steps 1 Check an event to use alarm You can use four alarms 2 Enter the name or description of each alarm 3 Check the day check box which is occur alarm 4 Set time in time box 5 Tap speaker icon for setting options then Notification window appears 6 Check notifications Sound Message and Flashing light You can use window default sound for alarm 7 Tap Save to save set ala...

Страница 45: ...n by tapping New or Remove 2 Enter Area Code and country Region code 3 Select dialing method You can choose Tone dialing or Pulse dialing 4 Check Disable call waiting and select dial not to use call waiting 5 Dialing patterns are box shows dialing patterns you set 6 Tap Edit to edit Dialing Pattern Enter local long distance and international call patterns 7 Tap OK ...

Страница 46: ...selecting Properties in R Button menu from desktop Background You can change the background image on desktop 1 Select the Background tab 2 From the Image list select an image to set the background of the desktop Image list shows the image files in Windows folder Click Browse to use images in other folders 3 To set tile image on the background check image on the background ...
Страница 47: ...pply to use the selected scheme To create a custom color scheme or change the color of each item 1 Select the Appearance tab 2 From the Item list select a display item You can select the item by tapping appropriate item in the preview box 3 Tap color box next to Item list Color window appears 4 From the Basic colors list select a color and tap OK 5 Changed color appears in the preview box 6 To sav...

Страница 48: ... Select Backlight tab 2 Select one or both of the check boxes to turn the backlight off when using batteries or external power 3 From the appropriate list select the length of time the device should be idle before the backlight is turned off 4 To turn on backlight automatically when any key is pressed or touch screen is tapped tap Advanced and check appropriate check box ...

Страница 49: ...m Current input method drop down list The Current input method shows available input methods 2 Tap Options Then Soft Keyboard Options window appears 3 Select keyboard key size You can select large keys or small keys 4 Check Use gestures for Space Backspace Shift and Enter to use gestures 5 Tap OK to save changes ...

Страница 50: ... delete cache in your system 5 Tap Clear History to delete web history Connection You can set connection options 1 Check Use LAN to use LAN for internet connection You cannot use autodial when selecting this option 2 Select the ID for autodial 3 Check Access the Internet using a proxy server if you want to use proxy server then enter proxy address and port 4 Check Bypass proxy server for local add...

Страница 51: ... you enter the insecure page if this option checked Advanced You can set advanced options 1 Check Display images to show images in web pages 2 Check Play sounds to play sounds in web pages You can access faster if you turn off these two options 3 Check Enable scripting to use script automatically 4 Check Display a notification about every script error to show a notification message for every scrip...

Страница 52: ... Make New Connection icon 3 In the Make New Connection dialog box enter a name for the connection 4 Select Dial Up Connection and tap Next 5 Select the modem to use and tap Configure 6 Under Connection Preferences use the default settings provided If you can t connect using these settings see your ISP or network administrator for specific information If you want to always enter a phone number befo...

Страница 53: ...t card 1 Insert the Ethernet card to a CF type slot 2 The NE2000 Compatible Ethernet Driver Settings window appears Select Obtain an IP address via DHCP then tap OK 3 Select Start Settings Control Panel Open the Network icon 4 In the Adapters tab select NE2000 compatible Ethernet driver 5 Select the Identification tab Enter the User Name Password and Domain name you use to log on to your PC Create...

Страница 54: ...tart Settings Connections 3 Double tap the connection you have created for the ISP Direct Connection to a Desktop PC 1 Double tap Make New Connection 2 Enter connection name 3 Select direct connection 4 Select a device you want to connect 5 Tap Configure 6 Set device properties as Dialup connection ...

Страница 55: ...hone in Identification tab Enter name company address work phone and home phone of owner To display owner s identification check Display owner identification Notes Notes Notes Notes You can add notes for more information about the owner Notes Enter notes in Notes box To display notes check Display owner notes Network ID Windows CE NET uses owner s information to gain access to network resource Ent...

Страница 56: ...get your password when you checked enable password you must perform a hardware reset Performing a hardware reset erases all files and data you have created and all programs installed You may keep valuable data such as names and phone numbers of contacts credit card numbers and confidential documents on your device To protect your important information you can do as following Use a password You can...

Страница 57: ... the PC connection icon 3 Make sure Allow connection with desktop computer when device is attached is selected 4 Tap Change Connection 5 Select a desired connection 6 To add a new connection refer to 4 Connecting to Desktop PC 4 Connecting to Desktop PC 4 Connecting to Desktop PC 4 Connecting to Desktop PC Note To connect your DOT 320 with desktop PC Microsoft ActiveSync 3 5 must be installed on y...

Страница 58: ...provides general information on battery conditions 3 There are three conditions Good Enough battery power Low Low battery power Recommended to charge your battery Very Low Very low battery power Recommended to turn off and to charge your DOT 320 not to lose important data Power Off You can save battery power and prevent unauthorized use by having turn off your DOT 320 To turn your DOT 320 off auto...

Страница 59: ... if it has one Connecting to a desktop computer Using a compactflash card or other peripheral Letting the LED indicator flash for extended time periods B Set device to turn off when idle While on battery power your device automatically turns off or suspends operation if you haven t touched the keyboard or used the stylus or mouse for more than three minutes Maximize battery life by shortening this...

Страница 60: ...currency time and date 1 Select Start Settings Control Panel 2 Open the Regional Settings icon 3 Select the tab for the type of information you want to change 4 Select desired options The characteristics available are determined by the region selected on the Region tab ...

Страница 61: ...ontrol Panel 2 Open the Remove Programs icon 3 From the Programs list select the program you want to remove 4 Tap Remove Note You can only remove programs that you have installed in RAM If you are unable to remove a program see Windows CE Help on your device or the program s documentation for more information ...

Страница 62: ...ns list partition name is disappeared 3 Tap the New icon and Enter new partition name Then new partition will be created and mounted automatically 4 If you want to delete partition Select a partition want to delete tap dismount icon and tap delete 5 If you want to view the properties of selected partition Tap Properties Icon 7 You can backup PIMs data in mounted partition For more information abou...
Страница 63: ...ll change To test the double tap sensitivity 1 Select Start Settings Control Panel 2 Run Stylus and select Double tap tab 3 Double tap the icon below The icon will change 4 If the icon doesn t change adjust your setting using the grid above Calibration If your DOT 320 is not responding properly to your taps recalibrate your screen using Recalibrate To start the recalibrate 1 Select Start Settings ...

Страница 64: ...stem program and select Memory tab 3 The blue portion of the slider bar shows available memory 4 Move slider The left side of the slider is storage memory and the right side of the slider is program memory 5 With more storage memory you can store more data and files With more program memory there will be less program problems Device name is the partnership device name of your DOT 320 used when you...

Страница 65: ...s for Events warning system events Applications and Notifications alarms reminder Sounds To change event sounds 1 Select Start Settings Control Panel 2 Open the Volume Sounds icon and then select the Sound tab 3 From the Event name list select an event 4 From the Event sound list select a sound 5 To remove a sound from the selected event select None 6 To save the changes to a different scheme sele...

Страница 66: ......

Страница 67: ...ill be replaced at option in ActiveSync PIMs contains following applications Today Today Today Today Display brief information for today Inbox Inbox Inbox Inbox Send and receive messages including e Mail via desktop PC Calendar Calendar Calendar Calendar Display Day Week Month and Year calendar scheduling for your appointments and meetings Contacts Contacts Contacts Contacts Display and keep track...

Страница 68: ...lowing Owner Information Shows the owner s name Company Name and Work Phone Home Phone Number Calendar Shows Calendar Inbox Shows Inbox Tasks Shows Tasks Contacts Shows Contacts Notes Shows Memos Owner Information Used For informing the Name Company Name Address Telephone Number e Mail address and Notes for DOT320 s Owner In Today window just owner s name and telephone number are displayed If you ...

Страница 69: ...et the Inbox synchronization from the option To set inbox synchronization 1 In ActiveSync program on your desktop PC on the Tools menu click Options and then select the Inbox 2 E mail messages in the Inbox folder of desktop of Microsoft Outlook are copied to the Inbox folder on your DOT 320 The E mail messages between the desktop PC and DOT 320 are linked so when you delete an e mail message on yo...

Страница 70: ...rd and then use inbox to send and receive e mail messages directly When you connect to the POP3 SMTP e mail server new messages are downloaded to the Inbox folder on your DOT 320 Messages in your Outbox folder are sent and messages that have been deleted on the POP3 SMTP e mail server are deleted from the Inbox folder when you re connect next time Messages that you receive directly from a POP3 SMT...

Страница 71: ...t Service type and enter Service name ex POP3 Mail and tap OK POP3 Mail Service Definition window appears 2 Select Connection and enter Host name User ID and Password Ask your mail server administrator or refer to mail connection setting of your PC for detail setting Optionally enter domain SMTP host and return address Tap Next 3 POP3 Mail General Preference window appears 4 Set up connection sett...

Страница 72: ...wn folder hierarchy with four default folders Inbox Outbox Deleted local and Sent The messages you receive and send through the mail service are stored in these folders You can also create additional folders within each hierarchy When connecting to a POP3 or IMAP4 server you may use a modem or Ethernet card to connect to your Internet service provider ISP or to the local area network that your mai...

Страница 73: ... you can see details of the received mail In the below window you can edit and view the message you selected To edit the received message follow these steps below 1 Tap a message in the message list 2 By Tapping the Delete Reply Forward Move and show hide icon you can edit or view the message ...

Страница 74: ...n make a new message window appears as shown below 1 Enter To Cc and Subject 2 You can select To and Cc from Contacts To select a contact from Contacts tap To window and select Compose Address Book 3 Select contact 4 Enter mail content tap Send 5 The message is saved in the Outbox folder The messages in Outbox will be sent when synchronized with desktop PC Send Icon ...

Страница 75: ...ing Coping messages You can move copy several messages as well as a message to another folder To move copy a message 1 Select message to move or copy 2 Select File and Move to or Copy to Appreciate window appears 3 Select folder to move or copy 4 Tap OK ...

Страница 76: ...r Menu Bar Menu bar is shown below New Menu create new appointment Tools Menu Categories shows category lists You can add delete and modify category Options set calendar options set week view show half hour slots set reminding time show hide Icon and Reminder Sound You can change view mode by just tapping view icon in menu bar Agenda View Icon Year View Icon Month View Icon Weekly View Icon Day Vi...

Страница 77: ...w You can also edit schedules New Copy Paste and Delete All day Appointment Item shows only a Subject and Normal Appointment Item shows Subject Start time End time Location and Icons Reminder Occurrence Sensitivity The property of appointment is as following Reminder Icon Occurrence Icon Sensitivity Icon Normal Appointment View All day Appointment View ...

Страница 78: ...time Location Icons Reminder Occurrence Sensitivity attendees Categories and Status Memo View shows any additional information you wrote Tap each view window to edit an appointment You will edit or view an appointment in detail with a attribute view window as follow Appointment edit edit appointment details Note edit edit notes in appointment Simple Memo View Simple Appointment View ...

Страница 79: ...new appointment by selecting New in a menu bar Also you can change the appointment time by tapping an appointment item Day View supports Edit tool Copy Delete Paste and Cut about the appointment item In the day view window you can move to the Appointment View by tapping an appointment item and edit an appointment Appointment Item ...

Страница 80: ...ew Weekly View shows appointments in any selected week You can move the relevant Day View Year View Month View by tapping an appointment item Tap the arrow buttons in the upper part of the window and move to previous this or next week ...

Страница 81: ...g an appointment item Tap the arrow buttons in the upper part of the window and move to previous this or next month The appointment icon in the month view shows the property of an appointment The property of icon is as follow Property Icons of Appointment ICON Description Morning Appointment Afternoon Appointment Morning and Afternoon Appointment All day Appointment Move to today ...

Страница 82: ...appointments You can move to the relevant Day View by tapping specific date Tap a day from the calendar and then a drop down box shows up You can select the year you want to see directly by tapping the arrow buttons in the upper part of the window and move to last or next year ...

Страница 83: ...ay week shows from Monday to Saturday Half hour slot setting show half hour slots in Day view window Reminder Time setting enable remind and set remind time Select remind time unit minute s hour s day s a week s and set remind time Set value maintains even when creating new appointment Show Icon set icon to display in calendar Tap icon to display Reminder Sound setting select sound for remind At r...

Страница 84: ...enu Bar consists of New Tools Menu and Icon Menu Bar New Menu is for creating new contact To create new contact tap New Then Edit Contact window appears New contact appears in Contact List window Tools Menu is for setting options of contact Icons in Icons Menu Bar are as follow Back to Contact list return to the main contact window Create a new contact create new contact Delete selected contact de...

Страница 85: ...ndow search contact Enter the key word to find in Search Contact window and tap Search icon Then Main Contact window shows the contacts including key word To show all of the list again tap the icon beside the input window Brief View Tap a contact in the main contact window The brief information for the selected item shows Tap Brief Contact window to change to Edit Contact window ...

Страница 86: ... Tap the arrow next to the input box Then detail input box of selected item appears After completing editing tap close to save or dismiss Saved contact will appear in Main Contact list Options View Lists view Settings 1 Show ABC tabs Decide to show the alphabetical order column such as ab cde in the main contact window 2 Use large font Set to use large font Country Region Settings 1 Area code Ente...

Страница 87: ...te a new task Task Edit window appears You can set up options of task in Tool Options Quick icons Enables to select the Categories menu quickly Shows all lists Shows only the tasks in progress Shows only the completed tasks Show Quick Bar in main window View Categories show task list by category You can edit category list in Category in Task Edit window And you can view only Active task or Complet...

Страница 88: ...K Quick Bar To enable the Quick Bar 1 Tap the quick bar icon from the Toolbar or Tool Quick Bar from the menu to show a Quick Bar 2 By enabling the Quick Bar without setting the additional task in details you can set only the task name and the priority quickly It also makes it possible to set IM automatically by selecting an edit window directly or tapping the Priority icon on the Quick Bar window...

Страница 89: ...n Managers 83 TASK Brief View 1 Tap the arrow in right down in Brief View window Then Start and Due date appears 2 Tap the upper part of task then task edit window appears 3 By tapping the lower part of task you can add a note to a task ...

Страница 90: ...brief view window Task Edit window appears Enter information to each item and close Task Edit window Then new task appears in Main Task window 2 You can add a note to task by tapping Note icon under the Task Edit window You can create a note by transcribes or Soft keyboard ...

Страница 91: ... 2 Check Set reminders for new items for reminding user of a new task 3 Check Show start and due date to show start and due date in main task window 4 Check Use a large font to use capital characters 5 Tap Change to change the sound for alarm My Computer Windows Directory에서 Select the sound file for alarm Wav files can be used for alarm ...

Страница 92: ...and view about for notes program Voice Recorder Icon Tap Voice Recorder icon or press Voice record button then Voice Recorder Tools appears You can process voice recording using Voice Recorder Tools Folder Selector Select a folder to save a new note Sorting files Sort notes ordered by Name Date Size or Type Create New File Tap File New then Text Edit window appears Text File Voice Recorded File Vo...

Страница 93: ...riting and also can draw as instructed below Using soft keyboard 1 Run Notes 2 Tap File New Edit window appears 3 Tap keyboard icon in taskbar 4 Input the character by tapping soft keyboard Using Transcriber 1 Run Notes 2 Tap File New Edit window appears 3 Tap Transcriber icon in taskbar If there is not a transcriber icon in taskbar run transcriber first 4 Draw the character by stylus pen on the N...

Страница 94: ...ditor Draw memo using stylus pen Note Drawing edit do not support Transcriber To erase a drawn memo tap Object Selector and drag to select object then tap Eraser Tap close to save memo Voice Recorder Selector Object Selector Eraser ...

Страница 95: ...hows now recording To stop recording tap Stop Icon or press Voice Recorder Button again By tapping Play Icon you can play the recorded voice or sounds You can control volume by tapping Volume Control Icon By sliding the volume is up or down In order not to use Voice Recorder tap Voice Recorder Selector in Menu Bar Record Icon Stop Icon Play Icon Pause Icon Play or recording progress Volume Control...

Страница 96: ...Button 4 2 Warning Message occurs when Flash ROM or CF Memory is not mounted to DOT 320 File System To solve this select Start Settings Control Panel Storage Manger and then mount storages For more information refer to 6 6 6 6 Setting your DOT 320 Setting your DOT 320 Setting your DOT 320 Setting your DOT 320 3 Check data to backup from File List Box And specify the folder to Backup 4 Tap Backup T...

Страница 97: ...can use not only simple calculator but also engineering calculator simple programming tool unit conversion exchange rates notation conversion and graph To use calculator select Start Programs Applications Calculator For more detailed information refer to Redcal User s Guide in bundle CD ROM ...

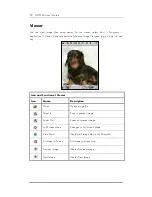
Страница 98: ...es jpg gif bmp tif and png Icon and Function of Viewer Icon Name Description Open Opens Image file Zoom In Zoon in present image Zoom Out Zoom out present image Full Screen Mode Changes to Full Screen Mode Slide Show Displays all image files in My Computer Fit Image to Screen Fits image to screen size Previous Image Display Previous Image Next Image Display Next Image ...

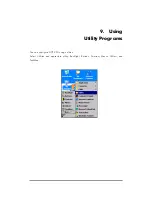
Страница 99: ...9 Using Utility Programs You can configure DOT 320 using utilities Select Utilities and appreciate utility Backlight Buttons Contrast Menus QStart and TaskMan ...

Страница 100: ...f Display by tapping the Backlight menu in Utility Programs Set the brightness level by checking radio button Also you can light on or off by tapping Light On Off You can select four brightness levels Super Brightness High Brightness Medium Brightness or Low Brightness ...

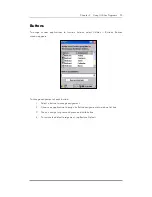
Страница 101: ...ct Utilities Buttons Buttons window appears To change assignment of each button 1 Select a button to change assignment 2 Choose an application to assign by Button assignment drop down list box 3 You can assign for press and press and hold button 4 To restore the default assignment tap Restore Default ...

Страница 102: ...plications in a specific category using QStart QStart consists of Tools and Menus To add and delete a category tap Tools You can add programs to a category From the QStart main window tap category drop down list Then you can check default categories and added categories Select a category then added programs appear in program list Task Manager To indicate the current working program tap the Task ma...

Страница 103: ...10 Using Microsoft Applications Command Prompt DOT 320 contains window console for pocket CMD You can use DOS command using pocket CMD ...

Страница 104: ...top And copy the downloaded multimedia files to your DOT 320 The Default folder for copied files is My Documents Use ActiveSync to copy multimedia files from your desktop to your DOT 320 To run the Windows Media Player select Start Programs Media Player Adjust the Volume Move the slider of Volume Control to adjust the volume Left is softer right louder Navigate a Track Move the slider of Process B...

Страница 105: ... time you start Windows Media Player there are two default playlists Local Content and Web Favorites Local Content contains all the multimedia files found in your DOT 320 and storage card You cannot edit Local Content Web Favorites lists your favorite streaming media files In default web favorite playlist is empty You can edit web favorite playlist You can create a new playlist To create a new pla...

Страница 106: ... an existing playlist To delete a playlist 1 Select File Playlists 2 In the drop down list box tap Organize Playlists 3 Select a playlist to delete and tap Delete Favorites You can play multimedia files quickly using favorites Favorites is the specified playlist To add a multimedia file or streaming media file to favorite 1 Play a multimedia file to add to favorite 2 While a multimedia file is bei...

Страница 107: ...elete and then tap Delete icon Exit close Media Player View Zoom zoom in or out You can select 50 100 or 200 or original size Full Screen play video file with full screen mode Available only with video files Statistics shows statistics of media player opened file name source protocol and memory usage Properties shows the properties of opened file filename duration audio frequency and whether this ...
Страница 108: ...ayback Play plays opened file Pause pauses playing file Stop stops playing file Mute mutes sound To enable sound select mute again Repeat plays repeatedly Shuffle plays files in random order Web Go to a web page for media player ...

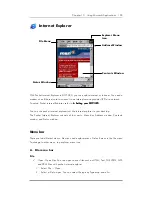
Страница 109: ...orer just like internet explorer in your desktop The Pocket Internet Explorer consists of four parts Menu bar Address window Contents window and Status window Menu bar There are two different menus file menu and explorer menu Default menu is the file menu To change to other menu tap explorer menu icon A File menu bar File Open Open files You can open various files such as HTML Text GIF JPEG AIFF a...

Страница 110: ...r Save Picture As from the Shortcut menu Some frames are designed so that they can t be saved Such frames will not be displayed once you open them as saved files from Windows Explorer Find You can find a word or string 1 Select File Find Find window appears 2 Enter a word or a phrase to find in Find what box 3 Check Match whole word only to find a phrase that is completely matching 4 Check Match c...

Страница 111: ...an select Largest Larger Medium Smaller or Smallest Encoding You can select a language to encode a page Default is Auto Select To choose a specific language select language from More list Stop You can stop loading page Refresh You can refresh current page Internet O1tions You can set up your internet options For more information refer to 6 Setting your DOT 320 6 Setting your DOT 320 6 Setting your...

Страница 112: ...Select Favorite Organize Favorite Organize Favorites window appears 2 Select favorite page to edit then tap appropriate button 3 You can rename move or delete page To create a new folder tap Create folder B Explorer menu There are 6 icons on explorer menu Back Forward Stop Refresh Home and Search Refer to appropriate file menu for more information Address Window You can move to other page by enter...

Страница 113: ...icon menu File Menu File New makes a new document You can also make a new document from a template Open opens an existing file You can open files with following formats TXT DOC and DOT Save saves the current document You can save as WordPad documents pwd Word 97 95 6 0 compatible documents doc or Word 97 95 6 0 compatible template dot Password You can set a password for a document for security To ...

Страница 114: ... Match case Find Next finds next matched text Replace finds text and replaces with another text View You can select either normal or outline view Normal normal view Document is shown as real Outline outline view You can see an outline of a document Wrap to Window wraps WordPad to window Full Screen sets to full screen mode Zoom zooms in or out You can also use custom zoom level Format Font set fon...

Страница 115: ...ost To avoid losing attributes save a document in a different file name then close the document Changes caused by Word document conversion a a a a Borders and Shading Borders and Shading Borders and Shading Borders and Shading Borders and shading are not displayed in WordPad but are restored when converted back to a Word document Shading is not restored when used in a table but simple borders are ...

Страница 116: ...ined and displayed in WordPad g g g g Pictures Pictures Pictures Pictures Pictures are removed during conversion h h h h Table of Contents Table of Contents Table of Contents Table of Contents Table of Contents and some formats are preserved However any text set at right aligned tab stops may wrap to the next line Index text and some formats are preserved Tables appear as a tab delimited text Cell...

Страница 117: ...arting Transcriber Program Selecting Text Editing Text Transcriber Gestures Alternates List Transcriber Keyboard Transcriber Tooltray Icons Transcriber Correction Window Transcriber Calculator Transcriber Features 1 Microsoft Transcriber is the natural handwriting recognition solutionyou re your Windows CE device It recognizes words from its integrated dictionary and allows you to write in cursive...

Страница 118: ...election text menu items etc or drag icon scrollbars etc by drawing a line across the selection and holding the pen still for a second at the end The ink will disappear and the desired block becomes highlighted or the dragged object will move to the pen tip location Editing Text with Transcriber Transcriber provides convenient gestures for text editing They allow you to remove capitalize and perfo...

Страница 119: ... same line back down Copy Copy Copy Copy Equivalent to pressing Ctrl C in most applications To perform this gesture draw a line from left to right then retrace the same line back to left Cut Cut Cut Cut Equivalent to pressing Ctrl X in most applications To perform this gesture draw a line from right to left then retrace the same line back to right Paste Paste Paste Paste Equivalent to pressing Ctr...

Страница 120: ...hlight the character word or phrase and then open the Correction Window in one of the following ways 1 Tap the Correction button in the Task Bar 2 Use the Correction gesture 3 Use the Quick Correct gesture which brings up the Alternates List Go to Corrector is one of the listed options The Correction Window includes these toolbar buttons Delete Delete Delete Delete Tap this toolbar button to delet...

Страница 121: ...ter or word to change it and then tap OK to close the Correction Window and save your corrections to your document Once the Correction Window is open you can make corrections in any of these ways Double tap a letter or word in the Correction Window to open the Alternates menu where you can 1 Select an alternate word from the list provided 2 Add the selected word to Transcriber s dictionary 3 Chang...

Страница 122: ...tap the caret underneath the text to open a menu where you can 1 Delete selected text 2 Replace selected text with a space 3 Change the case treatment of the selected text 4 Copy the selected text 5 Paste text from the Clipboard into the highlighted space ...

Страница 123: ...board 4 Paste text from the Clipboard into the Correction Window Transcriber Calculator Transcriber has built in calculator functionality capable of recognizing and completing simple mathematical equations This means that you do not have to open the separate Calculator application when you need to perform a simple calculation To use this feature write the formula like you would text For instance 2...

Страница 124: ...configuration dialog boxes by double taping or tap and holding the Transcriber icon from the Task Bar and choose Options from the pop up menu Enable Transcriber Returns Transcriber to the active state Sound On Unchecking the Sound On Box will mute Microsoft Transcriber sounds ...

Страница 125: ...Recognition Mode n Mode n Mode n Mode Choose from unrestricted a all symbols words allowed uppercase A everything you write is automatically capitalized and numeric mode 12 numerals and some letters allowed Correction Window Correction Window Correction Window Correction Window Makes correction easier by isolating words or phrases in a separate window Transcriber Keyboard Transcriber Keyboard Tran...

Страница 126: ...way to add punctuation or a special symbol to the existing text The keyboard will remain visible until you tap the OK button To make the keyboard close automatically after entering a symbol tap the Push Pin button in the upper left hand corner of the keyboard Note Some of these icons must be enabled from the Icons tab in the Options dialog before they appear on the task bar The General Options Dia...

Страница 127: ...fter Add Space After Add Space After A space is added after each recognized word if this option is selected Speed of Recognition vs Quality Speed of Recognition vs Quality Speed of Recognition vs Quality Speed of Recognition vs Quality Controls the trade off between recognition speed and quality Moving the slider toward Speed means faster recognition but could affect accuracy Recognition Start Tim...

Страница 128: ...talization as it will now consider this shape to be a capital A most of the time Or if you do not write Q similar to 2 disable this way of writing Q to help Microsoft Transcriber better recognize digit 2 Also to view how Transcriber expects characters to be written tap on a character you wish to explore then click one of the pictures of this character It will slowly redraw showing the writing sequ...

Страница 129: ...lete deletes selected folders or files You can multiple delete by selecting tap and drag or selecting with SHIFT key Rename renames selected folders or files Properties shows properties of selected folders or files If no folder or file is selected Properties shows system properties Sent To sends selected folders or files to a specific folder You can send folders or files to desktop as shortcut My ...

Страница 130: ...d files with large icons Small Icons shows folders and files with small icons Details shows folders and files with detailed information Name Size Type and Modified date Arrange Icons arranges icons in current folder Available when Large Icons or Small Icons are used Refresh refreshes current folder Options sets up Window Explorer options You can set hidden files to show or not and hide file extens...

Страница 131: ...ons 125 Icon Menu Back back to previous folder Forward forward to subsequent folder Up up to parent folder Delete deletes selected folders or files Properties shows properties of selected folder of files View type selects the type of view ...

Страница 132: ......

Страница 133: ... Serial Communication Ports 1 port USB Communication Port 1port USB Communication Display 64K color 16 bit reflective TFT LCD 3 5 inch Device Power AC DC 1 100mAh Rechargeable Lithium Ion Battery Dimension H W D 52 30 8 6 9 inch 132 78 17 5mm Weight 5 5 oz 156g Including Battery Battery Battery Battery Battery Specification Type Li ion rechargeable Capacity 1 100 mAh Battery Cutoff 3 0 V Battery R...

Страница 134: ...er provides the tips for better use of the DOT 320 and the troubleshooting solutions This chapter deals with problems related to the following Battery Power Reset Basic Problems Data File Backup Synchronization with the PC IrDA Communication Maintenance ...

Страница 135: ...T 320 will be hardware reset resulting in loss of all data and files stored in DOT 320 DOT 320 will not be in use for a long time Turn off the power of DOT 320 using the power button Tap Start Settings Control Panel Power Power Off and set the power to be turned off if DOT 320 remains idle for a certain time for efficient use of power Saving power Tap Start Settings Control Panel Display Backlight...

Страница 136: ...DOT 320 should be hardware reset To hardware reset DOT 320 press the Reset button on the bottom of DOT 320 and hold it for more than 4 seconds Then DOT 320 battery power is shut down and DOT 320 becomes down Press the Reset button again shortly then DOT 320 is connected with the battery power and DOT 320 is hardware reset Since the hardware reset will result in loss of all files and data it is rec...

Страница 137: ...he Double Tap Grid The program may become slow due to too many programs running at the same time Reduce the number of running programs Slow program speed The program speed may be slow due to insufficient program memory of DOT 320 Tap Start Settings Control Panel System And tap Memory tab and expand the program memory area with the slide bar If the storage memory area occupies too much space back u...

Страница 138: ...DOT 320 has to be hardware reset Therefore the password must be memorized Owner information display When DOT 320 is powered off on the owner information may appear To switch to the main window tap the display screen with the stylus pen To modify the owner information tap Start Settings Control Panel Owner Small volume or no sound Tap Start Settings Control Panel Volume Sounds Then tap Volume and c...

Страница 139: ...e time is the same for Date Time Check either Home or Visiting radio box to make DOT 320 operate on the time of the checked location The current time may be displayed on the task bar of the main window Press and hold down the task bar with the stylus pen to display the R Button Function Menu Tap Properties and then Show Clock to display the current time on the task bar The current time refers the ...

Страница 140: ...n DOT 320 and paste them in the backup folder of the CF memory card The data files can be copied to the flash ROM of DOT 320 In this case it is recommended that only essential PIMs data and notification data should be copied Since the flash ROM contains the programs of DOT 320 its memory capacity available is limited Use Start Programs PIMS PIMS Backup or run the Windows Explorer Tap PIMS Backup t...

Страница 141: ...Outlook is running properly on the desktop PC Since it may take some time for synchronization due to characteristics of the Windows CE NET wait until synchronization is complete after inserting DOT 320 in the docking cradle If connection fails despite continued attempts remove DOT 320 from the docking cradle wait for a while and insert DOT 320 again in the docking cradle Wait for synchronization I...

Страница 142: ...mmunication may be discontinued during the transfer of a large file In such an instance disconnect the connection connect it again and try the file transfer Disconnection during file transfer Connection cannot be made among three or more devices at a time but only between two devices IrDA communication control Place DOT 320 in normal positions and tap Quick Link Icon IR Send_Receive menu from the ...

Страница 143: ...se set DOT 320 to enter the automatic suspend mode or press the power button to turn DOT 320 off DOT 320 Power Management Adjust the backlight level to save power Do not use DOT 320 in places of high humidity or high temperature Use the leather protector case to protect DOT 320 from an external impact DOT 320 Management Avoid exposing DOT 320 in direct sunlight for an extended time Back up the dat...

Страница 144: ...al up connection A connection between your DOT 320 and another computer by modem You can have a dial up connection with an ISP a network or with a modem attached to a PC Direct connection A connection between your DOT 320 and another computer by means of the cradle or infrared port DNS Domain Name System An Internet service that translates domain names into IP addresses Driver A control program th...

Страница 145: ...nchronizing and transferring data PIM personal information manager An application or set of applications that organizes information such as addresses appointments and notes POP3 Post Office Protocol v3 A protocol that enables a computer to retrieve messages from a mail server PPP Point to Point Protocol The default method your DOT 320 uses to communicate with an ISP or network server Proxy server ...

Страница 146: ... A protocol for sending e mail messages between computers on the Internet Stylus A pen like utensil designed for navigating on a touch screen Synchronization The process of comparing the files or data on two computers to ensure that they contain exactly the same information Touch screen A touch sensitive screen that allows you to open files launch programs and select text by touching or tapping th...

Страница 147: ...n a particular installation If this equipment does cause harmful interference to radio or television reception which can be determined by turning the equipment of and on the user is encouraged to try to correct the interference by one or more of the following measures Reorient or relocate the receiving antenna Increase the separation between the equipment and receiver Connect the equipment into an...

Отзывы: