


CIARA
Kronos 600 workstation X79-KA-XXXXX-XX-XXX
- 30 -
3.3 Documenting your computer
CIARA
recommends that you record the information about your computer and keep a copy of this in a safe but readily accessible
location.
Please keep your equipment log up to date and include a copy of it whenever your equipment is returned to
CIARA
for servicing.
The equipment log is also helpful if your
CIARA
computer is lost, stolen, or damaged. It can serve as your record of when the
equipment was placed in service, and the dates of all equipment upgrades and configuration changes.
Record the model and serial numbers of the system components, dates of component removal and/or replacement. Be sure to
include the same information for any components added to the system, such as fixed disk, add-in boards, or printers. Record the
model and serial numbers of the
CIARA
System. The model and serial numbers of the System Unit are recorded on the label
attached to the rear cover.
The location of serial numbers on add-in boards, fixed and floppy disk drives, and external equipment, such as video displays or
printers, varies from one manufacturer to another, but should be easily recognizable.
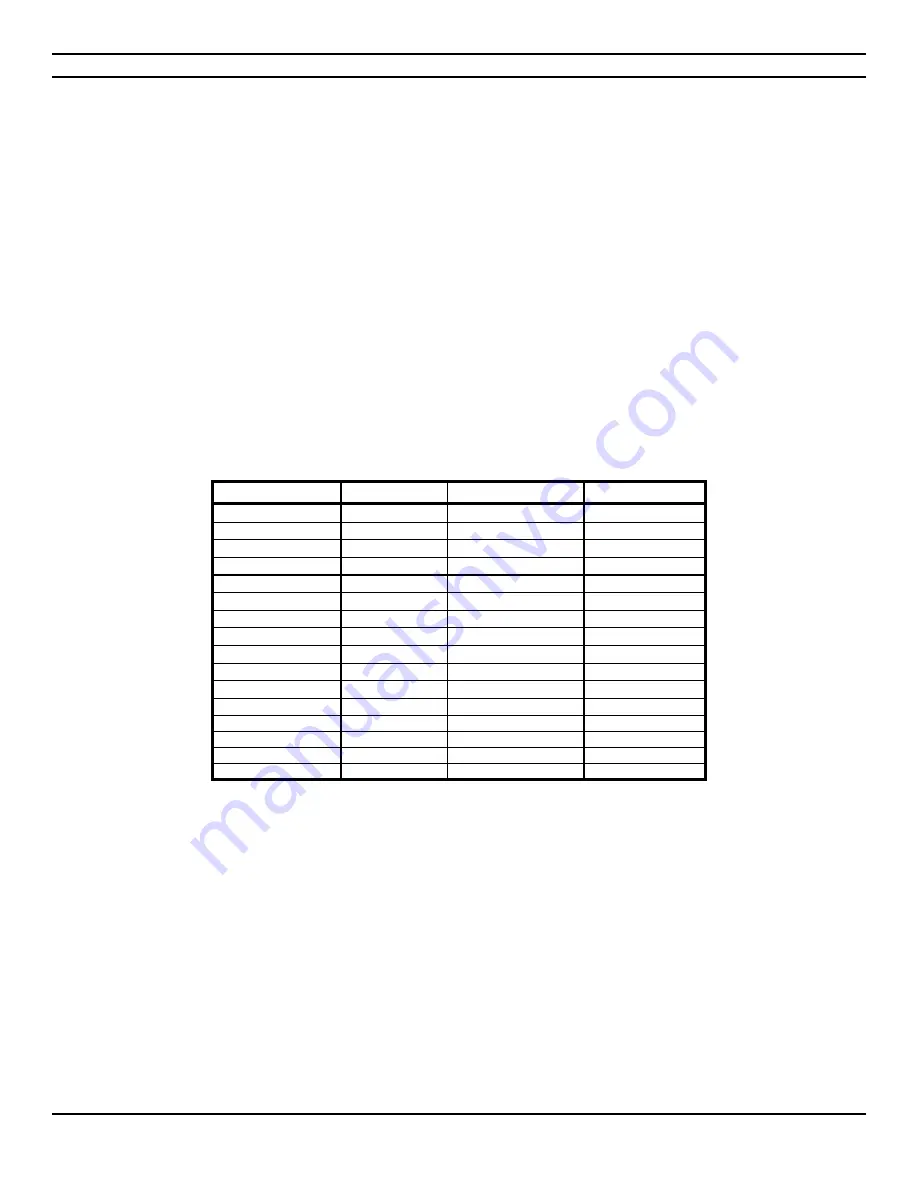
3.3.1 Base System Details
Component
Purchase date Model
Serial number
System Unit
Motherboard
Memory
Processor
Video Card
Sound Card
LAN Card
Hard Drive
DVD-ROM Drive
DVD-Writer
Mouse
Keyboard
Monitor
Power supply
Chassis fan(s)
Содержание Kronos 600 X79-KA SERIES
Страница 1: ...User Guide Kronos 600 Workstation X79 KA XXXXX XX XXX...
Страница 8: ...CIARA Kronos 600 workstation X79 KA XXXXX XX XXX 8...
Страница 36: ...CIARA Kronos 600 workstation X79 KA XXXXX XX XXX 36 NOTES...
Страница 43: ...P9X79 WS Motherboard...
Страница 58: ...16...
Страница 59: ...This chapter describes the motherboard features and the new technologies it supports Pro 1 duct introduction...
Страница 60: ...ASUS P9X79 WS Chapter summary 1 1 1 Welcome 1 1 1 2 Package contents 1 1 1 3 Special features 1 2...
Страница 107: ...ASUS P9X79 WS 2 37 5 6 Triangle mark 7 8 B A 9 B A...
Страница 109: ...ASUS P9X79 WS 2 39 2 3 4 DIMM installation 1 2 3 To remove aDIMM B A...
Страница 111: ...ASUS P9X79 WS 2 41 3 DO NOT overtighten the screws Doing so can damage the motherboard...
Страница 112: ...2 42 Chapter 2 Hardware information 2 3 6 ATX Power connection 1 2 OR...
Страница 113: ...ASUS P9X79 WS 2 43 2 3 7 SATAdevice connection 1 OR 2...
Страница 117: ...ASUS P9X79 WS 2 47 Connect toStereoSpeakers Connect to2 1 channelSpeakers Connect to4 1 channelSpeakers...
Страница 118: ...2 48 Chapter 2 Hardware information Connect to5 1 channelSpeakers Connect to7 1 channelSpeakers...
Страница 122: ...2 52 Chapter 2 Hardwareinformation...
Страница 133: ...ASUS P9X79 WS 3 11 Chapter 3 Scroll down to display the following items Scroll down to display the following items...
Страница 226: ...5 14 Chapter 5 rv JltipleGPUtechnology support...


