


3-2
Chapter 3: BIOS setup
uick switch to frequently
ed menus.
Chapter
3
3.2.1
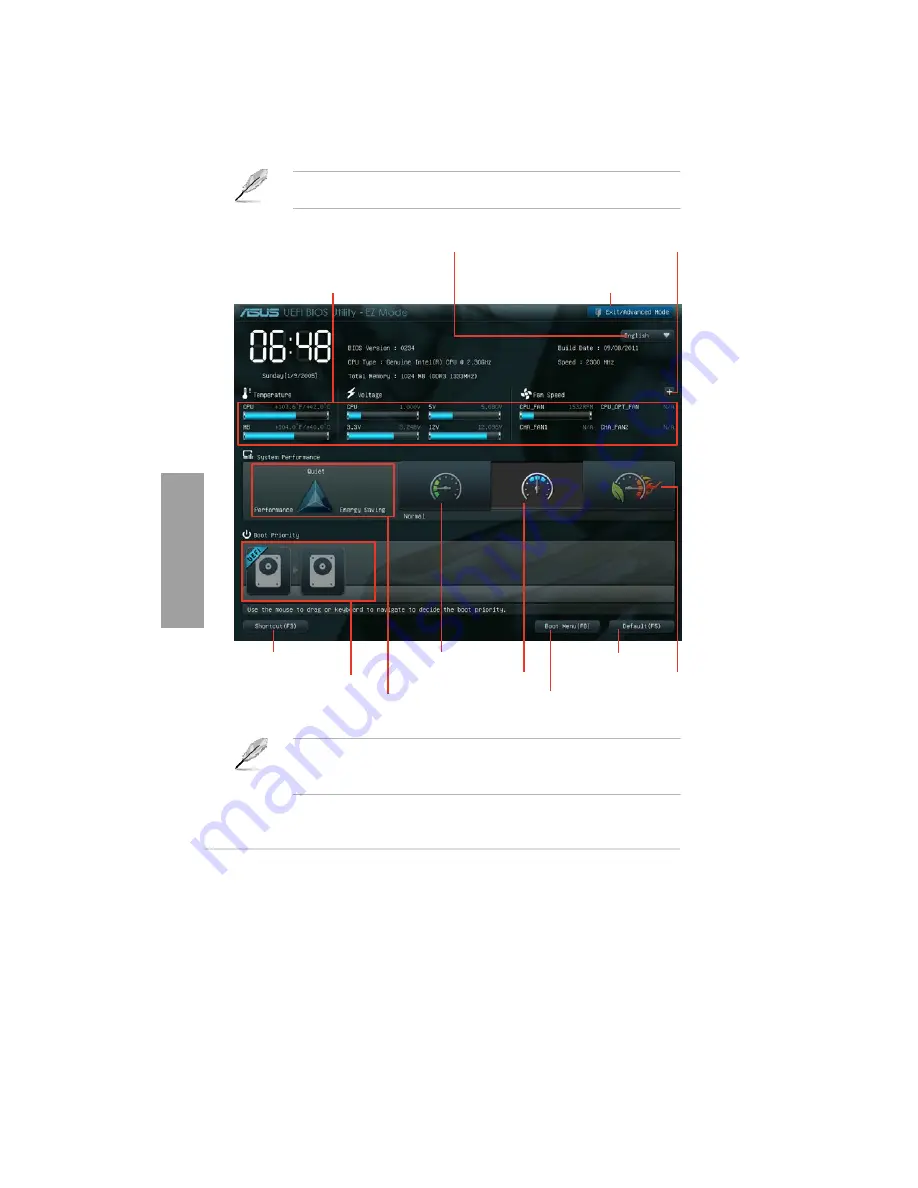
EZ Mode
By default, the EZ Mode screen appears when you enter the BIOS setup program. The EZ
Mode provides you an overview of the basic system information, and allows you to select
the display language, system performance mode and boot device priority. To access the
Advanced Mode, click
Exit/Advanced Mode
, then select
Advanced Mode
.
The default screen for entering the BIOS setup program can be changed. Refer to the
Setup Mode
item in section
3.7 Boot memu
for details.
Selects the display language of
the BIOS setup program
Clicks to display all fan
speeds if available
Displays the CPU/motherboard temperature,
CPU/5V/3.3V/12V voltage output,
CPU/CPU_OPT/Chassis fan speed
Exits the BIOS setup program without saving
the changes, saves the changes and resets
the system, or enters the Advanced Mode
P9X79 WS
Q
u
Selects the boot device priority
Power Saving mode
Loads optimized default
Normal mode
ASUS Optimal mode
Displays the system properties of the
selected mode on the right hand side
Selects the boot device priority
•
The boot device options vary depending on the devices you installed to the system.
•
The
Boot Menu(F8)
button is available only when the boot device is installed to the
system.
Содержание Kronos 600 X79-KA SERIES
Страница 1: ...User Guide Kronos 600 Workstation X79 KA XXXXX XX XXX...
Страница 8: ...CIARA Kronos 600 workstation X79 KA XXXXX XX XXX 8...
Страница 36: ...CIARA Kronos 600 workstation X79 KA XXXXX XX XXX 36 NOTES...
Страница 43: ...P9X79 WS Motherboard...
Страница 58: ...16...
Страница 59: ...This chapter describes the motherboard features and the new technologies it supports Pro 1 duct introduction...
Страница 60: ...ASUS P9X79 WS Chapter summary 1 1 1 Welcome 1 1 1 2 Package contents 1 1 1 3 Special features 1 2...
Страница 107: ...ASUS P9X79 WS 2 37 5 6 Triangle mark 7 8 B A 9 B A...
Страница 109: ...ASUS P9X79 WS 2 39 2 3 4 DIMM installation 1 2 3 To remove aDIMM B A...
Страница 111: ...ASUS P9X79 WS 2 41 3 DO NOT overtighten the screws Doing so can damage the motherboard...
Страница 112: ...2 42 Chapter 2 Hardware information 2 3 6 ATX Power connection 1 2 OR...
Страница 113: ...ASUS P9X79 WS 2 43 2 3 7 SATAdevice connection 1 OR 2...
Страница 117: ...ASUS P9X79 WS 2 47 Connect toStereoSpeakers Connect to2 1 channelSpeakers Connect to4 1 channelSpeakers...
Страница 118: ...2 48 Chapter 2 Hardware information Connect to5 1 channelSpeakers Connect to7 1 channelSpeakers...
Страница 122: ...2 52 Chapter 2 Hardwareinformation...
Страница 133: ...ASUS P9X79 WS 3 11 Chapter 3 Scroll down to display the following items Scroll down to display the following items...
Страница 226: ...5 14 Chapter 5 rv JltipleGPUtechnology support...


