


ASUS P9X79 WS
4-3
Chapter
4
4.3
Software information
Most of the applications in the support DVD have wizards that will conveniently guide you
through the installation. View the online help or readme file that came with the software
application for more information.
4.3.1
AI Suite II
AI Suite II is an all-in-one interface that integrates several ASUS utilities and allows users to
launch and operate these utilities simultaneously.
Installing AI Suite II
To install AI Suite II on your computer
1.
Place the support DVD to the optical drive. The Drivers installation tab appears if your
computer has enabled the Autorun feature.
2.
Click on the Utilities tab, then click
AI Suite II
.
3.
Follow the onscreen instructions to complete installation.
Using AI Suite II
AI Suite II automatically starts when you enter the Windows
®
operating system (OS). The AI
Suite II icon appears in the Windows
®
notification area. Click on the icon to open the AI Suite
II main menu bar.
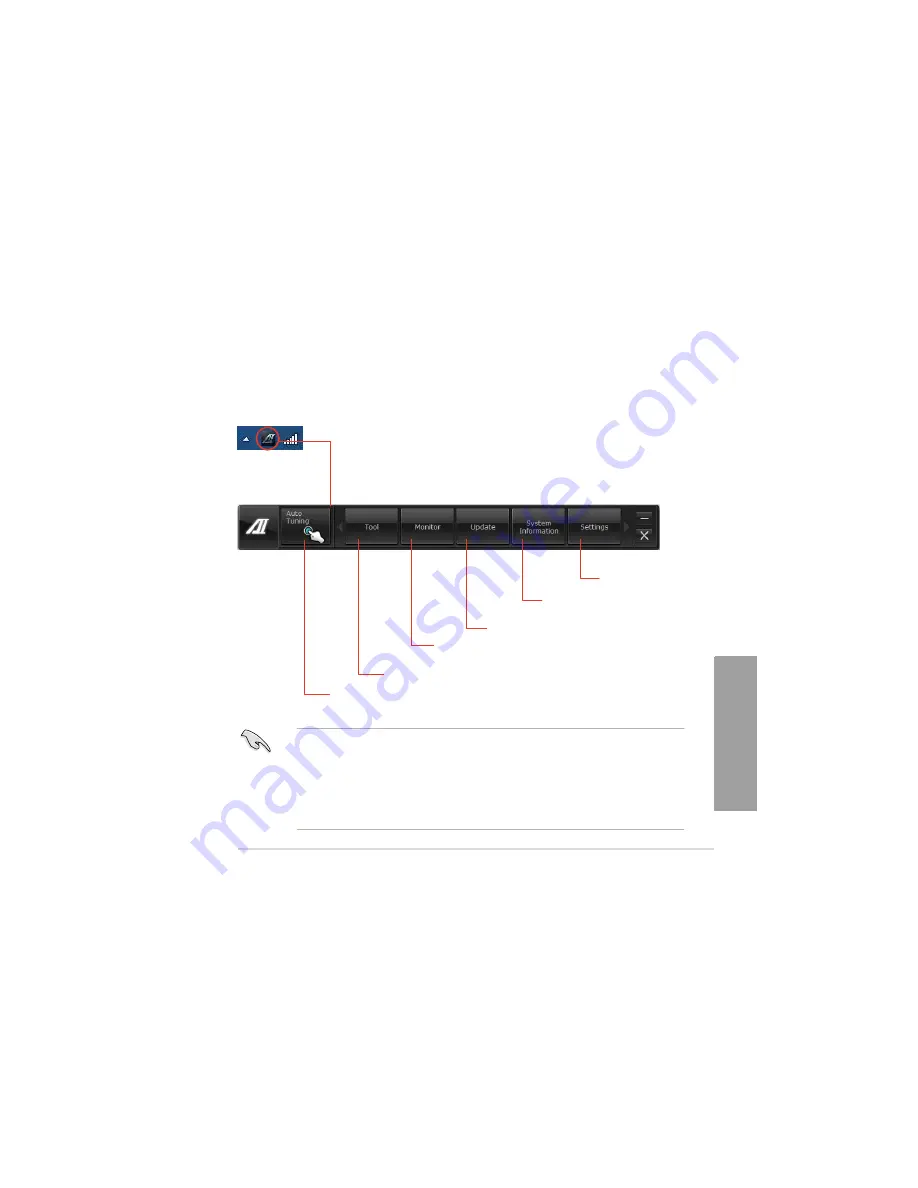
Click on each button to select and launch a utility, to monitor the system, to update the
motherboard BIOS, to display the system information, and to customize the settings of AI Suite II.
Click to customize
the interface settings
Click to show the
system information
Click to update the motherboard BIOS
Click to monitor sensors
or CPU frequency
Click to select a utility
Shortcut to the Auto Tuning
Mode under TurboV EVO
•
The
Auto Tuning
button appears only on models with the TurboV EVO function.
•
The applications in the Tool menu vary with models.
•
The screeshots of AI Suite II in this user manual are for reference only. The actual
screenshots vary with models.
•
Refer to the software manual in the support DVD or visit the ASUS website
at www.asus.com for detailed software configuration.
Содержание Kronos 600 X79-KA SERIES
Страница 1: ...User Guide Kronos 600 Workstation X79 KA XXXXX XX XXX...
Страница 8: ...CIARA Kronos 600 workstation X79 KA XXXXX XX XXX 8...
Страница 36: ...CIARA Kronos 600 workstation X79 KA XXXXX XX XXX 36 NOTES...
Страница 43: ...P9X79 WS Motherboard...
Страница 58: ...16...
Страница 59: ...This chapter describes the motherboard features and the new technologies it supports Pro 1 duct introduction...
Страница 60: ...ASUS P9X79 WS Chapter summary 1 1 1 Welcome 1 1 1 2 Package contents 1 1 1 3 Special features 1 2...
Страница 107: ...ASUS P9X79 WS 2 37 5 6 Triangle mark 7 8 B A 9 B A...
Страница 109: ...ASUS P9X79 WS 2 39 2 3 4 DIMM installation 1 2 3 To remove aDIMM B A...
Страница 111: ...ASUS P9X79 WS 2 41 3 DO NOT overtighten the screws Doing so can damage the motherboard...
Страница 112: ...2 42 Chapter 2 Hardware information 2 3 6 ATX Power connection 1 2 OR...
Страница 113: ...ASUS P9X79 WS 2 43 2 3 7 SATAdevice connection 1 OR 2...
Страница 117: ...ASUS P9X79 WS 2 47 Connect toStereoSpeakers Connect to2 1 channelSpeakers Connect to4 1 channelSpeakers...
Страница 118: ...2 48 Chapter 2 Hardware information Connect to5 1 channelSpeakers Connect to7 1 channelSpeakers...
Страница 122: ...2 52 Chapter 2 Hardwareinformation...
Страница 133: ...ASUS P9X79 WS 3 11 Chapter 3 Scroll down to display the following items Scroll down to display the following items...
Страница 226: ...5 14 Chapter 5 rv JltipleGPUtechnology support...


