


177
To Use the Cooling Charging Chart
Use the outdoor air temperature, saturated suction temperature
and saturated condensing temperature (available on the
Com-
fort
Link display), and find the intersection point on the cooling
charging chart. If intersection point is above the line, carefully
recover some of the refrigerant. If intersection point is below
the line, carefully add refrigerant.
NOTE: Indoor-air cfm must be within normal operating range of
unit.
In order to determine which charging chart to use, the techni-
cian can verify the evaporator configuration of the unit (High
Cap or Std Cap) by counting the number of rows on the in-
stalled evaporator. Use Table 118 to identify the correct unit
configuration for refrigerant charging.
Table 118 — Unit Capacity Type
Units With Humidi-MiZer
®
Adaptive Dehumidification System
NOTE: All circuits must be running in normal cooling mode. In-
door airflow must be within specified air quantity limits for cool-
ing. All outdoor fans must be on and running at normal speed.
Use the following procedure to adjust charge on Circuit B of
Humidi-MiZer equipped units:
1. Start all compressors and outdoor fans. Allow unit to run
for 5 minutes.
2. Switch system to run in a Dehumidification mode for 5
minutes by switching
RHV
to ON through the Service Test
function
(Service Test
COOL
RHV
).
3. At the end of the 5-minute period, switch back into Cool-
ing mode through the Service Test function
(Service
Test
COOL
RHV
) by switching
RHV
to OFF.
4. Using the cooling charging charts provided (Fig. 55-92), add
or remove refrigerant until conditions of the chart are met. As
conditions get close to the point on the chart, add or remove
charge in
1
/
4
lb increments until complete. See paragraph “To
Use the Cooling Charging Chart” for additional instructions.
5. If a charge adjustment was necessary in Step 4, then repeat
the steps in this paragraph (starting with Step 2) until no
charge adjustment is necessary. When no more charge
adjustment is necessary after switching from a Dehumidi-
fication Mode to a Cooling Mode (Steps 2 and 3), then the
charge adjustment procedure is complete.
Gas System Adjustment (48P Only)
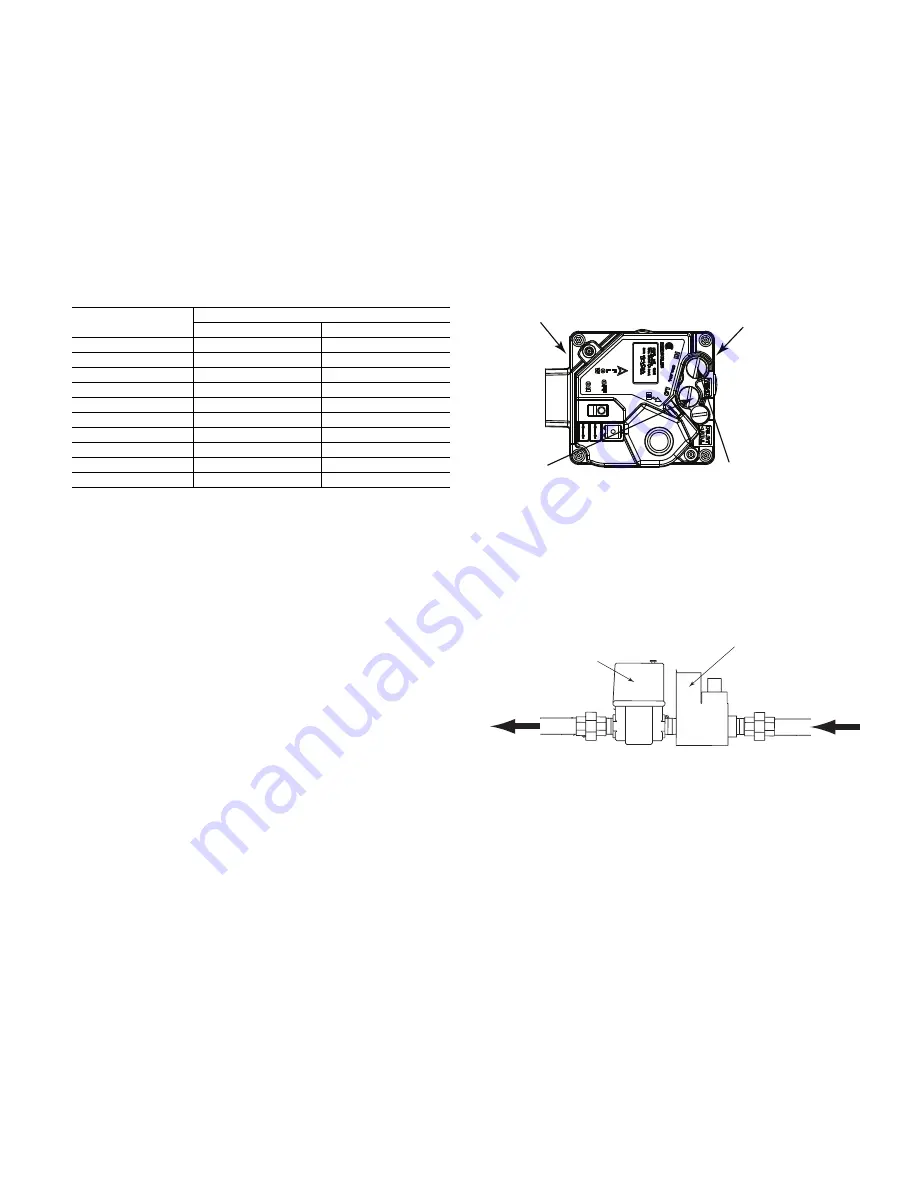
TWO-STAGE GAS VALVE ADJUSTMENT
The gas valve opens and closes in response to the unit control.
When power is supplied to valve terminals D1 and C2, the
main valve opens to its preset position.
The regular factory setting is stamped on the valve body
(3.3 in. wg).
To adjust regulator:
1. Set thermostat at setting for no call for heat.
2. Switch main gas valve to OFF position.
3. Remove
1
/
8
-in. pipe plug from manifold or gas valve pres-
sure tap connection. Install a suitable pressure-measuring
device.
4. Switch main gas valve to ON position.
5. Set thermostat at setting to call for heat.
6. Remove screw cap covering regulator adjustment screw
(see Fig. 93).
7. Turn adjustment screw clockwise to increase pressure or
counterclockwise to decrease pressure.
8. Once desired pressure is established, set thermostat setting
for no call for heat, turn off main gas valve, remove pres-
sure-measuring device, and replace
1
/
8
-in. pipe plug and
screw cap.
Fig. 93 — Two-Stage Gas Valve
MODULATING GAS VALVE ADJUSTMENT
The modulating gas valve is an electrically operated valve con-
trolled by a 0-20 vdc input directly to valve terminals or from
an external controller. The modulating gas valve is installed
downstream of a separate pressure regulator, such as a 2-stage
gas valve. See Fig 94.
Fig. 94 — Modulating Gas Valve Location
The modulating gas valve has both sides fitted for low fire ad-
justment. When 0 vdc is applied at the connect terminals, the
bypass provides a minimum outlet pressure of 0.3 in. wg for
2.0 in. wg at the gas regulator upstream the modulating valve
(factory setting).
For low fire adjustment (see Fig. 95):
1. Disconnect a wire from modulating valve connect terminals.
NOTE: Do not allow wire to come into contact with any other
part.
2. Remove the left bypass cap.
3. Turn adjustment screw using a small screwdriver to the
desired low fire adjustment.
NOTE: Clockwise screw rotation reduces flow rate. Do not over-
tighten.
UNIT SIZE
48/50P
NUMBER OF ROWS ON EVAPORATOR
High Capacity
Std Capacity
030
4
3
035
N/A
4
040
6
3
050
6
4
055
6
4
060
6
4
070
6
4
075
6
4
090
6
4
100
6
4
INLET PRE
SS
URE
TAP (ON
S
IDE)
1/
8
-IN. 27 NPT
OUTLET PRE
SS
URE
TAP (ON
S
IDE)
1/
8
-IN. 27 NPT
HIGH-FIRE REGULATOR
ADJU
S
TMENT
S
CREW
LOW-FIRE REGULATOR
ADJU
S
TMENT
S
CREW
2-
S
TAGE
GA
S
VALVE
MODULATING
GA
S
VALVE
Содержание Weathermaster 48P2030-100
Страница 130: ...130 Fig 19 Typical Power Schematic Sizes 040 075 Shown ...
Страница 131: ...131 Fig 20 Main Base Board Input Output Connections ...
Страница 132: ...132 Fig 21 RXB EXB CEM SCB Input Output Connections ...
Страница 133: ...133 Fig 22 Typical Gas Heat Unit Control Wiring 48P030 100 Units Shown ...
Страница 134: ...134 Fig 23 Typical Electric Heat Wiring 50P030 100 Units Shown ...
Страница 135: ...135 Fig 24 Typical Power Wiring 115 V ...
Страница 136: ...136 Fig 25 Typical Gas Heat Section Size 030 050 Units Shown ...
Страница 138: ...138 Fig 27 Component Arrangement Size 030 035 Units ...
Страница 139: ...139 Fig 28 Component Arrangement Size 040 075 Units ...
Страница 140: ...140 Fig 29 Component Arrangement Size 090 100 Units ...


