Custom Picture Settings
120
Simplified Graphical Interface
In addition to the very detailed settings explained in the previous section (
A
114), the camcorder offers a
graphical interface for adjusting the gamma and white balance settings. Gamma settings are presented as a
gamma curve and white balance settings are presented on a color plane.
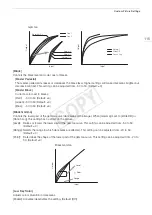
Gamma Curve
1 After selecting a file, open the gamma curve adjustment screen.
[
, /
Edit File]
>
[Gamma]
• The current gamma curve will be displayed on the screen.
2 Push the joystick left/right to highlight the [M] field and then push the
joystick up/down to select the desired basic gamma curve.
• The numbers correspond to the [Gamma] settings explained
previously (
A
114), as follows:
1 to 4: [Normal 1] to [Normal 4]
5 and 6: [Cine 1] and [Cine 2]
7: [EOS Std.]
8: [Wide DR]
9: [Canon Log]
• The gamma curve is displayed in white before adjustment and in
red after adjustment.
3 Push the joystick left/right to highlight the [H] field or [L] field and then push the joystick up/down to select the
basic gamma curve.
• The [L] value can be adjusted from 1 to 9. It is equivalent to the [Black Gamma] setting and controls the
lower part of the gamma curve (dark areas of the image). This setting is not available when the [M] value is
set to 8 or 9.
4 Push the joystick left/right to highlight the [H] field.
• The [H] value can be adjusted from 1 to 5. It is equivalent to the [Knee] setting and controls the upper part of
the gamma curve (highlights of the image). This setting is not available when the [M] value is set to 5 or
higher.
5 Push the joystick left/right to select [Set] and then press the joystick.
• The adjusted gamma curve will be saved. The [Gamma], [Black Gamma] and [Knee] values under the
[
/
Fine Tuning] submenu will change accordingly.
6 Press the CUSTOM PICT. button to exit the custom picture menu and apply the selected custom picture
settings.
White Balance
1 After selecting a file, open the white balance shift screen.
[
, /
Edit File]
>
[White Balance]
• The current white balance is shown as an orange point at the
center of the WB correction coordinates.
2 Push the joystick left/right to shift the white balance along the blue
(B)/amber (A) gradation. Push the joystick up/down to shift the white
balance along the green (G)/magenta (M) gradation.
• The white balance shift can be set to one of 9 levels in each
color's direction.
• The amount of white balance shift will be displayed as two
coordinates in the [SHIFT] box to the left of the graph.
3 Press the joystick.
• The adjusted white balance shift value will be saved. The [White Balance] value under the [
/
Fine
Tuning] submenu will change accordingly.
4 Press the CUSTOM PICT. button to exit the custom picture menu and apply the selected custom picture
settings.
[
, /
Edit File]
[Gamma]
[
, /
Edit File]
[White Balance]
COP
Y
Содержание EOS C100 Mark II
Страница 1: ...Instruction Manual HD Camcorder PUB DIE 0463 000 COPY ...
Страница 12: ...12 COPY ...
Страница 46: ...Adjusting the Black Balance 46 COPY ...
Страница 106: ...Using Accessories 106 COPY ...
Страница 124: ...Saving and Loading Camera Settings 124 COPY ...
Страница 144: ...Saving Clips to a Computer 144 COPY ...
Страница 162: ...Playback via Browser 162 COPY ...
Страница 168: ...Photo Operations 168 COPY ...


