RIVER IDROTECH 18 - 24 - 24H2O
13
.LEGENDA
4
FLOOR GUARD
5
RADIATED SURFACE TO BE PROTECTED
6
REAR/SIDE/UPPER FLAMMABLE SURFACE
If the floor is made of combustible material, use a protection made of non-combustible material (steel, glass...) that also protects
the front from any falling combusted material during cleaning operations.
Always fit a floor guard if the floor is made of flammable material.
Install the stove also detached from any non-combustible walls/surfaces, observing a minimum clearance of
200mm
(back) and
300mm
(side) to allow effective aeration of the appliance and a good distribution of heat in the room.
In any case, ensure adequate distance to facilitate access during cleaning and extraordinary maintenance. If this is not possible, it
must still be possible to distance the product from adjacent walls/elements.
This operation
(1*)
must be performed by a technician qualified to disconnect the combustion product expulsion ducts and their
subsequent restoration.
For generators connected to the hydraulic system, a connection must be provided between the system itself and the product so
that, during extraordinary maintenance, carried out by a qualified technician, it is possible to move the generator 1 by at least 50
cm from adjacent walls without emptying the system (e.g. by using a double shut-off gate or suitable flexible connection).
(1*)
The national reference standard for the installation of domestic appliances is UNI 10683 (IT) - DTU NF 24.1 (FR) - DIN 18896
(DE) - NBN B 61-002 (BE) - Real Decreto 1027/2007 (ES) Paesi Bassi (NL) Bouwbesluit - Danmark (DK) BEK n° 541 del 27/04/2020.
6.3
OVERALL DIMENSIONS
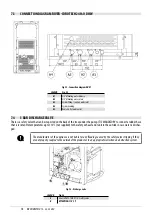
Fig. 15 - RIVER IDROTECH 18 - 24 - 24 H2O
LEGEND
A
Exhaust fumes d.8 cm
B
Hole combustion air inlet d.5 cm
6.4
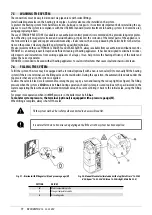
STOVE DOOR REMOVAL/INSTALLATION
For some operations (e.g.: side panel assembly and cleaning) you must remove the stove door.
To remove the door:
• Open the door.
• Undo the screws from the upper hinge (see
• Remove the hinge, keeping the door in position (see
• Lift the door and release it from the lower hinge.
• To assemble, proceed in reverse order.
Содержание RIVER IDROTECH 18
Страница 42: ...RIVERIDROTECH18 24 24H2O 42 10 2 ELECTRONIC BOARD WITH DHW Fig 68 ElectricalboardwithDHW ...
Страница 46: ...NOTE ...
Страница 47: ...NOTE ...


