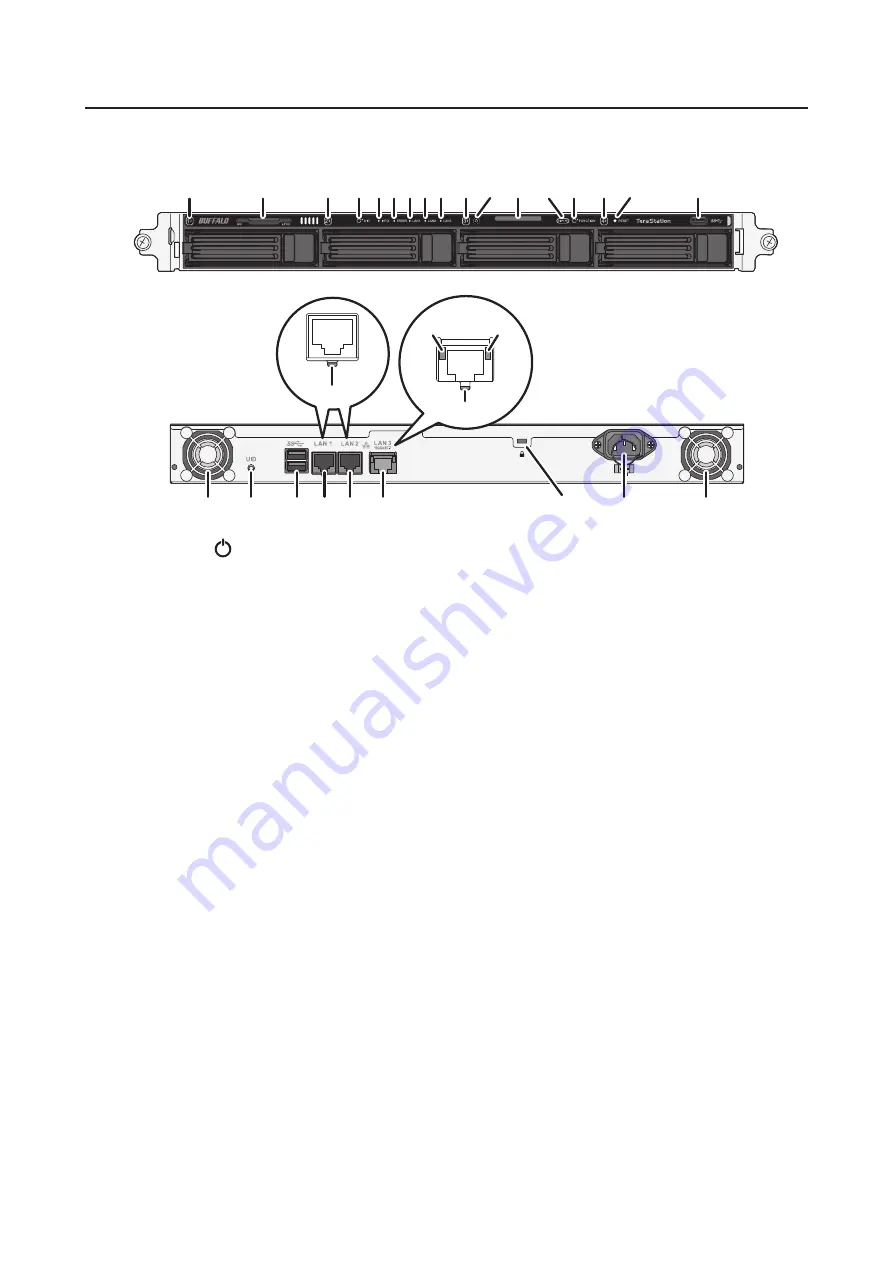
4-Bay Rackmount Model
TS5410RN
11
19
11 20 2 3 4 5
11 1
9 11 10
13
6
7 8
12
20
13
18
17
12
16
14 15
21
24
22
23
1
Power Button ( )
To power on, connect the power cable and wait for 10 seconds, then press the power button. To power off,
press and hold the power button for 3 seconds.
If the TeraStation beeps, pressing this button for a short period will stop the beeping.
2
Info LED
If there is a status message, the amber info LED will light up. Check the LCD panel to see the status message.
3
Error LED
If there is an error, the red error LED will light up. Check the LCD panel to see the error message.
4
LAN1 LED
When LAN port 1 is connected, this LED glows green. It blinks when the connection is active.
5
LAN2 LED
When LAN port 2 is connected, this LED glows green. It blinks when the connection is active.
6
LAN3 LED
When LAN port 3 is connected, this LED glows blue. It blinks when the connection is active.
7
LCD Panel
This display shows the status of many TeraStation settings. It also displays errors and messages when available.
8
Display Button
Switches between the different display modes. Also, if the TeraStation is beeping, press this button to stop it.
9
Function Button
Use this button for dismounting USB devices, rebuilding RAID arrays, configuring failover, stopping the
TeraStation's beeping, and initializing settings using a USB drive.
12
Содержание TeraStation 5010 TS51210RH
Страница 32: ...3 Click Create User 31...
Страница 35: ...3 Click Add Group 34...
Страница 103: ...2 Click to the right of Failover 3 Click the Periodic Sync tab 4 Click Edit 102...
Страница 106: ...15Click Time Machine 105...
Страница 107: ...16Click Select Backup Disk 17Select the TeraStation then click Use Disk 106...
Страница 121: ...3 From the task list click the task whose settings you want to change 4 Click the Options tab 120...
Страница 122: ...5 Click Edit 121...
Страница 145: ...7 Click to the right of NFS 8 Click the Client Settings tab 144...
Страница 159: ...Updating Automatically 1 In Settings click Management 2 Click to the right of Update 3 Click Edit 158...
Страница 168: ...3 Click Edit 167...
Страница 169: ...4 Select or enter the desired MTU size and click OK 168...
Страница 171: ...3 Click Edit 170...
Страница 198: ...1 Open the front cover with the included key 2 Remove the front cover while holding the hook downward 197...
Страница 211: ...IEC60950 1 WARNING Hazardous moving parts Keep away from moving fan blades 210...


