Page 18
SECTION IV: INSTALLATION
The vent and combustion air intake systems must be sufficiently supported along
vertical and horizontal sections.
At minimum, it is recommended that a support is placed
along the vent or air intake piping every 4 feet. For horizontal systems, the first support shall
be located immediately adjacent to the first 90-deg. elbow following the vertical section
connected to the water heater. The support method should act to isolate the vent and
combustion air intake piping from floor joists or other structural members to reduce transmis-
sion of noise and vibration.
NOTE: Do not support, pin, or secure the vent and combustion air intake pipe in a
way that restricts the normal thermal expansion and contraction of the venting
material.
For replacement installations, thoroughly inspect the existing vent and combustion air intake
systems prior to installing the new water heater. The following steps shall be taken to properly
inspect the existing vent system:
• Verify that the materials as specified in this manual have been used.
• Verify the maximum and minimum vent and combustion air intake equivalent lengths and
terminal clearances meet the specifications in this manual.
• Inspect the vent and combustion air intake systems for cracking. Pay close attention to joints
between elbows and straight pipe.
• Inspect the system for misalignment of components. This may lead to sagging and unwanted
stresses in the joints.
If any corrections are required they must be computed before installing the replacement water
heater.
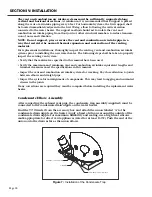
Condensate Elbow Assembly
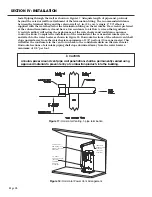
After connecting the exhaust vent pipe, the condensate trap assembly (supplied) must be
connected to the condensate drain nipple on the water heater.
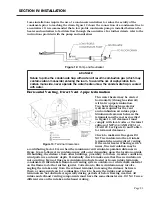
Find the 90° Orienter from the accessory box and attach the union labeled ‘A’ to the
condensate drain nipple on the heater. Apply a bead of silicone around the outside of the
condensate drain nipple. For maximum durability and sealing, use a high heat silicone
caulk appropriate for direct vent appliances (rated for at least 150°F). Push the end of the
union onto the drain as far as the union allows.
D
DETAIL D
SCALE 1 : 12
RUNNING TRAP PORTION
ORIENTER
CONDENSATE DRAIN NIPPLE
Figure 7: Installation of the Condensate Trap
Содержание OT600-A
Страница 35: ...SECTION IV INSTALLATION Page 35 Figure 26 Piping Diagram One Unit Figure 27 Piping Diagram Two Units ...
Страница 40: ...Page 40 SECTION IV INSTALLATION Figure 32 Component Wiring Diagram ...
Страница 41: ...Page 41 Figure 33 Schematic Wiring Diagram SECTION IV INSTALLATION ...
Страница 62: ...Page 62 ...

