Manual 2100-419E
Page
36 of 48
Strainer (5)
installed upstream of
constant flow valve
(7)
to collect foreign material which would clog the
flow valve orifice.
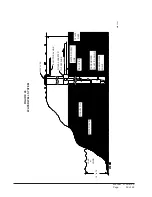
Figure 22 on preceding page shows the use of
shutoff
valves (9)
and
(11)
, on the in and out water lines to
permit isolation of the unit from the plumbing system
should future service work require this. Globe valves
should not be used as shutoff valves because of the
excessive pressure drop inherent in the valve design.
Instead us gate or ball valves as shut-offs so as to
minimize pressure drop.
Figure 22 shows the use of
shutoff valves (9)
and
(11)
,
on the in and out water lines to permit isolation of the
unit from the plumbing system should future service
work require this. Globe valves should not be used as
shutoff valves because of the excessive pressure drop
inherent in the valve design. Instead us gate or ball
valves as shut-offs so as to minimize pressure drop.
Drain cock (8)
and
(10)
, and tees have been included
to permit acid cleaning the refrigerant-to-water coil
should such cleaning be required. See
WATER
CORROSION
section on page 37.
Drain cock (12)
provides access to the system to check
water flow through the constant flow valve to insure
adequate water flow through the unit. A water meter is
used to check the water flow rate.
WELL PUMP SIZING
Strictly speaking, sizing the well pump is the
responsibility of the well drilling contractor. It is
important, however, that the HVAC contractor be
familiar with the factors that determine what size pump
will be required. Rule of thumb estimates will
invariably lead to under or oversized well pumps.
Undersizing the pump will result in inadequate water to
the whole plumbing system but with especially bad
results to the heat pump – NO HEAT / NO COOL calls
will result. Oversized pumps will short cycle and could
cause premature pump motor or switch failures.
The well pump must be capable of supplying enough
water and at an adequate pressure to meet competing
demands of water fixtures. The well pump must be
sized in such a way that three requirements are met:
1. Adequate flow rate in GPM.
2. Adequate pressure at the fixture.
3. Able to meet the above from the depth of the
well-feet of lift.
The pressure requirements put on the pump are directly
affected by the diameter of pipe being used, as well as,
by the water flow rate through the pipe. The work sheet
included in manual 2110-078 should guarantee that the
well pump has enough capacity. It should also ensure
that the piping is not undersized which would create too
much pressure due to friction loss. High pressure losses
due to undersized pipe will reduce efficiency and
require larger pumps and could also create water noise
problems.
SYSTEM START UP PROCEDURE FOR
OPEN LOOP APPLICATIONS
1. Be sure main power to the unit is OFF at disconnect.
2. Set thermostat system switch to OFF, fan switch to
AUTO.
3. Move main power disconnect to ON. Except as
required for safety while servicing –
do not open the
unit disconnect switch.
4. Check system air low for obstructions.
A. Move thermostat fan switch to ON. Blower
runs.
B. Be sure all registers and grilles are open.
C. Move thermostat fan switch to AUTO. Blower
should stop.
5. Fully open the manual inlet and outlet valves.
6. Check water flow.
A. Connect a water flow meter to the drain cock
between the constant flow valve and the
solenoid valve. Run a hose from the flow meter
to a drain or sink. Open the drain cock.
B. Check the water flow rate through constant flow
valve to be sure it is the same as the unit is rated
for.
C. When water flow is okay, close drain cock and
remove the water flow meter. The unit is now
ready to start.
7. Start the unit in cooling mode. By moving the
thermostat switch to cool, fan should be set for
AUTO.
A. Check to see the solenoid valve opened.
8. Check the system refrigerant pressures against the
cooling refrigerant pressure table in the installation
manual for rated water flow and entering water
temperatures. If the refrigerant pressures do not
match, check for air flow problem that refrigeration
system problem.
9. Switch the unit to the heat mode. By moving the
thermostat switch to heat, fan should be set for
AUTO.
A. Check to see the solenoid valve opened again.
Содержание QW242
Страница 6: ...Manual 2100 419E Page 6 of 48 FIGURE 1 UNIT DIMENSIONS ...
Страница 9: ...Manual 2100 419E Page 9 of 48 FIGURE 4 INSTALLATION OF UNIT THROUGH WALL WITH WALL SLEEVE MIS 1564 ...
Страница 21: ...Manual 2100 419E Page 21 of 48 FIGURE 15 REMOTE THERMOSTAT WIRING DIAGRAM X OPTION ...
Страница 22: ...Manual 2100 419E Page 22 of 48 FIGURE 16 REMOTE THERMOSTAT WIRING DIAGRAM A THERMOSTAT OPTION 4102 021A ...
Страница 23: ...Manual 2100 419E Page 23 of 48 4102 022C FIGURE 17 REMOTE THERMOSTAT WIRING DIAGRAM D THERMOSTAT OPTION ...
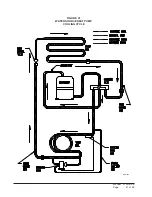
Страница 41: ...Manual 2100 419E Page 41 of 48 FIGURE 27 WATER SOURCE HEAT PUMP COOLING CYCLE MIS 329 ...
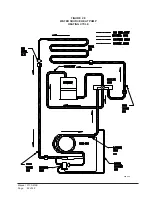
Страница 42: ...Manual 2100 419E Page 42 of 48 FIGURE 28 WATER SOURCE HEAT PUMP HEATING CYCLE MIS 328 ...


