


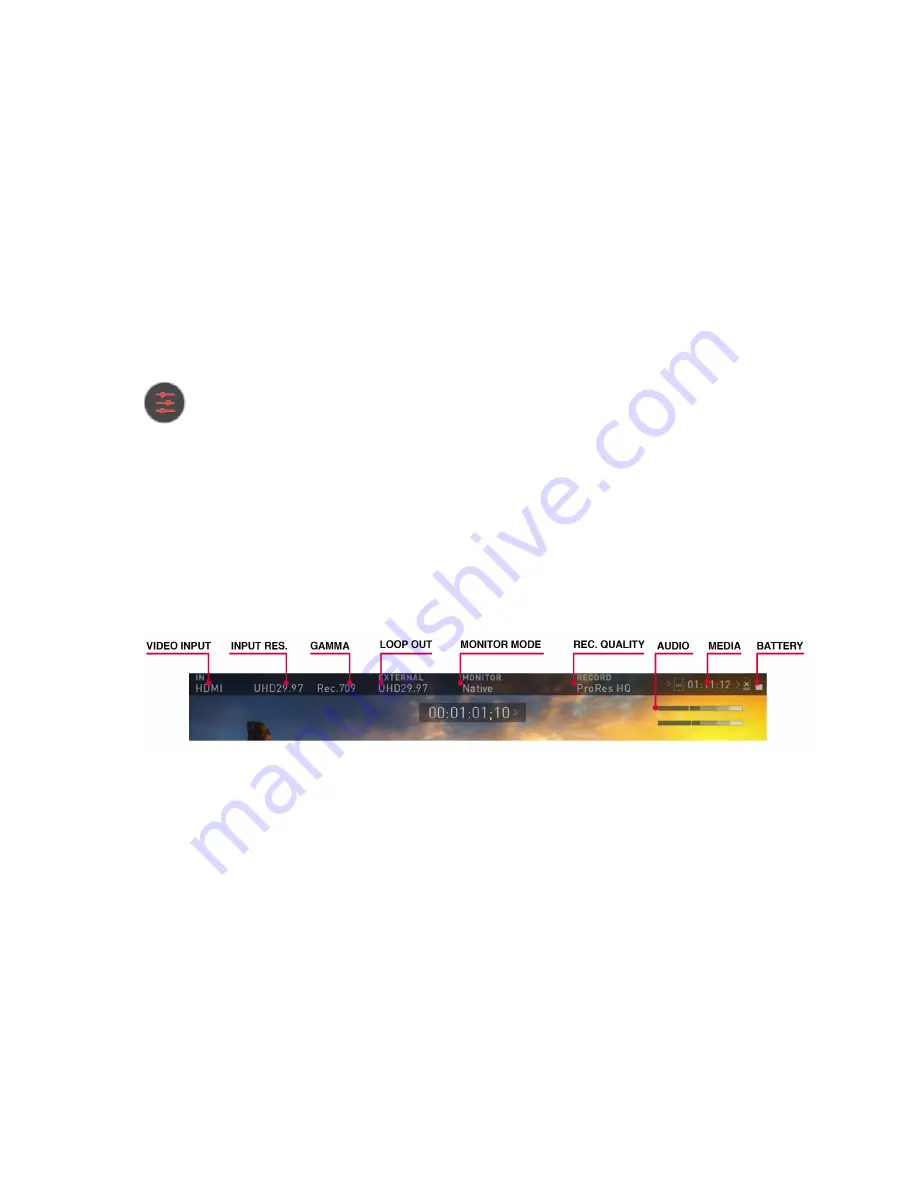
The Main Screen - Information Bar
At the top of the SHOGUN STUDIO 2 screen is the area referred to as the
Information
Bar
.
It displays the input source as SDI or HDMI, the settings of your input device/camera, cur-
rent settings of your SHOGUN STUDIO 2, media, audio, disk capacity and more. Touching
any of these areas will take you to the relevant menu and allow you to make changes to
your setup.
Alternatively you can access these setting by tapping the Record Settings icon. Tapping
the Settings button will open the Record Settings menu, from where you will be able to
navigate to the required tab. Swipe left to see more tabs.
The content in the Information Bar is dependent on what mode you are in, for example
Recording and Monitoring will display the Video Input type, but if you are in Play mode,
Video Input will show the resolution and frame rate of the video clip currently cued or play-
ing.
Monitor Mode / Features
VIDEO INPUT: (Rec & Mon mode)
Input source - HDMI or SDI
VIDEO INPUT: (Rec & Mon mode)
Resolution and frame rate from input device
VIDEO INPUT: (Play & Edit mode)
Resolution and frame rate of current playback clip
INPUT GAMMA
: Displays the current input gamma. Tap to open Input menu to ensure it
matches the output coming from your camera or other input device. RAW inputs will auto-
matically be set to match the camera output. For some cameras further options can be
selected. During playback mode this setting will be determined by the metadata of the
recorded content.
VIDEO OUTPUT
: This menu displays the active video resolution and frame rate being
output from the HDMI Out.
Содержание Shogun Studio 2
Страница 1: ...U S E RMA N U A L S H O G U NS T U D I O2...
Страница 18: ...13 RJ45 connection For SERVICE ONLY and should only be used if instructed to do so as part of firmware updates...
Страница 51: ......
Страница 79: ...Red Arri file naming is only supported when the signal is connected via SDI...
Страница 85: ...Phantom Power You can choose to deliver phantom power over the XLR MIC input Tap Off to toggle Phantom Power On...
Страница 96: ...Ready to Record monitor mode features No Input No Disk No Disk Formatted...
Страница 110: ...l 2x l 1 8x l 1 5 l 1 33x l 1 25x Scopes are not available when anamorphic de squeeze is activated...
Страница 115: ...Outline Width Adjusts the width used focus peaking indicators on screen Tap to select the desired width...
Страница 122: ...Remember that you can remove all overlays by simply tapping in the center of the screen Tap again to reveal the overlays...
Страница 131: ......
Страница 137: ......
Страница 169: ...Choose the Event you wish to import the footage into or create a new event Click on Import...
Страница 170: ...Your Scene Shot and Take files now appear in the project window ready for use in your FCP project...
Страница 171: ......
Страница 174: ...You can also filter the view to only see specific tags e g favorite etc...


