


94
Chapter 4 Features and Functions
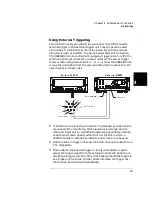
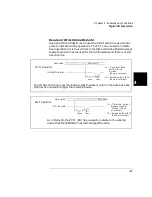
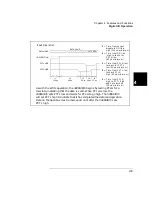
Scanning
4
•
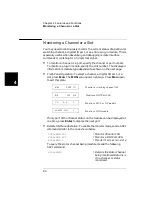
Front-Panel Operation: Press Menu, use the knob to select
“CONF EXT TRIG” and press Enter. Select either slot 0 (built-in
external trigger) or the slot where a 44474A is installed and press
Enter. Enable or disable the pair of trigger lines and press Enter.
Press the Menu key again to exit the menu.
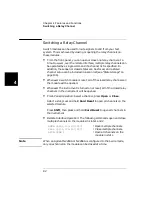
Press S.List, select “CONFIG SCAN”, and configure the arm source
or trigger source as either
EXT
or
MIX
.
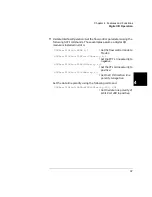
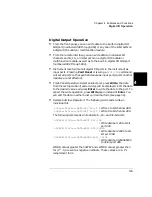
•
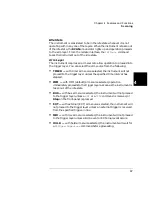
Remote Interface Operation: The following code segment will set up
the 3499A/B/C to synchronize with an external instrument.
CONFigure:EXTernal:TRIGger:SOURce 0
! Select to use the built-in
ext.trig.in and ext.trig.out
lines.
CONFigure:EXTernal:TRIGger:OUTPut 1
! Enable to output a trigger
pulse on the ext.trig.out
line.
ARM:SOURce EXT
! Set arm source to EXT.
TRIGger:SOURce EXT
! Set trigger source to EXT.
Содержание Agilent 3499A
Страница 13: ...1 1 Quick Start ...
Страница 27: ...2 2 Front Panel Operation ...
Страница 55: ...3 3 System Overview ...
Страница 77: ...4 4 Features and Functions ...
Страница 113: ...5 5 Remote Interface Reference ...
Страница 164: ...164 5 ...
Страница 165: ...6 6 Error Messages ...
Страница 173: ...7 7 Plug in Modules ...
Страница 256: ...256 Chapter 7 Plug in Modules 44475A Breadboard Module 7 ...
Страница 261: ...261 Chapter 7 Plug in Modules 44476B Microwave Switch Module 4 7 The 44476B is shown below ...
Страница 268: ...268 Chapter 7 Plug in Modules 44478A B 1 3 GHz Dual 4 to 1 MUX Modules 7 The 44478A B is shown below ...
Страница 286: ...286 Chapter 7 Plug in Modules Terminals and Connections Information 7 ...
Страница 288: ...288 7 ...
Страница 289: ...8 8 Application Programs ...
Страница 299: ...9 9 Specifications ...
Страница 343: ...343 Chapter 9 Specifications 44475A Breadboard Module 4 9 ...


