


292
Chapter 8 Application Programs
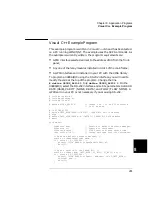
Visual C++ Example Program
8
# if USING_RS232
/* Set RS-232 parameters according to 3499A/B/C settings:
BAUD RATE (9600), */
/* PARITY (NONE, 8 BITS), FLOW (FLOW NONE). */
viSetAttribute( vi, VI_ATTR_ASRL_BAUD, 9600 );
viSetAttribute( vi, VI_ATTR_ASRL_DATA_BITS, 8 );
viSetAttribute( vi, VI_ATTR_ASRL_FLOW_CNTRL, VI_ASRL_FLOW_NONE );
viSetAttribute( vi, VI_ATTR_ASRL_PARITY, VI_ASRL_PAR_NONE );
# endif
/* Set 3499A/B/C to SCPI mode. */
viPrintf( vi, "SYSMODE SCPI\n" );
Sleep(4000);// Wait 4 seconds.
/* Reset the instrument to a known state. */
viPrintf( vi, "*RST\n" );
Sleep( 4000 );
/* Close channels 100 through 103.
viPrintf( vi, "CLOSE (@ 100:103)\n" );
/* Open channels 100 through 103. */
viPrintf( vi, "OPEN (@ 100:103)\n" );
/* Scanning setup: executing the following commands to make
the instrument to scan sweep */
/* channels 100 through 103 two times. The channels are scanned
continuously and the second scan sweep starts 1 second after
the start of the first scan sweep. */
viPrintf( vi, "SCAN (@ 100:103)\n" );// Create a scan list.
viPrintf( vi, "ARM:SOURCE TIMER\n" );// Set arm source to TIMER.
viPrintf( vi, "ARM:TIMER 1\n" );// Interval time between two scan
// sweeps is 1 second.
viPrintf( vi, "ARM:COUNT 2\n" );// Set scan sweep 2 times.
viPrintf( vi, "TRIG:SOURCE IMM\n" );// Set trigger source to
// IMM (default).
viPrintf( vi, "CHAN:DELAY 0, ( @100:103)\n");// Set channel delay
//time to 0 (default).
viPrintf( vi, "INIT\n");// Start the scan.
/* Set visa time-out value to 10 seconds. */
viSetAttribute( vi, VI_ATTR_TMO_VALUE, 10000 );
/* *OPC command will wait until scan finishes. */
status = viQueryf( vi, "*OPC?\n","%t*", retStr );
printf("Scan End.\n");
viClose( vi );// Close session to 3499A/B/C.
viClose( drm );// Close session to the resource manager.
}
Содержание Agilent 3499A
Страница 13: ...1 1 Quick Start ...
Страница 27: ...2 2 Front Panel Operation ...
Страница 55: ...3 3 System Overview ...
Страница 77: ...4 4 Features and Functions ...
Страница 113: ...5 5 Remote Interface Reference ...
Страница 164: ...164 5 ...
Страница 165: ...6 6 Error Messages ...
Страница 173: ...7 7 Plug in Modules ...
Страница 256: ...256 Chapter 7 Plug in Modules 44475A Breadboard Module 7 ...
Страница 261: ...261 Chapter 7 Plug in Modules 44476B Microwave Switch Module 4 7 The 44476B is shown below ...
Страница 268: ...268 Chapter 7 Plug in Modules 44478A B 1 3 GHz Dual 4 to 1 MUX Modules 7 The 44478A B is shown below ...
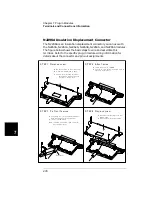
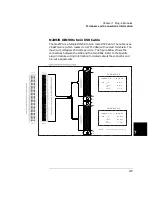
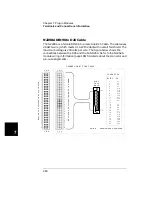
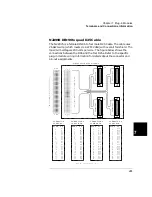
Страница 286: ...286 Chapter 7 Plug in Modules Terminals and Connections Information 7 ...
Страница 288: ...288 7 ...
Страница 289: ...8 8 Application Programs ...
Страница 299: ...9 9 Specifications ...
Страница 343: ...343 Chapter 9 Specifications 44475A Breadboard Module 4 9 ...


