


90
Chapter 4 Features and Functions
Scanning
4
Configuring a Scan
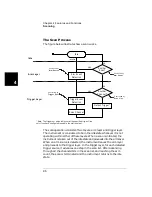
The scan procedure is controlled by specifying an arm source, a trigger
source, and the number of sweeps (a sweep is one pass through the scan
list). Delay times can also be configured.
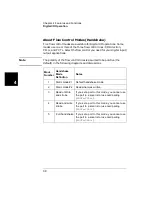
•
You can select any one of the six arm sources (listed on page 87) to
control the onset of each sweep through the scan list. IMM
(immediate) is the default arm source. If TIMer arm source is
selected, the elapsed time can be set from 0 to 99999.999 seconds,
with a 1 ms resolution.
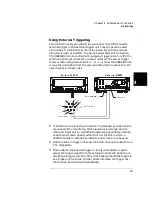
•
You can select any one of the six trigger sources (listed on page 88) to
advance to the next channel in the scan list. IMM (immediate) is the
default trigger source. If TIMer trigger source is selected, the elapsed
time can be set from 0 to 99999.999 seconds, with a 1 ms resolution.
•
You can specify the number of times (between 1 and 99999) the
instrument is to sweep through the scan list. When the specified
number is reached, the scan stops.
•
You can specify a delay time (from 0 to 99999.999 seconds, with 1 ms
resolution) between when a channel is closed and when the next
operation begins (and, if configured, a trigger out pulse is sent). The
delay time can be set individually for each channel in the scan list, or
one delay can be set for all channels in the scan list. Note that, even if
the trigger source is set to IMMediate, the scan list will not advance
until the delay time is met.
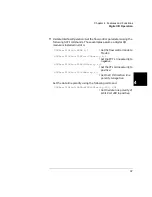
•
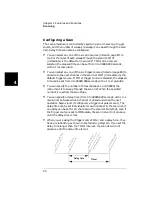
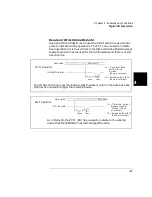
When you are using the trigger source TIMer and a delay time, they
have a relationship as shown in the following diagram. If you set the
delay time longer than the TIMer interval, the scan list will not
advance until the delay time is met.
Timer
Delay time
N
ex
t o
pe
ra
ti
on
b
eg
in
s
D
el
ay
ti
m
e-
ou
t
R
el
ay
is
c
lo
se
d
C
lo
se
a
r
el
ay
c
om
m
an
d
E
xt
er
na
l t
ri
gg
er
p
ul
se
Содержание Agilent 3499A
Страница 13: ...1 1 Quick Start ...
Страница 27: ...2 2 Front Panel Operation ...
Страница 55: ...3 3 System Overview ...
Страница 77: ...4 4 Features and Functions ...
Страница 113: ...5 5 Remote Interface Reference ...
Страница 164: ...164 5 ...
Страница 165: ...6 6 Error Messages ...
Страница 173: ...7 7 Plug in Modules ...
Страница 256: ...256 Chapter 7 Plug in Modules 44475A Breadboard Module 7 ...
Страница 261: ...261 Chapter 7 Plug in Modules 44476B Microwave Switch Module 4 7 The 44476B is shown below ...
Страница 268: ...268 Chapter 7 Plug in Modules 44478A B 1 3 GHz Dual 4 to 1 MUX Modules 7 The 44478A B is shown below ...
Страница 286: ...286 Chapter 7 Plug in Modules Terminals and Connections Information 7 ...
Страница 288: ...288 7 ...
Страница 289: ...8 8 Application Programs ...
Страница 299: ...9 9 Specifications ...
Страница 343: ...343 Chapter 9 Specifications 44475A Breadboard Module 4 9 ...


