AEQ
CAPITOL
Ultra-compact digital audio mixer
97
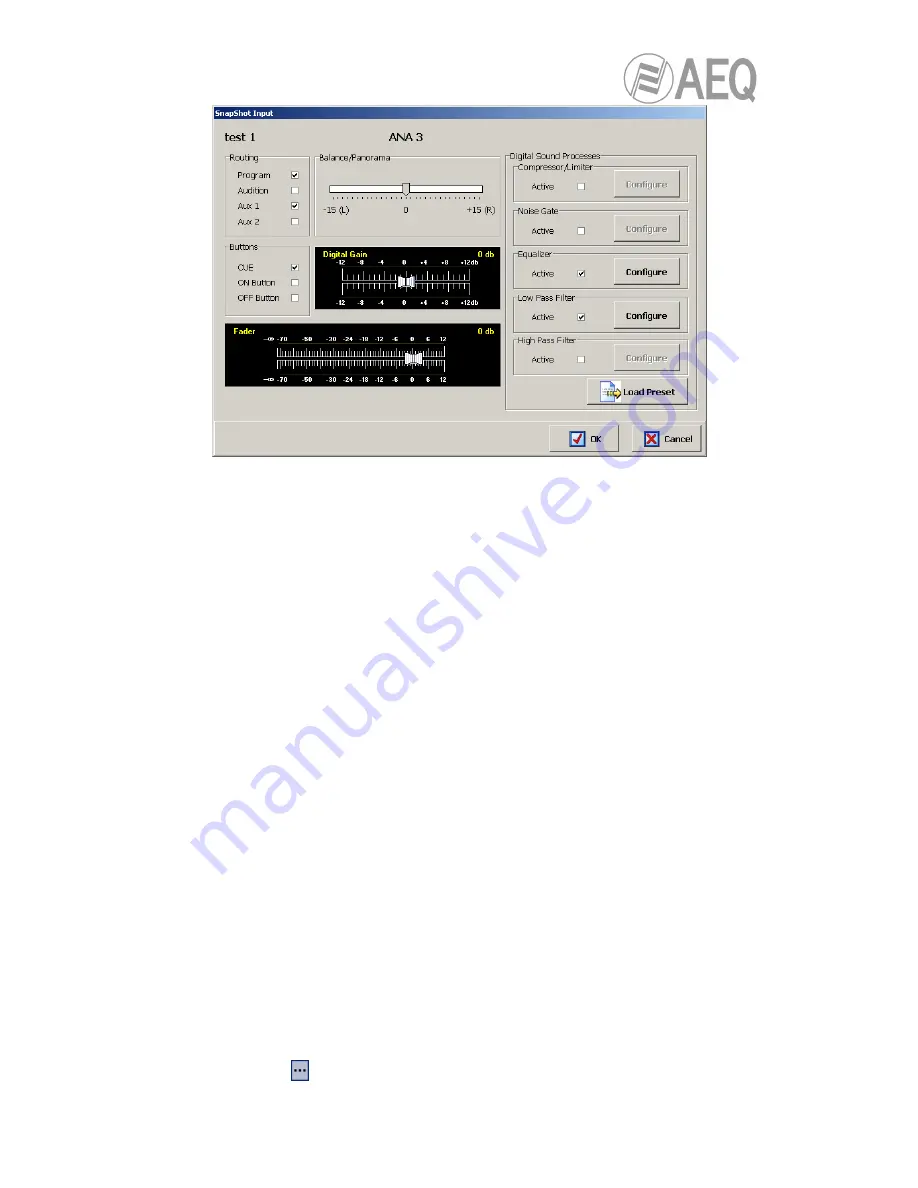
From left to right and from top to bottom the available options are:
•
Name of the snapshot (test 1 in the example).
•
Name of the channel (ANA 3 in the example).
•
“
Routing
”
:
allows you to configure the initial activation (or not) of the 2 quick routing
keys that are available above each fader channel of AEQ CAPITOL control surface
(“Program” and “Audition”), as well as the 2 main auxiliary sendings (“Aux 1” and “Aux
2”).
•
“
Balance/Panorama
”
:
allows you to manage the initial balance or panoramic control for
this input channel.
•
“
Buttons
”
:
allows you to configure the initial status of the PFL sending button (“
CUE
”)
and activate (“
ON Button
”) or deactivate (“
OFF Button
”) the CHANNEL ON key of the
corresponding channel of AEQ CAPITOL control surface.
•
“
Digital Gain
”
:
allows you to control the initial input gain of the selected channel from -
12dB to +12 dB, by means of a graphical representation of a sliding fader.
•
“
Fader
”
:
allows you to configure the initial virtual position of that channel fader.
IMPORTANT NOTE:
This configuration will take effect when that channel is not
associated to a physical fader in the control surface; when it’s associated to a fader, the
value corresponding to that physical fader position will be taken.
•
“
Digital Sound Processes
”
:
allows you to configure and activate/deactivate initially the
available processes for that channel or, by means of “
Load Preset
” button, to select
and load a previously created preset (see section 4.3.4).
•
“
OK
”
:
allows you to accept the created or edited configuration.
•
“
Cancel
”
:
allows you to reject the created or edited configuration. No change you may
have made is saved.
4.3.5.2. Advanced configuration of outputs.
Within the “Configure Inputs & Outputs” advanced configuration screen, the right part of the
screen shows the complete list of all the available audio output channels. Three columns are
shown:
•
“
Output
”
:
shows the internal numeric identifier for the output.
•
“
Label
”
:
shows the name or label associated to the channel.
•
“
Config
”
:
allows you to configure the associated options for that output channel from a
specific screen. You can access by clicking “
Click to [CONFIG]
” and then clicking
again on the
button that will appear.


