System Utilities
2-12
BIOS Flash Utilities
BIOS Flash memory updates are required for the following conditions:
•
New versions of system programs
•
New features or options
•
Restore a BIOS when it becomes corrupted.
Use the Flash utility to update the system BIOS Flash ROM.
Perform the following to run a BIOS Flash update:
1.
Prepare a bootable USB HDD/FDD.
2.
Download and copy the Flash utilities to the bootable USB HDD/FDD.
BIOS Flash may be performed by one of the following:
•
DOS Flash Utility
•
WinFlash Utility
NOTE:
•
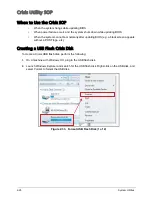
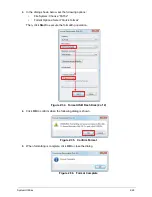
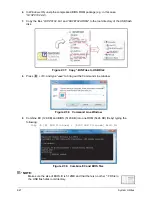
If a Crisis Recovery Disc is not available, create one before BIOS Flash utility is used.
See
Creating a USB Flash Crisis Disk
on page
2-25
.
•
Do not install memory related drivers (XMS, EMS, DPMI) when BIOS Flash is used
•
Use an AC adaptor power supply when running BIOS Flash utility. If the battery pack
does not contain power to finish loading BIOS Flash, do not boot the system.
•
Flash utility has auto execution function.
Содержание AO756
Страница 1: ...AO756 V5 171 S E R V I C E G U I D E G U I D E ...
Страница 109: ...Service and Maintenance 5 14 Table 5 8 Base Door Screw Screw Name Screw Type Quantity M 2 0 x 6 0 1 ...
Страница 117: ...Service and Maintenance 5 22 4 Lift the fan by the fan cable to remove from its bay Figure 5 25 Removing the Fan ...
Страница 139: ...Service and Maintenance 5 44 4 Lift to remove the IO board from the lower case Figure 5 58 Removing the IO Board ...
Страница 147: ...Service and Maintenance 5 52 3 Lift to remove the left speaker Figure 5 70 Removing the Speakers 2 of 2 ...
Страница 151: ...Service and Maintenance 5 56 3 Lift to remove the keyboard Figure 5 76 Removing the Keyboard ...
Страница 160: ...5 65 Service and Maintenance Table 5 18 Thermal Module Screws Screw Name Screw Type Quantity M 2 0 x 3 0 4 ...
Страница 163: ...Service and Maintenance 5 68 5 Lift to remove the LCD module from the lower case Figure 5 94 Removing the LCD Module ...
Страница 170: ...5 75 Service and Maintenance 3 Lift to remove the LCD bezel Figure 5 104 Removing the LCD Bezel 3 of 3 ...
Страница 188: ...5 93 Service and Maintenance 3 Remove the main antenna from the LCD cover Figure 5 138 Removing the Main Antenna 3 of 3 ...
Страница 198: ...FRU Field Replaceable Unit List 6 6 Upper Case Assembly Figure 6 3 Upper Case Assembly Exploded Diagram 1 2 3 4 5 ...
Страница 200: ...FRU Field Replaceable Unit List 6 8 LCD Assembly Figure 6 4 LCD Assembly Exploded Diagram 1 2 3 4 5 8 9 6 7 ...
Страница 212: ...CHAPTER 7 Test Compatible Components Test Compatible Components 7 2 Microsoft Windows 7 Environment Test 7 2 ...
Страница 217: ...CHAPTER 8 Online Support Information Online Support Information 8 2 Introduction 8 2 ...
Страница 219: ......


