2-1
Questions? Refer to Page 10-10 for Technical Support Instructions.
Using the Monitor
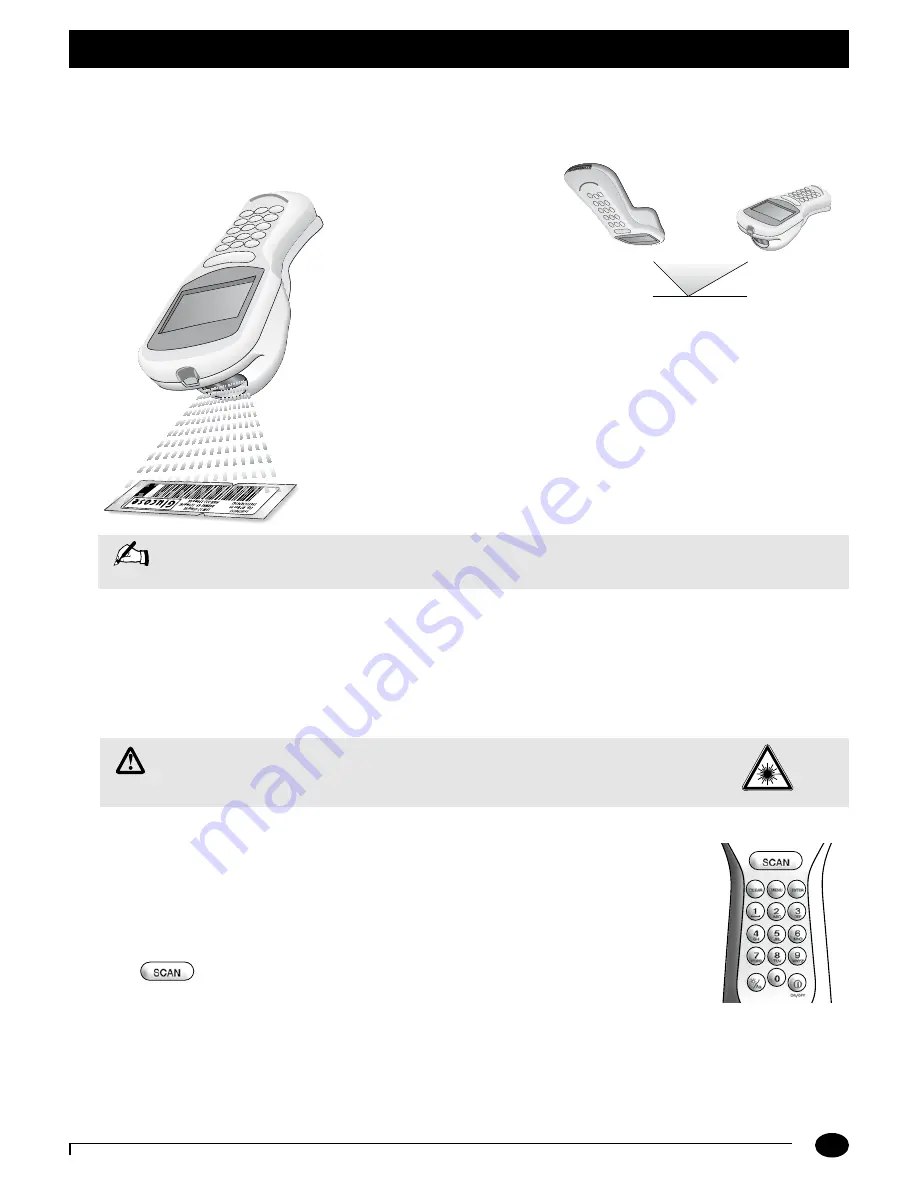
Bar Code Scanner
The bar code scanner enables you to scan the information into the monitor instead of manually entering the data
using the keypad. Scanning the bar code on the test strip foil packet automatically enters the test strip information
(calibration, control range, lot number and expiry date). The scanner
may also be used to enter Operator ID, Patient ID, control lot number,
comment code and free text
fields. To operate the monitor:
Step 1:
Place the bar code on a
flat surface.
Step 2:
Hold the bar code
scanner 6-24 cm (3-12 inches)
from the bar code to be scanned, and at a 30 to 135 degree angle to the bar code.
Step 3:
Press and hold down the Scan button until a visible red beam is emitted
by the monitor.
Step 4:
Slowly move the monitor, if needed, so that the red beam is directly over
the bar code.
Step 5:
The monitor will beep in acknowledgement when it accepts the bar code.
When first learning to use the bar code scanner, some precautions should be taken. It is important that you place the
object to be scanned on a flat surface or hold it by itself. This will prevent other items from being accidentally scanned.
If data has been manually entered, scanning data will erase the manually entered data (unless the Enter key has been
selected to confirm manual entry) and replace it with the scanned data. This entry will be considered scanned. Upon a
successful bar code scan, this system will automatically proceed to the next screen. The scanning beam shuts off in three
seconds if nothing is detected.
Data Entry Keypad
The data entry keypad allows you to enter identification numbers and letters (only the 26 letter
English alphabet) or to select an option that appears on the display. The keypad contains a 10 digit
telephone-style keypad with the keys for the numbers 0-9. The 2-9 keys also have letters printed below
the number. The keypad also has six special keys, including a scan button, on/off button, backlight/
alphanumeric, clear, menu and enter key.
Scan
Press this button to operate the bar code scanner. If the audible indicator is enabled, the monitor will
beep once a bar code has been successfully scanned. Continuing to hold the scan button will display
the scanned bar code on the display until the button is released. If no information is scanned after 3 seconds, the scanner
will turn off.
30 °
135 °
Note:
If you hold the Scan button for three seconds, the scanner stops. Reposition scanner and try again. Optimal
distance depends on bar code type.
IMPORTANT
: Never look into the bar code scanner beam or point it toward anyone’s eyes.
The beam could cause permanent damage to the eye. CDRH Class II/IEC
Class 2 Laser Product: Avoid Long Term Viewing of Direct Laser Light.
Chapter 2: Using the Monitor
Содержание Precision Xceed Pro
Страница 37: ...6 Proficiency Test Proficiency Test Glucose Proficiency Test β Ketone ...
Страница 42: ...7 Linearity Test ...
Страница 60: ...9 Data Upload Docking Station Mounting Instructions Enabling Data Upload ...
Страница 77: ...11 Maintenance Cleaning the Exterior Surface Replacing the Port Protector Battery Life Replacing the Batteries ...
Страница 80: ...12 Specifications Precision Xceed Pro Monitor Symbols Bar Code Types Important Safety Instructions ...


