


Chapter 9 Network
Cloud Storage User’s Guide
177
9.5 UPnP Port Mapping Screen
Use UPnP (Universal Plug and Play) port mapping to allow access from the WAN to services you
select on the NAS. It is recommended that you place the NAS behind an Internet gateway firewall
device to protect the NAS from attacks from the Internet. Many such Internet gateways use UPnP
to simplify peer-to-peer network connectivity between devices. UPnP can automatically configure
the Internet gateway’s firewall and Network Address Translation (NAT) to allow access to the NAS
from the Internet.
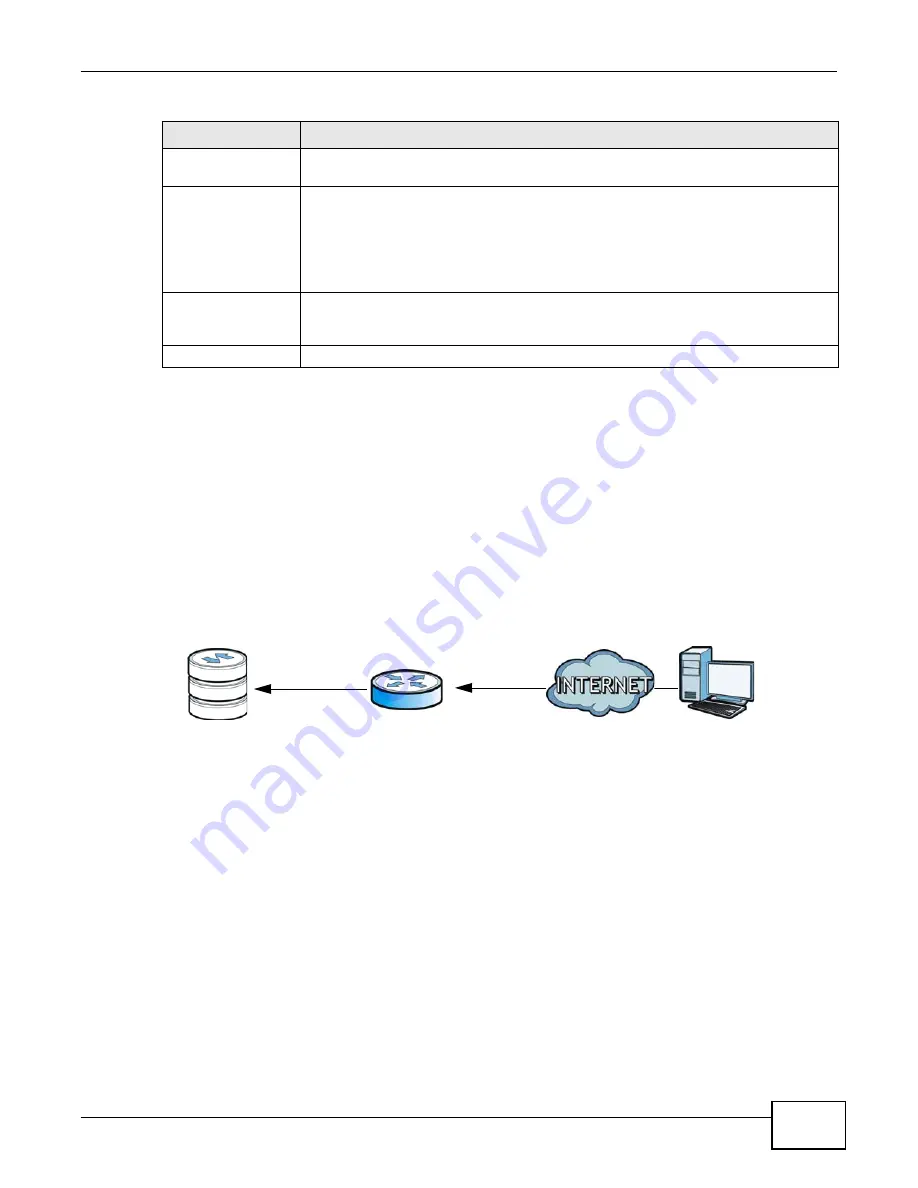
Figure 81
UPnP for FTP Access
In the above example, UPnP creates a firewall rule and NAT port forwarding mapping to send FTP
traffic (using TCP port number 21) from the public IP address a.b.c.d to the NAS’s private IP
address of 192.168.1.20.
Use the NAS’s UPnP Port Mapping screen to configure the UPnP settings your Internet gateway
uses to allow access from the WAN (Internet) to services you select on the NAS. You can also set
which port Internet users need to use in order to access a specific service on the NAS.
Note: To use UPnP port mapping, your Internet gateway must have UPnP enabled.
Enable Another Web
Configuration Port
Select this to configure an additional HTTP port for accessing the web configurator.
Specify a number in the Port Number field.
Network Diagnostic
Tool
Use this section to test the network connection to a particular IP address or domain
name. Select an address or type it into the field. Then click Ping to have the NAS send
a packet to test the network connection.
•
Successfully pinged host - The NAS is able to “ping” the host, the network
connection is OK.
•
Unable to ping host - The NAS is able to “ping” the selected host.
Apply
Click this to save your TCP/IP configurations. After you click Apply, the NAS restarts.
Wait until you see the Login screen or until the NAS fully boots and then use the NAS
Starter Utility to rediscover it.
Reset
Click this to restore your previously saved settings.
Table 46
Network > TCP/IP (continued)
LABEL
DESCRIPTION
TCP: 21
TCP: 21
192.168.1.20
a.b.c.d
Summary of Contents for NAS Series
Page 4: ...Contents Overview Cloud Storage User s Guide 4 ...
Page 13: ...13 PART I User s Guide ...
Page 14: ...14 ...
Page 18: ...Chapter 1 Getting to Know Your NAS Cloud Storage User s Guide 18 ...
Page 26: ...Chapter 2 NAS Starter Utility Cloud Storage User s Guide 26 ...
Page 132: ...Chapter 5 Tutorials Cloud Storage User s Guide 132 5 Click Get Certificate ...
Page 152: ...Chapter 5 Tutorials Cloud Storage User s Guide 152 ...
Page 153: ...153 PART II Technical Reference ...
Page 154: ...154 ...
Page 158: ...Chapter 6 Status Screen Cloud Storage User s Guide 158 ...
Page 168: ...Chapter 7 System Setting Cloud Storage User s Guide 168 ...
Page 172: ...Chapter 8 External Volume Cloud Storage User s Guide 172 ...
Page 186: ...Chapter 9 Network Cloud Storage User s Guide 186 ...
Page 260: ...Chapter 14 Using Time Machine with the NAS Cloud Storage User s Guide 260 ...
Page 280: ...Chapter 17 Shares Cloud Storage User s Guide 280 ...
Page 284: ...Chapter 18 WebDAV Cloud Storage User s Guide 284 ...
Page 356: ...Appendix C Legal Information Cloud Storage User s Guide 356 Environmental Product Declaration ...


