background image

08

11

05

09

12

07

10

06

35

CHAPTER  

OPERATION

ZIRKONZAHN – P4000 PRINTER OPERATION AND MAINTENANCE MANUAL – VERSION: 20/09/2022

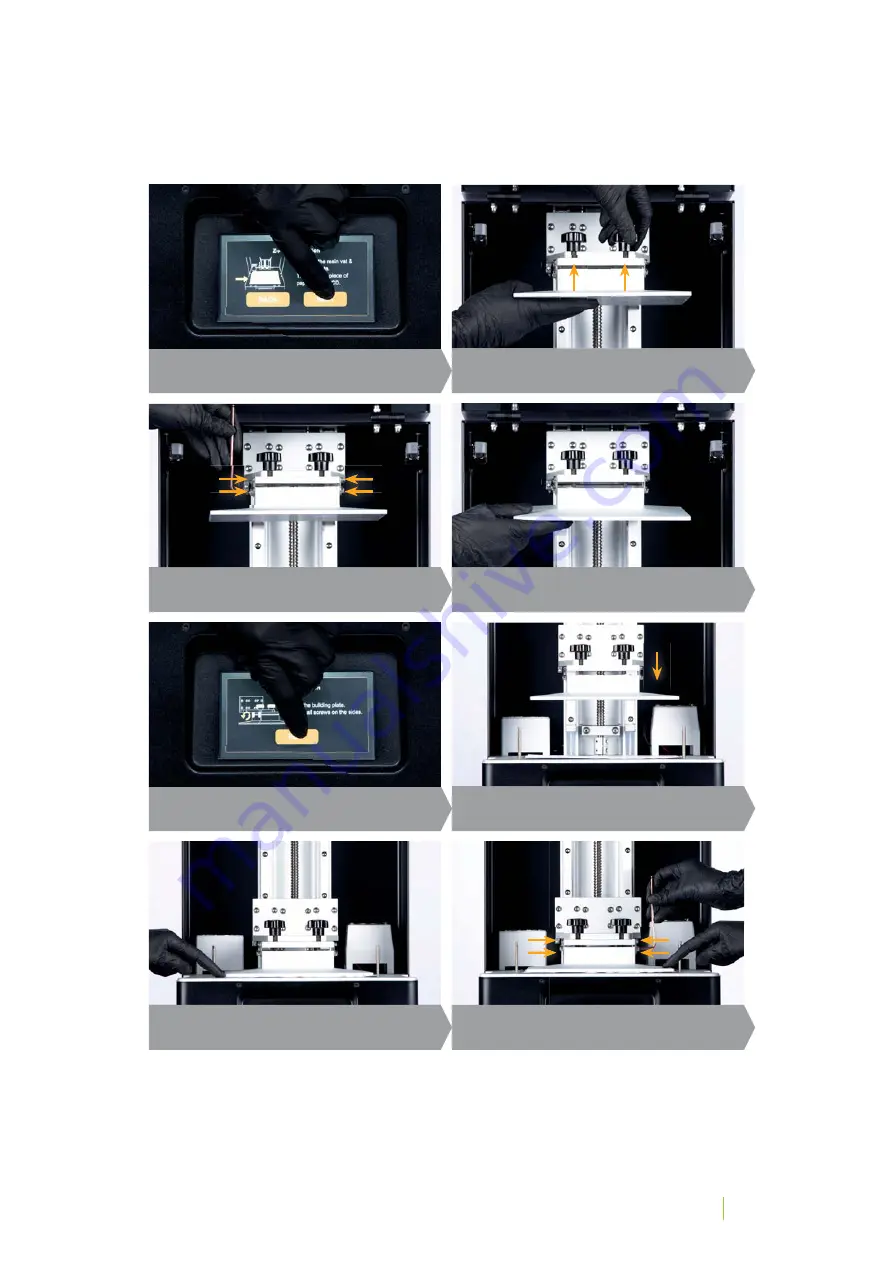
Select NEXT.

Select NEXT ...

Use the supplied Allen key to loosen the 4 screws 
positioned on the sides of the building plate.

... and after 1-2 minutes the building plate will move 
down to touch the A4 paper on the LCD.

Double-check to see if the lower part of the plate 
moves freely.

Once the plate has reached the bottom, press down  
the plate sides tightly to make sure that it perfectly 
lies against the paper sheet.

Tighten the 4 lateral screws alternatevely, while 
pressing the building plate down with the
other hand.

Install the building plate inside the P4000 Printer.

Summary of Contents for P4000 PRINTER

Page 1: ...P4ooo Printer operation and maintenance manual SCAN FOR INFORMATION AND INSTRUCTIONS...

Page 2: ...ZIRKONZAHN P4000 PRINTER OPERATION AND MAINTENANCE MANUAL VERSION 20 09 2022 Operation and maintenance manual translation of the original version P4000 Printer Version 1 0 Copyright 2022 Zirkonzahn s...

Page 3: ...03 ZIRKONZAHN P4000 PRINTER OPERATION AND MAINTENANCE MANUAL VERSION 20 09 2022...

Page 4: ...ID plate 16 Manufacturer and distributor 16 Usage 17 Intended use 17 Not intended use 18 Safety and Residual Risks 19 Residual risks and safety regulations 19 Safety guide 19 Possible sources of dange...

Page 5: ...ects 36 Procedure 37 4G NNKPI VJG 4GUKP 8CV 9JKNG 2TKPVKPI 38 Removing printed objects from the building plate 39 How to Hold the Building Plate 39 How to Use the Metal Scraper 39 How to Remove Printe...

Page 6: ...e LED panel 55 Check if the LCD lights up 55 Check if the LCD blackens 56 Check LCD Grid 57 Printing the test model 58 Formatting the USB Drive 61 Recommended USB Drives 61 Procedure in the event of f...

Page 7: ...r 67 Extraction requirements 68 Environment and storage conditions 68 Permissible transport conditions 68 L300 Post curing Lamp 69 Unboxing 70 Power Supply Light Switch 71 Setting Curing Time 71 start...

Page 8: ...08 ZIRKONZAHN P4000 PRINTER OPERATION AND MAINTENANCE MANUAL VERSION 20 09 2022...

Page 9: ...manual contains all the information required for the safe use of the P4000 Printer and the L300 Post Curing Lamp supplied by Zirkonzahn srl However it is not intended to replace a training course with...

Page 10: ...e 2014 35 EU IEC 62368 1 2014 For EMC Rules 2014 30 EU EMC EN 55032 2015 A11 2020 EN 55035 2017 A11 2020 EN IEC 61000 3 2 2019 EN 61000 3 3 2013 A1 2019 For RoHS Rules 2011 65 EU DIN EN IEC 63000 VDE...

Page 11: ...use of water compressed air or solvents is strictly forbidden Moving parts Use by competent personnel only Touching moving parts is strictly forbidden Repair and maintenance work on moving parts is st...

Page 12: ...VERSION 20 09 2022 Other symbols Symbol General warnings that can lead to injuries if disregarded This symbol refers to particularly important text passages in the operation and maintenance manual Th...

Page 13: ...13 ZIRKONZAHN P4000 PRINTER OPERATION AND MAINTENANCE MANUAL VERSION 20 09 2022 P4000 PRINTER...

Page 14: ...14 ZIRKONZAHN P4000 PRINTER OPERATION AND MAINTENANCE MANUAL VERSION 20 09 2022...

Page 15: ...perations The large RTKPVKPI CTGC RGTOKVU VJG UKOQWNVCPGQWU RTQFWEVKQP QH WR VQ VYGPV QPG GNNGT OQFGNU QT HVGGP full arch bridges depending on the structure and size The resin vat is provided with sta...

Page 16: ...L VERSION 20 09 2022 Device ID plate The device ID plate of the P4000 Printer is attached on the rear side of the machine Manufacturer and distributor PHROZEN TECH CO LTD having its principal place of...

Page 17: ...Resin Waterbased Beige resin If resins from other manufacturers are used the user has to set parameters for each processing step according to the resin used V KU TGEQOOGPFGF VQ WUG QPN QTKIKPCN KTMQP...

Page 18: ...stributor declines any responsibility for this Please pay particular attention to the following unintended and unauthorised uses The P4000 Printer is not designed for operation in an explosive atmosph...

Page 19: ...event of defects push the ON OFF button and follow hazard warnings SAFETY GUIDE The printer is not equipped with light alert system Keep the front door closed during machine operation Keep resin away...

Page 20: ...r respiratory protection and safety goggles when opening the P4000 Printer and especially when working with it cleaning use of resins Chemical subtances Resin might cause skin irritations Therefore we...

Page 21: ...ct the P4000 Printer and in particular the electronics installed on the rear side against splash water GGR C FKUVCPEG QH CV NGCUV O QP CNN UKFGU HTQO YCNNU GVE VQ GPUWTG UWH EKGPV CKT EKTEWNCVKQP and...

Page 22: ...22 ZIRKONZAHN P4000 PRINTER OPERATION AND MAINTENANCE MANUAL VERSION 20 09 2022...

Page 23: ...rotect LCD and components The toolbox is included in the printer s box and is supplied in a cardboard box placed on top of the printer UNBOXING Remove the adhesive strip Remove the upper box Remove th...

Page 24: ...MPORTANT Preserve the packaging in case of return or for any future maintenance carried out at the Zirkonzahn headquarters Remove the building plate Remove the protective foam Install the handle using...

Page 25: ...aintenance manual One toolbox placed in a cardboard box on top of the printer One P4000 Printer with foam protection for LCD Gloves USB with Zirkonzahn Slicer software and test le for printing Power c...

Page 26: ...building plate and printed models 2CRGT NVGTU Washing up bowl Soft bristle brush Silicone sponge Transparent container If one of the components listed above is not contained in the supply contact your...

Page 27: ...P4000 PRINTER OPERATION AND MAINTENANCE MANUAL VERSION 20 09 2022 01 Building plate 02 KT NVTCVKQP U UVGO 03 Resin vat 04 LCD screen 05 Touch panel 06 Heater 07 Z axis 08 Power switch Power socket 09...

Page 28: ...h different resins L300 Post Curing Lamp recommended UV LED lamp 365 nm 385 nm 405 nm with turntable for uniform curing of the model Printer Resin Waterbased Beige recommended The system works ideally...

Page 29: ...om Follow the safety regulations for moving loads Wear safety shoes and safety gloves when transporting and setting up the device The P4000 Printer is supplied in a cardboard box Do not put any other...

Page 30: ...30 ZIRKONZAHN P4000 PRINTER OPERATION AND MAINTENANCE MANUAL VERSION 20 09 2022...

Page 31: ...An external PC is TGSWKTGF HQT WUKPI VJG UNKEKPI UQHVYCTG 2TKPVKPI NGU ECP DG WRNQCFGF KPVQ VJG RTKPVGT U KPVGTPCN storage via USB LAN cable RJ45 or WiFi CONNECTION METHODS USB Connection 7RNQCF C RT...

Page 32: ...WiFi connections Follow the steps below to connect the P4000 Printer via LAN connection Connect the ethernet cable to the router and to the P4000 Printer Turn on the P4000 Printer Open Google Chrome a...

Page 33: ...via WiFi Plug in your WiFi adapter Select WiFi on the touch panel After saving the project le in the Zirkonzahn Slicer software click on Send by WiFi Choose the WiFi that you want to connect and inser...

Page 34: ...he building plate and resin vat on the printer 07 The P4000 Printer is ready for use PERFORMING Z AXIS CALIBRATION Follow the steps below to perform a calibration of the Z axis Calibration is importan...

Page 35: ...and after 1 2 minutes the building plate will move down to touch the A4 paper on the LCD Double check to see if the lower part of the plate moves freely Once the plate has reached the bottom press do...

Page 36: ...ccur during functional and visual inspections contact Zirkonzahn s Support immediately Tel 39 0474 066 630 e mail support zirkonzahn com If the defect might cause danger to persons the P4000 Printer m...

Page 37: ...RTKPVKPI NG 09 Start the printing process Make sure that the front door is closed before starting the process 10 Monitor the starting procedure In the event of malfunctions abort the printing process...

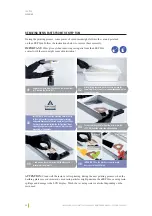
Page 38: ...DO NOT QXGT NN VJG TGUKP XCV URKNNCIGU OKIJV FCOCIG VJG FGXKEG After each printing process remove any trace of resin from the building plate using the yellow plastic scraper included in the toolbox A...

Page 39: ...GF RTKPVGF QDLGEVU OWUV DG TGOQXGF ECTGHWNN VQ RTGXGPV CP accident or damage to the building plate Follow the instructions below to remove printed objects safely How to Hold the Building Plate When re...

Page 40: ...using a heat gun or by soaking the plate in warm hot water ATTENTION Soaking is possible for water washable resins only When heating the building plate make sure that the temperature does not exceed...

Page 41: ...02 Do not print if the temperature is below 65 F or 18 C Increase the temperature in case of particularly dense resins The heater can be activated deactivated by pressing ON OFF Select HEATER on the t...

Page 42: ...42 ZIRKONZAHN P4000 PRINTER OPERATION AND MAINTENANCE MANUAL VERSION 20 09 2022...

Page 43: ...ly endanger operators SAFETY MEASURES WHEN CLEANING THE DEVICE Wear protection mask safety goggles and protective gloves when cleaning the device risk of eye injuries and skin irritation When designin...

Page 44: ...ng the instructions Vat Cleaning Function which can be requested at Zirkonzahn Clean the building plate Check for any traces of resin or cured particles on the building plate Depending on the resin us...

Page 45: ...on the LCD might cause permanent damages to the LCD In such cases remove the resin carefully according to the following instructions Apply a small amount of 95 sanitising alcohol on the spillage and w...

Page 46: ...Repeat step 5 until the resin vat is totally clean including the vat edges Pour the remaining resin into the lter slowly to avoid spilling it IMPORTANT Do not pour the cleaning water directly in the...

Page 47: ...uilding RNCVG OQXGU FQYPYCTF EWTGF TGUKP RCTVKENGU OKIJV RWPEVWTG VJG P 2 NO ECWUKPI TGUKP spillage and damage to the LCD display Wash the vat using water or alcohol depending on the resin used If the...

Page 48: ...age to the LCD display Wash the vat using water or alcohol depending on the resin used Remove the resin from the vat see the instructions in Cleaning the Resin Vat After ltering the resin wash the vat...

Page 49: ...PI TGUKP VQ CXQKF CP YCUVG Do not leave the resin in the vat since its hardening might affect the next printing process Prepare lter funnel and an opaque bottle made of plastic use an empty bottle Do...

Page 50: ...the printed objects during processing Dry cleaning Make sure that the building plate on the Z axis reached the top completely If it has not select Z AXIS then set the number showed on the touch panel...

Page 51: ...9 2022 Lubricating the Z axis To lubricate the Z axis select Z AXIS on the touch panel and then press the second icon The axis and the building plate will move downwards Lubricate the Z axis while the...

Page 52: ...52 ZIRKONZAHN P4000 PRINTER OPERATION AND MAINTENANCE MANUAL VERSION 20 09 2022...

Page 53: ...f Zirkonzahn instructions are available upon request 4GRCKTU CPF TGRNCEGOGPV QH GNGEVTKECN EQORQPGPVU OWUV QPN DG ECTTKGF QWV D C SWCNK GF electrician under the supervision of Zirkonzahn H C OCNHWPEVK...

Page 54: ...0 grit sand paper roughen the plate moving towards the left Rotate the plate and roughen it moving towards the left ROUGHENING THE BUILDING PLATE If the surface of the building plate is too smooth the...

Page 55: ...to avoid eye and or skin injuries We recommend to wear UV protection glasses during this work process Check if the LCD lights up A bright blue square appears on the screen Check if all LED light bulbs...

Page 56: ...ckens During the printing process the display always has to block out some UV light to disable the resin polimerisation Select LCD TEST on the touch panel The LED has to turn on under the LCD display...

Page 57: ...rid IMPORTANT Grid lines should appear regular without thinner or thicker parts Distorted lines indicate that a problem has occurred in the LCD display Select LCD TEST on the touch panel A bright blue...

Page 58: ...4000 PRINTER OPERATION AND MAINTENANCE MANUAL VERSION 20 09 2022 PRINTING THE TEST MODEL Plug in the power cable Insert the USB ash drive Select Print Switch on the P4000 Printer Choose le Printing_Te...

Page 59: ...igments Fill the vat with the liquid resin and close the printer Once the printing process is completed remove the building plate with the model from the printer Start the printing process Remove the...

Page 60: ...MAINTENANCE MANUAL VERSION 20 09 2022 Cure the model for 10 minutes in the L300 Post Curing Lamp Compare the printed model with the milled model included in the set If the model ts the printing proce...

Page 61: ...WFGF KP QWT 75 before formatting 01 Connect the USB drive to a Windows computer 02 Right click on Computer then on Manage 03 Click on Disk Manager 04 Choose your USB drive right click on it choose For...

Page 62: ...tact Zirkonzahn Support The printing process is interrupted If the printing process is interrupted due to power outage restart the printing process through VJG URGEK E UQHVYCTG HWPEVKQP 66 06 10 4GUVC...

Page 63: ...e components DEVICE DISPOSAL In case of dismantling follow safety procedures listed under Safety and Residual Risks The P4000 Printer contains different electronic and electrical components which must...

Page 64: ...64 ZIRKONZAHN P4000 PRINTER OPERATION AND MAINTENANCE MANUAL VERSION 20 09 2022...

Page 65: ...n the set warranty period of 12 months WARRANTY CLAIM For warranty claims the customer must prove the date of purchase i e copy of invoice The warranty includes solely at Zirkonzahn s discretion the f...

Page 66: ...COVER Damages during transport and supply this is the forwarding company s liability only if noted on the delivery note when receiving the goods Loss in sales Wear parts Consumables TECHNICAL IMPROVE...

Page 67: ...Slicer software Zirkonzahn Slicer Connectivity USB Ethernet WiFi 2TKPVKPI 5RGEK ECVKQPU Technology Resin 3D Printer LCD Type Light Source 405 nm ParaLED Matrix 3 0 XY Resolution 0 052 mm Layer Thickne...

Page 68: ...TIONS Degree of contamination according to IEC 61010 1 2 Up to 2000 m above sea level Ambient temperature in the range from 24 C to 30 C Do not expose to direct solar radiation CZKOWO TGNCVKXG CKT JWO...

Page 69: ...69 CHAPTER L300 POST CURING LAMP ZIRKONZAHN P4000 PRINTER OPERATION AND MAINTENANCE MANUAL VERSION 20 09 2022 L300 POST CURING LAMP...

Page 70: ...CURING LAMP ZIRKONZAHN P4000 PRINTER OPERATION AND MAINTENANCE MANUAL VERSION 20 09 2022 Remove the adhesive strip Remove the plastic wrap Remove the quick guide L300 Lamp is ready for use Remove the...

Page 71: ...r cable Turn on the device by pressing the power button To enable custom mode press S to set seconds and M to set minutes Turn off the device by long pressing the power button The lamp turns off after...

Page 72: ...ng lights without closing the door risk of eye injury This appliance can be used by children aged 8 and above as well as by persons with reduced physical sensory or mental capabilities only under adul...

Page 73: ...nd rinse the 3D model IMPORTANT In case of hollow models clean the inner parts to remove any excess resin This step is very important to avoid cracking of models or sticky surfaces IMPORTANT It is rec...

Page 74: ...ater used to clean the model may contain plastic parts For this reason we recommend not to empty the basin directly in the sink in order to reduce enviromental impact and avoid damages to the sink Put...

Page 75: ...shown in the gure Repeat the same process for all dies Using a brush apply a thin layer of vaseline on the displayed surface to ensure the die insertion and removal Cure the dies for 10 minutes in th...

Page 76: ...x H 17 5 x 14 x 18 5 cm Weight 4 2 kg URGEK ECVKQP PO PO CPF PO UV light intensity 60 W in total Operating voltage 100 240 V 50 60 Hz Device ID plate The device ID plate of the L300 Post Curing Lamp i...

Page 77: ...77 ZIRKONZAHN P4000 PRINTER OPERATION AND MAINTENANCE MANUAL VERSION 20 09 2022...

Page 78: ...78 ZIRKONZAHN P4000 PRINTER OPERATION AND MAINTENANCE MANUAL VERSION 20 09 2022...

Page 79: ...79 ZIRKONZAHN P4000 PRINTER OPERATION AND MAINTENANCE MANUAL VERSION 20 09 2022...

Page 80: ...U M A N ZI RCON I U M T ECH NOLOGY Zirkonzahn Worldwide Tel 39 0474 066 660 info zirkonzahn com www zirkonzahn com All information is subject to change Errors and omissions excepted Version 20 09 202...

Reviews: