background image

IM 701210-07E

56

Setup Menu Items

RECORDER (Only DL750P)

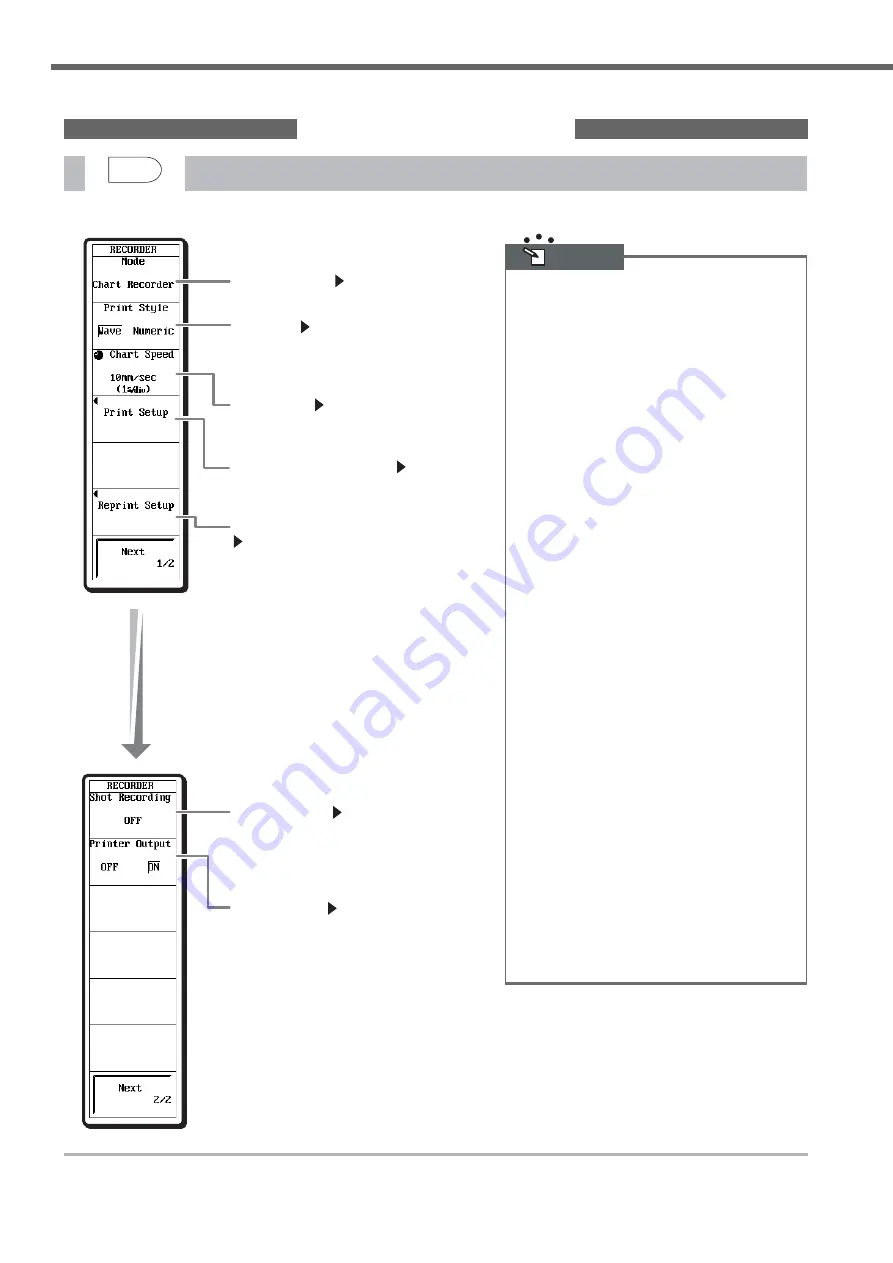
Recorder mode

     Section 9.2

Select the recorder mode to chart, X-Y, or OFF.

Print style

     Section 9.4

When Chart Recorder mode is selected, set the 

print style to T-Y waveform recording (Wave) 

or numeric value recording (Numeric).

Chart speed

     Section 9.3

Set the chart speed in the range of 10 mm/h to 

20 mm/s.

Specify the print settings

     Section 9.4

Set the print format, graticule, and detailed 

information.

Specify the reprint settings

     Sections 9.8 and 9.9

Displays a menu used to reprint to the built-in 

printer or create a PDF file after T-Y recording.

Functions that cannot be used during recorder 

mode

The functions that cannot be used during Chart 
Recorder mode or X-Y Recorder mode are as follows:
•  History memory (HISTORY)
•  GO/NO-GO determination (GO/NO-GO)
• Dual  capture
•  Waveform computation (MATH)
•  Items that are set with the ACQ or X-Y key cannot be 

changed.

•  Data search (SHIFT+ZOOM (SEARCH))
   (only during X-Y Recorder mode)

Trigger Mode during Chart Recorder Mode

• Auto 
  Starts recording simultaneously with the start of the 

measurement. Recording continues until the 
measurement is stopped.

• Log
  Starts recording simultaneously with the start of the 

measurement. Measurement and recording stops 
when the maximum number of divisions of measured 
values that can be saved is recorded.

• Single 
  Starts recording when the trigger conditions are met 

after the start of the measurement. Measurement and 
recording stops when the maximum number of 
divisions of measured values that can be saved is 
recorded.

• Repeat
  Starts recording when the trigger conditions are met 

after the start of the measurement. Recording stops 
when the maximum number of divisions of measured 
values that can be saved is recorded. Then, the 
DL750P enters the trigger-wait state.

Acquisition Mode during Chart Recorder Mode

Normally, the acquisition mode in Chart Recorder mode 
is envelope. However, the acquisition mode can be 
changed from envelope to normal by using the MISC 
key > Others menu.

 Note

RECORDER

DUAL 

CAPTURE

Shot recording

     Section 9.3

Stops the recording when the specified length 

of recording is complete. Select the shot 

recording length from 20 cm, 50 cm, 1 m, 2 m, 

or OFF (do not shot record).

Printer output

     Section 9.3

Select whether to carry out T-Y recording to 

the built-in printer. When set to ON, data is 

recorded to the built-in printer and saved to the 

internal memory. When set to OFF, only the 

saving of the data to the internal memory is 

carried out.

•  The following figure shows the menu that appears only when the recorder mode is set to chart.

Summary of Contents for ScopeCorder DL750P

Page 1: ...ScopeCorder IM 701210 07E 3rd Edition...

Page 2: ...those that appear in the actual screen Every effort has been made in the preparation of this manual to ensure the accuracy of its contents However should you have any questions or find any errors ple...

Page 3: ...the Screen 18 Changing the Waveform Display Conditions 19 Changing the Trigger Setting 22 Measuring Waveforms 24 Zooming the Waveform along the Time Axis 25 Printing Saving Waveforms 26 Setup Menu Ite...

Page 4: ...is Time Axis Vertical Axis Trigger Waveform Acquisition Computing Analyzing and Searching Waveforms Computation Cursor Measurement Automated Measurement of Waveform Parameters GO NO GO Determination P...

Page 5: ...C key the channel information appears If you press the ESC key again the channel information is cleared and the waveform display area is expanded horizontally SHIFT ZOOM key Sections 8 5 and 11 4 Disp...

Page 6: ...SAVE key Sections 13 11 13 12 and 16 3 Stores the screen image data to the storage medium Pressing the SHIFT key followed by the IMAGE SAVE key displays a menu related to the saving of the screen imag...

Page 7: ...h Section 7 2 Acquisition mode Section 7 3 Sample rate Section 5 2 T div Section 5 2 Trigger position Section 6 2 Display record length Appendix 1 Trigger level Chapter 6 Ground level Chapter 6 Channe...

Page 8: ...ecord length of the Z2 zoom waveform display Record length of the normal waveform Z2 zoom range Screen When Using the Dual Capture Function Section 7 6 Using the Dual Capture Function in the User s mM...

Page 9: ...ote Menu type on which the item is selected from the displayed selections The selected item switches each time the soft key is pressed The selected item is displayed highlighted Menu type on which a s...

Page 10: ...ng to the selected item appears Sub menu For items lower in the hierarchy than the top menu a sub menu is displayed Moving the pointer to this position causes the pointer s appearance to change from t...

Page 11: ...igger A trigger is activated when the specified timeout time is reached Period trigger A trigger is activated when the period of the signal matches the specified condition Window trigger A trigger is...

Page 12: ...e Function in the User s Manual Part 1 This function enables trend recording in low speed roll mode1 while acquiring data at high speeds The function is useful when capturing at high speeds abnormal p...

Page 13: ...24000 data points for all waveforms can be saved Of those up to 24 arbitrary parameters can be displayed on the screen Delay parameter 1 Time difference from the reference waveform or trigger point t...

Page 14: ...n a specific determination is made include printing saving of the screen image data saving of the waveform data sounding of a beep and sending of an e mail message with the C10 option Zone determinati...

Page 15: ...data such as saving the data to a file performing cursor measurements automated measurement of waveform parameters normal statistical processing and search zoom T Y Waveform Recording T Y waveforms ar...

Page 16: ...Comparatively simple computation Addition subtraction multiplication division digital filter differentiation and integration Comparison of Normal Computation Math1 to Math8 and Computation on DSP Chan...

Page 17: ...o use the DL750 DL750P in a safe manner read the warnings given in section 3 3 Installing Input Modules in the user s manual before installing the module Install the module in the input module install...

Page 18: ...the warnings given in section 3 6 Connecting Probes and the cautions given in section 3 7 Compensating the Probe Phase Correction in the user s manual before connecting the probe Probe compensation ou...

Page 19: ...Initialize soft key are as follows Date time settings language settings communication settings and SCSI ID setting To initialize all settings except the date time carry out the following procedure Tu...

Page 20: ...he User s Manual Part 1 By default the screen is divided into 4 windows Quad Since only CH1 is observed in this case the display format is set to Single 2Display the selection menu and select Single 1...

Page 21: ...g from 200 s div to 100 ms div Section 5 2 Setting T div in the User s Manual Part 1 Time axis setting refers to setting of the time per division of the grid If the time axis setting is increased the...

Page 22: ...s div Section 5 2 Setting T div in the User s Manual Part 1 The display returns from roll mode to update mode and 5 periods of the waveform are displayed 1Turn the TIME DIV knob clockwise and set the...

Page 23: ...ection of the specified trigger slope If auto setup is performed the trigger mode is set to auto For details see section 6 1 Setting the Trigger Mode in the user s manual Trigger position Determines t...

Page 24: ...rm moves 2 div to the left If you wish to select 10 50 or 90 you can press the corresponding soft key Trigger position mark Pre trigger section Post trigger section Trigger point Change the Trigger Mo...

Page 25: ...difference between the X axis values at Cursor1 and Cursor2 Y axis value of Cursor1 Y axis value of Cursor2 The difference between the Y axis values at Cursor1 and Cursor2 The CH specified by trace is...

Page 26: ...1Press the ZOOM key 3Set the jog shuttle control to Z1 Mag 4Turn the jog shuttle to set the zoom ratio of Z1 5Likewise set Z2 Mag If the jog shuttle control is set to both Z1 Mag and Z2 Mag the zoom r...

Page 27: ...P in the user s manual 1Press the PRINT key Printing is executed Output example Note Pressing the SHIFT key followed by the PRINT key displays the PRINT menu Though not required in the procedures give...

Page 28: ...ta to a Specified Storage Medium Section 13 7 Saving Loading the Waveform Data in the User s Manual Part 2 Saves the data of the waveform displayed on the screen to the storage medium When the save op...

Page 29: ...factory default Cancel initialization Applicable Waveforms for Auto Setup Auto setup can be performed on the following waveform Frequency Approx 50 Hz to 1 MHz Input voltage magnitude Up to approx 20...

Page 30: ...abbreviated name NONISO_10M12 High Voltage 100 kS s 16 Bit Isolation Module with RMS MODEL 701260 abbreviated name HV with RMS Universal Voltage Temp Module Only When Measuring Voltage MODEL 701261 a...

Page 31: ...to eight characters Unit Section 5 16 You can set the temperature unit to C K or F RJC Section 5 16 Select whether to perform reference junction compensation by the internal RJC circuit ON OFF Burnout...

Page 32: ...Shunt Cal MODEL 701271 abbreviated name STRAIN_DSUB Bridge Voltage 2 V When the bridge resistance is 120 to 1000 5 V When the bridge resistance is 350 to 1000 10 V When the bridge resistance is 350 to...

Page 33: ...5 17 Set the sensitivity of the acceleration sensor in the range of 0 10 to 2000 00 mV Unit Unit Section 5 12 Enter the acceleration unit The default setting is m s2 Waveform label Section 8 10 You c...

Page 34: ...waveforms are zoomed expanded vertically and the offset voltage Note Turn ON OFF linear scaling Section 5 11 Set the method of scaling the measured values Select OFF when not scaling Waveform label Se...

Page 35: ...ON in order from the top Auto Differences in the Bit Display Position Example when bit 7 is OFF Note or A1 A3 A2 A4 A5 A6 A8 A1 A3 A2 A4 A5 A6 A8 Fixed Auto Turn ON OFF the event waveform display Sect...

Page 36: ...expanded vertically DSP Channel G3 Option DSP Digital Signal Processor channels are used to perform computations between channels and filter computations in realtime using the output data of the input...

Page 37: ...ined at every time interval from the data sampled at the maximum sample rate of each input module The time interval used to determine the values is equal to the sample rate of the normal mode The maxi...

Page 38: ...set to edge trigger meets the condition B Time B Time B TimeOut A trigger is activated on the falling or rising edge of the pulse when the pulse width width over which condition B is met exceeds or dr...

Page 39: ...splay is updated once when the trigger conditions are met and the waveform acquisition stops Single N mode Section 7 5 When the trigger conditions are met waveform acquisition is repeated the specifie...

Page 40: ...menu Buzzer Sounds a buzzer Send Mail Sends an e mail message to a specified address C10 option Note Action on trigger Section 6 18 Performing a specified action each time a trigger occurs Action on...

Page 41: ...er position to the 50 position of the display record length To the 90 position Set the trigger position to the 90 position of the display record length Trigger Position Note Display record length Trig...

Page 42: ...ON OFF Conditions That Allow Dual Capture Dual capture is possible when all of the following conditions are met Time div of the main waveform 100 ms div to 3 day div roll mode display Sample rate of...

Page 43: ...d automated measurement values of waveform parameters Interpolation When the Area Is an Interpolation Area Interpolation When the Area Is not an Interpolation Area If the number of data points is grea...

Page 44: ...axis range 5 to 5 div of the T Y waveform display Notes When Displaying X Y Waveforms The divided windows of the T Y waveform display when using the T Y X Y mode are displayed according to Format in...

Page 45: ...Time Axis Parameters Display Example of Automated Measurement Note Target waveform for distal mesial and proximal Select the waveform used to determine the values of distal mesial and proximal that a...

Page 46: ...eform cycle within the specified measurement range Statistical processing of history data Performs automated measurement of waveform parameters on the waveform that is acquired using the history memor...

Page 47: ...limits of the automated measurement of waveform parameters GO NO GO determination is performed on whether the measured value enters the range or exits the range Zone GO NO GO is determined by creatin...

Page 48: ...ursors and V cursors are displayed simultaneously Marker cursors Four markers are displayed on the specified waveform The voltage and the time from the trigger position of each marker as well as the v...

Page 49: ...ified waveform parameter exceeded or stayed within a specified range History search conditions Section 11 2 When search mode is Zone Set the search zone search source channel search condition and sear...

Page 50: ...computed data into the specified number of data points Cycle Count This is done across multiple periods of data from the start to the end position of the computation Then the average of the data poin...

Page 51: ...to the newest position of the waveform Moves the zoom box of Z1 or Z2 to the newest position right end of the main waveform This is useful when displaying the newest waveform expanded in roll mode Sel...

Page 52: ...xecute the search Edge Search Example when the edge is set to rising and the count is set to 2 Note The following figure shows the menu that appears when the search type is set to Edge Select the sear...

Page 53: ...visions Display of past search results Specify the number of the search result to be displayed Execute the search Playing the Voice Memo That Is Found When using the voice search function the voice me...

Page 54: ...tch on the earphone microphone is held down or from the time when the Rec Start soft key is pressed until the Rec Stop soft key is pressed Recording is possible up to a total of 100 s Fixed Recording...

Page 55: ...tion 12 3 Select the print destination of the screen image from built in printer USB printer network printer and PDF DL750P only Output format Select the output format of the USB printer from ESC P ES...

Page 56: ...en Image Drive Name of the Storage Medium FD ZIP PC Card HD HD 1 SCSI5 SCSI5 1 NetWork USB Note Floppy disk Zip disk DL750 only PC card Hard disk Partition 1 on the hard disk SCSI device with the ID n...

Page 57: ...of the measurement Measurement and recording stops when the maximum number of divisions of measured values that can be saved is recorded Single Starts recording when the trigger conditions are met af...

Page 58: ...elect whether to automatically record print to the built in printer when waveform acquisition is stopped Reprint Section 9 7 Displays the menu that recalls data recorded immediately up to the point wh...

Page 59: ...e data and setup data to the FTP server on the network Access the DL750 DL750P from an FTP client on the network and retrieve the files on the storage medium of the DL750 DL750P the storage medium of...

Page 60: ...IM 701210 07E 59 MEMO...

Page 61: ...IM 701210 07E 60 MEMO...

Reviews: