User Guide for the VC400 Video Conferencing System
24
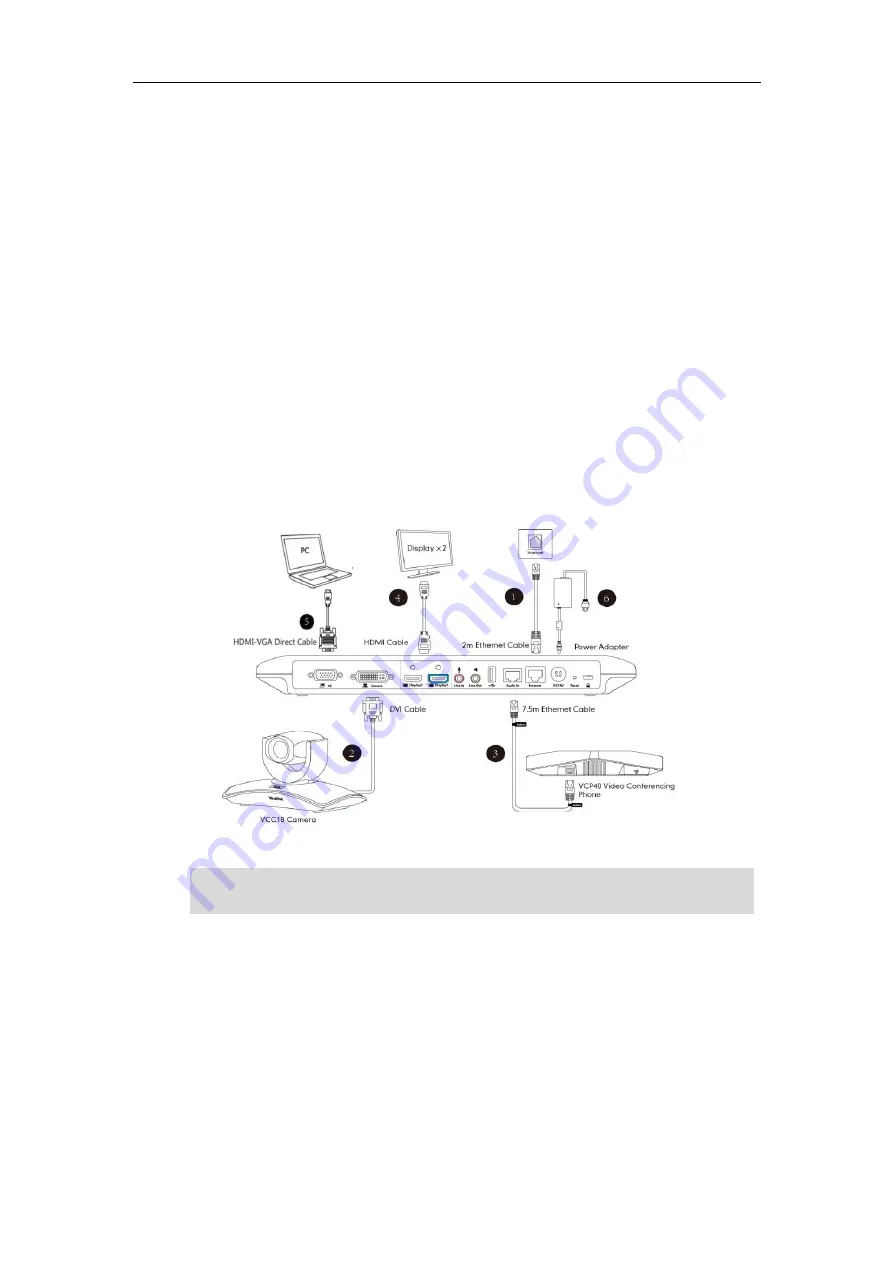
Installing the VC400 Video Conferencing System
Do the following:
1.
Connect the Internet port on the VC400 codec to a switch/hub device port with the
supplied 2m Ethernet cable.
2.
Locate the Camera port on the back of the VC400 codec, and connect it to the Camera port
of the camera with the supplied DVI cable.
3.
Connect the Audio In port on the VC400 codec to the Audio Out port on VCP40 video
conferencing phone with the 7.5m Ethernet cable labeled Audio in.
4.
Locate the Display1 port on the VC400 codec, and connect it to the HDMI port on the
display device with the supplied HDMI cable (Make sure the display device is powered on)
5.
(Optional.) Locate the PC port of the VC400 codec and connect it to the HDMI
port on the
PC with the supplied HDMI-VGA direct cable for sharing content.
6.
Connect the DC19V port on the VC400 codec to an AC power outlet with the supplied
power adapter and power cord.
Note
The VC400 video conferencing system should be used with Yealink original power adapter
(19V/3.42A) only. The use of the third-party power adapter may cause the damage to the system.
Summary of Contents for VC400
Page 1: ...jiu ...
Page 8: ...User Guide for the VC400 Video Conferencing System viii ...
Page 12: ...User Guide for the VC400 Video Conferencing System xii ...
Page 34: ...User Guide for the VC400 Video Conferencing System 22 ...
Page 54: ...User Guide for the VC400 Video Conferencing System 42 ...
Page 96: ...User Guide for the VC400 Video Conferencing System 84 ...
Page 138: ...User Guide for the VC400 Video Conferencing System 126 ...
Page 148: ...User Guide for the VC400 Video Conferencing System 136 ...
Page 164: ...User Guide for the VC400 Video Conferencing System 152 ...
Page 168: ...User Guide for the VC400 Video Conferencing System 156 ...


