GENERAL SERVICE INFORMATION
6LPA Service Manual
3-25
Engine Coolant
12/05
© 2007 Yanmar Marine International
Checking and Adding Engine Coolant
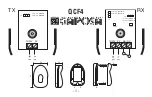
Figure 3-24
Figure 3-24
1 – Filler Cap
1. Ensure all drain cocks are closed.
2. Loosen the filler cap of the coolant tank to
relieve the pressure, then remove the filler cap
(Figure 3-24, (1)). WARNING! NEVER remove
the filler cap while the engine is hot. Serious
burns may result.
3. Pour coolant slowly into the coolant tank to
avoid air bubbles. Fill until coolant overflows
from the filler port.
4. Align filler cap tabs with filler port notches and
tighten filler cap. WARNING! ALWAYS tighten
the filler cap. Steam or scalding water may
spray out if it is not closed tightly.
Figure 3-25
Figure 3-25
1 – Hose
2 – Full Mark
3 – Low Mark
4 – Coolant Recovery Tank Cap
5. Check the coolant level in the coolant recovery
tank. The level should be at the FULL mark
(Figure 3-25, (2)). Add coolant if necessary.
NOTICE: NEVER pour cold coolant into a hot
engine.
6. Remove the coolant recovery tank cap
(Figure 3-25, (4)) to add coolant if necessary.
NEVER add water.
7. Replace the filler cap and tighten it firmly, failure
to do so will cause water leakage.
8. Check the rubber hose (Figure 3-25, (1))
connecting the coolant recovery tank to the
coolant tank / heat exchanger. Replace if
damaged.
NOTICE: If the coolant runs low too often or only
the coolant level in the coolant tank drops without
any change in the level in the coolant recovery
tank, there may be water or air leaks in the
cooling system.
0004910_
s
1
(1)
LOW
FULL
(4)
(1)
(2)
(
3
)
000449
3
_
s
1