background image

3–18

Pagis Pro User's Guide

Contents

Index

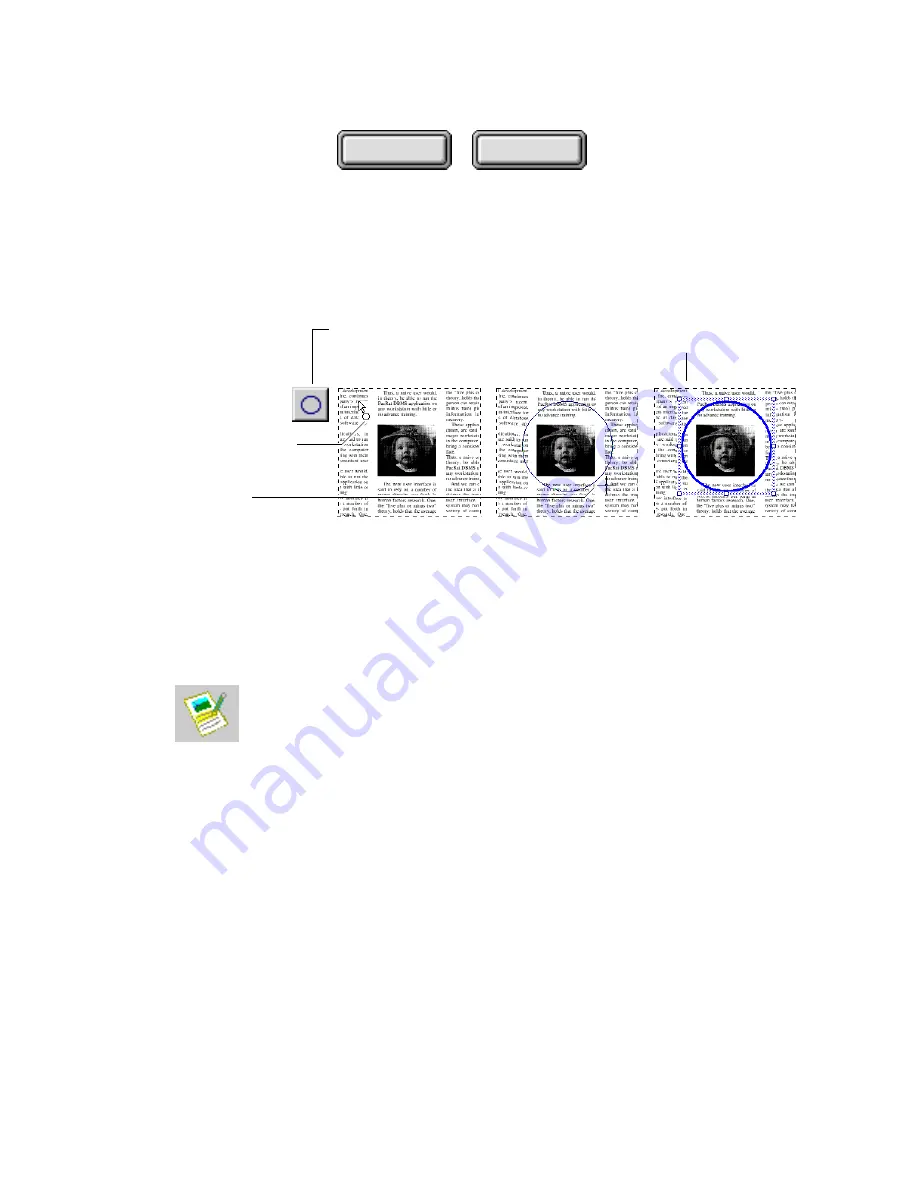
For example, you can use the circle tool to draw attention to an
illustration in your document (Figure 3–15).

 Drag the cursor to 
the lower right corner

Release the mouse. 
Circle is selected.

Select the 
circle tool

1

Click the upper left corner 
of the area to be circled 

2

3

4

Figure 3–15.  Draw a circle

Refer to Chapter 4 for more information about the annotation
tools available in the Pagis Pro Editor.

S

CANNING AND 

T

YPING 

I

NTO A 

F

ORM

The Pagis Editor also provides tools to scan a form, detect the form
fields, and enter text into these fields.

For example, you might want to scan and fill out a purchase
requisition, invoice, loan application, or tax return. After you fill
out the form, it is ready to be printed, faxed, e-mailed, or saved to
disk for future reference.

To scan and type into a form, use the following procedure:

1. Place the form to be scanned into the scanner.

2. Click the Edit icon on the Pagis ToolBar.

This displays the Pagis Editor window (refer to Figure 3–11) with
no document in it as yet.

Summary of Contents for PAGIS PRO 2.0

Page 1: ...About This Guide Index Contents User s Guide...

Page 2: ...may not apply to you ScanSoft reserves the right to revise this publication and to make changes from time to time in the content hereof without obligation of ScanSoft to notify any person of such rev...

Page 3: ...Go to previous page viewed Go to last page Go to next page Go to previous page This document also contains some custom navigation tools Index Contents Bold Text Click on the Contents button from any p...

Page 4: ...ODUCTION What is Pagis Pro 1 1 What Comes with Pagis Pro 1 2 Pagis Pro Features 1 3 Where to Go From Here 1 8 2 INSTALLING PAGIS PRO System Requirements 2 1 Installing and Testing Your Scanner 2 2 Ins...

Page 5: ...From Here 3 31 4 USING PAGIS PRO Pagis Inbox 4 1 Pagis Inbox menus and commands 4 2 Pagis commands in the File menu 4 3 Pagis commands added to the View menu 4 3 Pagis menu 4 4 Document thumbnails 4 5...

Page 6: ...ax 4 26 Setting up your scanner or digital camera to work with Pagis Pro 4 27 About scanners and scanner drivers 4 27 Selecting the scanner or digital camera driver 4 28 Displaying the TWAIN dialog bo...

Page 7: ...t 4 62 Pagis Editor 4 64 File menu 4 65 New command 4 65 New Window command 4 65 Open command 4 65 Save command 4 66 Save As command 4 66 Export command 4 66 Send To command 4 68 Properties command 4...

Page 8: ...to Width command 4 74 Fit to Height command 4 74 Toolbars command 4 75 Status Bar command 4 75 Page Thumbnails command 4 75 Enhance Text Display command 4 76 Show Annotations command 4 76 Show Backgr...

Page 9: ...4 89 Blur command 4 89 Resize command 4 89 Change Resolution command 4 90 Convert Color Depth command 4 90 Remove Background Tint command 4 91 Convert Text to Black command 4 91 Image Properties comma...

Page 10: ...Pagis Index Manager and Update Tool 4 101 About search indexes 4 103 Exploring the Pagis Index Manager 4 104 Create Index command 4 105 Configure Index command 4 106 Delete Index command 4 106 Change...

Page 11: ...tab 4 122 Date Modified tab 4 123 Keywords tab 4 124 Name Type tab 4 124 File menu 4 125 Open Selected command 4 125 Properties command 4 125 Open Containing Folder command 4 126 Save Search command...

Page 12: ...comment on scanned design drawings 5 4 Scan invoices and e mail them to customers 5 5 Scan pictures for art projects or to create posters 5 6 Scan and fax reports to clients 5 6 Scan organize and retr...

Page 13: ...and MS Outlook 5 21 Netscape Mail 5 21 Registering Netscape and Netscape Mail 5 22 Dragging XIF files to open applications 5 23 Using TextBridge Pro as a standalone application 5 24 Using MGI PhotoSui...

Page 14: ...How to contact customer support ABOUT THIS USER S GUIDE This user s guide provides all the information you need to install learn and use Pagis Pro successfully Please note that this user s guide does...

Page 15: ...Examples and Tips describes many sample uses for Pagis Pro and some additional tips and techniques For example it describes how to attach and e mail a Pagis document using many popular e mail applica...

Page 16: ...ote strong in line emphasis italic Denotes titles of other manuals or books Also used to denote generic representations of file name entries for example filename monospace Denotes examples menu text a...

Page 17: ...of contents and index that let you navigate quickly to specific information in the manual On line Help From Pagis Pro software you can access context sensitive help including topics about the menus c...

Page 18: ...l menu of the Pagis ToolBar under the About Pagis command Your software serial number This is the serial number on the back of the Pagis CD ROM case Your scanner make and model A description of the st...

Page 19: ...ort uksupport xis xerox com Sales information xisuk xis xerox com Telephone and fax numbers Call one of the following telephone numbers or send a fax describing the problem to one of the fax numbers I...

Page 20: ...WHAT IS PAGIS PRO Pagis Pro is the premier color scanning suite available for Microsoft Windows 95 Windows 98 and Windows NT 4 0 Pagis Pro enables you to scan copy fax view and edit index search and o...

Page 21: ...ains the following Pagis Pro installation program and application software TextBridge Pro OCR software MGI PhotoSuite image editing software Pagis Pro multimedia product tour On line documentation for...

Page 22: ...and tools Pagis menu is added Enhanced Explorer view thumbnail pictures of scanned documents can be shown Pagis Toolbar Pagis SendTo Bar with shortcuts to other programs on your PC Figure 1 2 Pagis I...

Page 23: ...drop any scanned document onto any shortcut on the SendTo Bar to convert if necessary and open the document in that application For example when you drag and drop a scanned document onto the MS Word...

Page 24: ...compressed Scan to and read many popular image formats In addition to XIF Pagis Pro can read and write many popular image formats including BMP FlashPix GIF JPEG and TIFF For a complete list of suppo...

Page 25: ...scanned pages Add annotations to scanned documents The Pagis Editor enables you to add comments and draw emphasis to key parts of your scanned documents before distributing them Some of the annotatio...

Page 26: ...drives Zip drives floppy disks and CD ROMs Create and manage multiple search indexes The Pagis Index Manager allows you to create and configure Pagis indexes on your system and removable media The Ind...

Page 27: ...de Contents Index WHERE TO GO FROM HERE Proceed to Chapter 2 of this manual for detailed instructions to install and register Pagis Pro software and to select your scanner Chapter 2 also describes how...

Page 28: ...all and run Pagis Pro your PC must be set up to run Microsoft Windows 95 Windows 98 or Windows NT version 4 0 Your PC must also be equipped with the following an Intel Pentium or compatible microproce...

Page 29: ...bout installing your scanner interface card and driver The basic steps for installing a scanner are to 1 Install the correct scanner interface card if one is necessary in the PC bus Note that many sca...

Page 30: ...featured version of TextBridge Pro 98 Refer to the TextBridge Pro 98 User s Guide for uninstall instructions Note that if you have saved any training files or recognized text files in the TextBridge P...

Page 31: ...ase Click No if you want to keep your search database and update it for use with the new version of Pagis Pro See the next subsection Upgrading your old Pagis search index for details Click Yes if you...

Page 32: ...her dialog box informs you that Pagis is converting your Pagis Pro 97 index to a Pagis Pro 2 0 index The contents of the files and the Author Title and Keyword information are being merged into the ne...

Page 33: ...everal options If your system is set up to ignore autorun commands use Windows Explorer to navigate to the Pagis CD ROM At the top level of the CD ROM double click the Autorun exe program and display...

Page 34: ...folder Figure 2 2 Choose Destination Location dialog box 5 Specify a different installation drive and directory if necessary then click Next The next screen lets you specify the Setup Type Typical or...

Page 35: ...ogram item then click Change you can opt not to install TextBridge Pro or MGI PhotoSuite If you do this however you will not have access to some of Pagis Pro s features 8 The Select Program Folder app...

Page 36: ...placed on the SendTo Bar When you are done click OK In general select the programs into which you are likely to be importing scanned documents for example word processing programs imaging programs we...

Page 37: ...s which are provided by the manufacturer Pagis Pro also provides a number of ISIS drivers mainly for older scanners If you have at least one TWAIN scanner driver installed on your system this dialog b...

Page 38: ...r has occurred appears when you attempt to scan One of the error messages Bad value or Invalid parameter appears during scanning Other error messages appear during scanning or the scanned image itself...

Page 39: ...ar and SendTo Bar Click No if you would prefer not to have these on your desktop The Pagis ToolBar and SendTo Bar are integrated into the Pagis Inbox the main control center for Pagis Pro operation It...

Page 40: ...t Please refer to Chapter 3 of this guide It is designed to help you learn the primary features of Pagis Pro UNINSTALLING PAGIS PRO To restore your PC to the state it was in before you installed Pagis...

Page 41: ...indows task bar Left click on the icon to display a context menu Click the Close Index Manager Scheduler command A dialog box to confirm the closing appears Click Yes in the dialog box 2 With no other...

Page 42: ...d files 5 In the Remove Shared File dialog click Yes To All Click Yes again to confirm The uninstall process continues When the process is completed an Uninstall completed message is displayed 6 Click...

Page 43: ...If you selected the Yes option your system is rebooted automatically at this stage Recommended If you selected the No option make sure to reboot your system as soon as possible to finish the Pagis Pro...

Page 44: ...g a document Refining and annotating a document Scanning and typing into a form Editing a picture Searching for documents Running OCR on a document TOOLS THAT PAGIS PRO ADDS TO WINDOWS Pagis Pro is de...

Page 45: ...Pagis Inbox The Pagis Inbox an enhanced Windows folder is the control center for Pagis Pro operations Figure 3 1 Standard menus and tools Pagis menu is added Enhanced Explorer view thumbnail pictures...

Page 46: ...embedded Pagis SendTo Bar Pagis ToolBar During installation you can specify that the Pagis ToolBar Figure 3 2 will start up on your Windows desktop The Pagis ToolBar is also integrated into the Pagis...

Page 47: ...any or all of the file indexes that you have created Index Manager which lets you create indexes to your local hard drive s network drives removable drive s and CD ROMs Pagis SendTo Bar During instal...

Page 48: ...les and graphics into the open Word document ready for editing By right clicking on a document and dragging it to Word or any other text program you can access a dialog box of OCR settings to control...

Page 49: ...l settings please refer to Chapter 4 1 Place the page s to be processed into the scanner If you have a scanner with an automatic document feeder you can load a stack of pages If you have a flatbed sca...

Page 50: ...Pagis Pro will only perform a one pass scan This is because Pagis Pro does not need to segment the resulting file into multiple layers For more information about layers in scanned Pagis documents see...

Page 51: ...if necessary Click to scan the next page of the document Figure 3 6 More Pages dialog box 7 Specify the page type for the next page and click the Scan button Continue from Step 5 to scan additional pa...

Page 52: ...make very good quality copies using practically any supported scanner printer combo However if you have both a color scanner and a color printer Pagis Pro can make excellent color copies of any docum...

Page 53: ...page document For more details about the settings you can adjust for copying please refer to Chapter 4 Click here and type the number of copies Click to start the copy process Specify size enhancemen...

Page 54: ...Copier Progress page area Repeat this step for each additional page When all pages have been scanned go to Step 6 6 Click the Print Copy button All scanned pages in the Copier Progress window are prin...

Page 55: ...are properly connected and that the necessary fax software is installed and working 1 Place the document to be faxed in your scanner 2 Click the Fax icon on the Pagis ToolBar This starts up the Pagis...

Page 56: ...e job When the page is completely scanned it appears as Page 1 in the Fax Progress window Figure 3 10 next page 5 If you are faxing a multiple page document go to Step 6 to scan the next page If you a...

Page 57: ...All scanned pages are saved to a temporary file then your fax software takes over 8 When the fax process is completed the temporary document is automatically discarded If you would prefer to save the...

Page 58: ...se the following procedure 1 In the Pagis Inbox or other folder double click the XIF document that you want to edit Pagis Pro displays the document in the Pagis Editor window Figure 3 11 You can also...

Page 59: ...tool Figure 3 12 Tools to change the view of the image The Standard toolbar also includes the familiar Windows New Open Save Print Undo and Redo buttons 3 Refine the document image Another toolbar in...

Page 60: ...more information about the Image Toolbar and Auto Refine options 4 Add annotations to the document The Pagis Editor provides the annotation tools shown in Figure 3 14 to allow you to make notes or dr...

Page 61: ...n the Pagis Pro Editor SCANNING AND TYPING INTO A FORM The Pagis Editor also provides tools to scan a form detect the form fields and enter text into these fields For example you might want to scan an...

Page 62: ...op of the Editor window 4 Select the Form page type 5 Click the Scan button After the page is completely scanned it appears in the Scanner Progress dialog s view window refer to Figure 3 5 6 On the Sc...

Page 63: ...ncorrect field is added simply click on it and press the Delete key to remove it If no field is added where there should be one you can add one Pull down the Forms menu and click the Add Field command...

Page 64: ...and you can move it around to add text delete it backspace over it type over it and so on EDITING A SCANNED PICTURE In the Pagis Editor you can open a scanned photograph or a document containing graph...

Page 65: ...Editor and embedded PhotoSuite tools you can open and edit many different image file types such as Windows Bitmap BMP TIFF JPEG and many more The full list is shown in the Files of Type list box in th...

Page 66: ...es over the Editor window and displays its menus and tools Figure 3 19 Movable Color Palette provides 256 colors for shapes and brushes Movable Tool Panel provides selection tools shapes brushes and m...

Page 67: ...ure editing click PhotoSuite closes and the Pagis Editor menus and tools return to the window The edited picture remains in the Editor window 6 Save the newly edited image to a different file name Pul...

Page 68: ...ords In Pagis Pro three tools are related to the search process Index Manager which enables you to create configure schedule and otherwise maintain your search indexes Update which runs the actual ind...

Page 69: ...all the files in the Pagis Inbox A status dialog informs you of the operation s progress Figure 3 22 Progress information Click to stop indexing Click to minimize the screen and index in the backgrou...

Page 70: ...is Pro In the Look In list box specify Pagis Index Before you begin a search you can also specify a number of search parameters for example search options such as Match Case date and time conditions k...

Page 71: ...hows you the found documents by name rank relevance the words found location size and the date the document was last modified This is called Details view You can also display other standard Windows vi...

Page 72: ...the Image toolbar You can run OCR on a selection on the current page or on the entire document SendTo from the Scan Tool After scanning a document you can use a SendTo button to send it directly to a...

Page 73: ...our word processor TextBridge Pro reads the XIF file and automatically performs OCR on it displaying a progress window that tracks the process Figure 3 25 Page being recognized is shown here Process s...

Page 74: ...document should look virtually identical to the image The difference is now you have formatted fully editable text Do not use TextBridge Pro to scan forms for the purpose of filling them in TextBridge...

Page 75: ...anager and the Update Tool Search Tool PAGIS INBOX The Pagis Inbox is a special icon that sits on your Windows desktop It points to an enhanced Windows folder that serves as the main control center fo...

Page 76: ...ndTo Bar with shortcuts to other programs Figure 4 1 Pagis Inbox Pagis Inbox menus and commands The menu bar on the Pagis Inbox and the menus and commands it contains closely follow those of a standar...

Page 77: ...ex Pagis documents Commands to stack combine and unstack Pagis documents Convert a XIF document to another image format Add the selected file to the Pagis Index Pagis related properties are added to t...

Page 78: ...ds to access Pagis ToolBar tools Register a program for drag and drop purposes Command to prepare the TextBridge OCR process Run the Pagis ToolBar as a standalone program Figure 4 3 Pagis menu in the...

Page 79: ...In addition to XIF file formats that can be viewed as thumbnails in the Pagis Inbox or any Pagis Folder include JPEG GIF BMP Word Excel PowerPoint WordPerfect HTML and many more Pagis Pro also provide...

Page 80: ...w the document s name To show the document s name beneath the thumbnail Show the document s type To show the file type for example XIF JPEG and so on beneath the thumbnail Show the document s size To...

Page 81: ...n the Pagis Inbox As shown in Figure 4 1 page 4 2 the Pagis ToolBar appears as a set of large icons above the view area of the Pagis Inbox To change to small icons With the mouse right click anywhere...

Page 82: ...To launch the Pagis ToolBar program click Start Programs Pagis Pro 2 0 Pagis ToolBar To change the Pagis ToolBar view Display the Pagis ToolBar control menu Figure 4 6 by right clicking anywhere in th...

Page 83: ...Pagis SendTo Bar Launching the SendTo Bar on the Windows desktop To launch the SendTo Bar on your Windows desktop click Start Programs Pagis Pro 2 0 Pagis SendTo Bar Changing SendTo Bar options Built...

Page 84: ...isplay smaller versions of the program icons on the SendTo Bar Click the Show Label checkbox to display the shortcut label for the program icons on the SendTo Bar Adding a program to the SendTo Bar Du...

Page 85: ...displays the Create New Shortcut dialog box with the pathname of the program already entered Figure 4 8 Verify that the correct program path is here Click to continue the process Figure 4 8 Create Ne...

Page 86: ...Follow the directions to register the application and have it appear on the SendTo Bar Removing a program from the SendTo Bar To remove a program from the SendTo Bar 1 Right click on the SendTo Bar Th...

Page 87: ...agis Inbox location in your file system The Pagis Inbox folder by default has the following location Windows 95 98 C My Documents Pagis Inbox Windows NT C Pagis Inbox If you wanted all future scanned...

Page 88: ...ures as the Pagis Inbox Pagis ToolBar SendTo Bar Thumbnails and so on However there can only ever be one Pagis Inbox Read the following subsections for more information about Pagis Folders Creating a...

Page 89: ...lder all Pagis enhancements are removed WORKING WITH PAGIS FILES IN WINDOWS Pagis Pro brings to the Windows environment a number of added features related to Pagis XIF files This section describes the...

Page 90: ...ot of space on your computer XIF s built in file compression technology produces very compact files Later you may want to search on the data contained in this magazine page Or you may want to extract...

Page 91: ...ur word processor to include the color pictures from the original document The background tint and text color layers are present so that if you print or OCR a document the output remains true to the o...

Page 92: ...Pagis Inbox or another Pagis Folder However if a XIF document is on the desktop or in a standard Windows folder Thumbnail view is not available In such cases use the Thumbnail command to view a XIF th...

Page 93: ...ys the Stack Files dialog A message on the dialog iden tifies which of the selected files will receive the stacked pages The target file is always the one that is listed first in the view 4 Optionally...

Page 94: ...d This displays the Unstack Files dialog box which indicates the number of pages in the source document and the new files that will be created from the unstack process 4 Optionally click the checkbox...

Page 95: ...ontext menu refer to Figure 4 10 3 Select the Convert Format command This displays the Select Output Format dialog box Figure 4 11 Select the output format from the list box If available click to spec...

Page 96: ...nary image at the original highest scanning resolution typically 200 to 400 dpi Color or Gray Lower Resolution Use this for images destined for a graphics application for example PhotoSuite Output is...

Page 97: ...le Pagis Pro enables you to index and search for virtually any text or image file on your system One way to organize files for later searching is to define Pagis Index properties for them The Pagis In...

Page 98: ...e and Author fields are blank unless they are identical for all files The Keywords field contains only those keywords that are common to all files 4 Enter text for Title Author and Keywords as desired...

Page 99: ...e document number of annotations whether it is seg mented and whether it is searchable included in a Pagis index In this property sheet you can also view the different pages of the document in a thumb...

Page 100: ...epending on scanner setup options you specify the Scan Tool directly controls your scanner or digital camera or connects to the device s TWAIN interface Either way with the Scan Tool you can capture p...

Page 101: ...in scanner drivers referred to as ISIS drivers These drivers support many popular older scanners more than a year old In addition Pagis Pro provides support of TWAIN drivers for scanners and digital...

Page 102: ...r provided by your scanner manufacturer Consult the scanner documentation for details about installing your scanner interface card and driver 1 Launch the Scan Tool by selecting the Scanner icon from...

Page 103: ...IN option shows only the TWAIN drivers that you installed on your PC Select a driver for your scanner either TWAIN or ISIS as appropriate Click the Configure button to specify additional settings For...

Page 104: ...th Pagis Pro The message An internal error has occurred appears when you attempt to scan One of the error messages Bad value or Invalid parameter appears during scanning Other error messages appear du...

Page 105: ...n done Figure 4 17 Configure TWAIN Driver dialog box 5 Select the option to use your scanner s TWAIN dialog box 6 Click OK to close the Configure TWAIN Driver dialog box 7 Click OK again to close the...

Page 106: ...ontrol the scanning and document creation process Specifically these topics are presented Specifying scanner properties Specifying page refinements Specifying auto save properties Specifying keyword p...

Page 107: ...tabbed group Figure 4 18 Define the original document Define resolution OCR quality and color depth Depending on your original lighten or darken the scan Specify page size if different from default C...

Page 108: ...OCR on the scanned document make sure to specify a resolution of 300 to 400 dots per inch dpi Also click the Enhance for OCR Accuracy checkbox for best results Photo For most practical purposes a res...

Page 109: ...her standard page size or a custom page size Standard The list box contains the default page sizes supported by your scanner for example Letter A4 A5 and so on Custom Click this button to display the...

Page 110: ...page image has noise unwanted spots Pagis removes them Remove Lines If the page image has horizontal and vertical lines as on forms Pagis removes them Remove Shading If the image area is printed on a...

Page 111: ...plays the Properties dialog refer to Figure 4 18 3 Click the Page Refinements tab to display this group of settings Figure 4 20 Click on or off page refinement settings as desired Click OK when you ar...

Page 112: ...is ToolBar 2 With the Scanner tab displayed click 3 Click the Auto Save tab to display this group of settings Figure 4 21 next page 4 In the File Name field specify a new file name The default file na...

Page 113: ...s including TIFF BMP JPEG GIF PCX FlashPix and more Click the list box to select a different image format Generally you can leave the Compression level where it is However if you want to increase imag...

Page 114: ...ater in this chapter To specify keyword properties use the following procedure 1 Launch the Scan Tool by selecting the Scanner icon from the Pagis ToolBar 2 With the Scanner tab displayed click 3 Clic...

Page 115: ...button on the Pagis ToolBar as follows Note This procedure assumes that you have properly connected your scanner and it is working with Pagis Pro 1 Place the page s to be processed into the scanner If...

Page 116: ...Any Properties that you specify are maintained whenever you select Custom 4 Click the Properties button to fine tune settings for the document you are about to scan For example you might want to adju...

Page 117: ...the job and save the scanned image Figure 4 23 When all pages are scanned click to save the document Scanned page is shown here Click to scan the next page of the document Figure 4 23 Scanner Progres...

Page 118: ...ditional pages When you are done scanning go to Step 11 11 On the Scanner Progress dialog box refer to Figure 4 23 click the Save button Depending on the Auto Save properties the scanned document is a...

Page 119: ...der so that the front sides of the pages will be scanned first On a 10 page document for example place the document so that pages 1 3 5 7 and 9 would be scanned first 2 Click the Scan icon on the Pagi...

Page 120: ...ument is saved automatically to the default file name and location in Auto Save properties Click the Close when done option off if you want the Scan Tool to remain open after you finish scanning a doc...

Page 121: ...SendTo bar For example you might want to scan a photograph directly into Adobe Photoshop or a magazine article directly into Microsoft Word During scanning Pagis Pro automatically converts the scanned...

Page 122: ...start scanning As the page is being scanned a Scanner Progress dialog box tracks scanning status refer to Figure 4 23 7 To continue scanning go to Step 8 To end scanning and save your document go to...

Page 123: ...r system in JPEG format If you have trouble using your digital camera s TWAIN interface with Pagis Pro use this alternative method Once a photograph is on your PC as a JPEG file you can use the Pagis...

Page 124: ...se options on the Scan Tool Click the Auto Save checkbox off to display a standard Save As dialog box when scanning is complete Otherwise the document is saved automatically to the default file name a...

Page 125: ...or a Save As dialog appears for you to name and locate the file the photograph is automatically located and selected for you in Windows or is automatically opened in the Pagis Editor ready for editin...

Page 126: ...rmation 5 Specify Save and Close options on the Scan Tool Click the Auto Save checkbox off to display a standard Save As dialog box when scanning is complete Otherwise the document is saved automatica...

Page 127: ...egins After scanning is complete additional buttons appear on the Scanner Progress dialog box refer to Figure 4 23 9 Click the Save button Depending on the Auto Save properties the scanned document is...

Page 128: ...step procedures to Select a printer Set up the copy job Make copies Select a printer Like most applications in Windows Pagis Pro uses the default printer If you only have one printer connected to your...

Page 129: ...printer you intend to use in the Copy process From the Printer Name list box select the printer Specify paper size source and page orientation Click the Properties button to define additional options...

Page 130: ...esizes the scanned page so that it will fit within the selected paper size taking into account the selected printer s built in margins 50 reduces the scanned image to half its original size 62 reduces...

Page 131: ...or Copy checkbox on to make color copies If you have both a color scanner and a color printer this checkbox is available to you 6 Click the Properties button to further fine tune scanner and page refi...

Page 132: ...ton on the Copier tab As the page is being scanned a Copier Progress dialog box tracks scanning status After the page is completely scanned it is printed immediately and the Copier tab refer to Figure...

Page 133: ...n copy print it later use the Scanner Tab to scan the document to a XIF document on your system When you are ready to print it open the document in the Pagis Editor and select the Print command from t...

Page 134: ...at it sends out You select your fax printer the same way you select any printer connected to your system Use the following procedure to select a fax printer 1 Click the Fax tool on the Pagis ToolBar T...

Page 135: ...Click OK in the Print Setup dialog Note that the new fax printer is shown in the Fax To field on the Fax tab Set up the fax job The Fax tab refer to Figure 4 28 provides controls to set up the fax job...

Page 136: ...or resolution or turn on or off some of the page refinement settings For complete information about Properties refer to Changing default properties for scanned documents earlier in this chapter Fax a...

Page 137: ...he next page If you are ready to fax the document proceed directly to Step 6 5 Insert the next page of the multiple page document in the scanner In the Fax Progress dialog click More Pages The next pa...

Page 138: ...document into virtually any word processor or text editor Picture editing capabilities provided by integrated MGI PhotoSuite tools let you perform such operations as air brushing freehand drawing era...

Page 139: ...n the Pagis Editor New command The New command creates a new document with one blank page You can import external image files or scan a paper document into this new file New Window command The New Win...

Page 140: ...ys a standard Windows Save As dialog box to enable you save the current document to another name and or location A checkbox in the Save As dialog box enables you to save the current page only The curr...

Page 141: ...ect the output image format for the document For some output formats namely TIFF Uncompressed PCX DCX and BMP you can click the Options button to further define the type of data that will be stored Wh...

Page 142: ...converts the XIF document to the appropriate text or image format launches the target program and places the converted data into an open document Properties command The Properties command displays the...

Page 143: ...put Click to store changes Figure 4 34 Page Setup dialog box In this dialog box you can specify paper size and source orientation margins scale and options to print annotations background tint and tex...

Page 144: ...an Tool customized for scanning pages directly into the open Editor document For more information refer to Scan Tool earlier in this chapter Exit command The Exit command closes the Pagis Editor If yo...

Page 145: ...lected region image segment or page from the document and places it on the Windows clipboard Copy command The Copy command copies the selected region image segment or page from the document and places...

Page 146: ...mand selects the page currently displayed in the Editor s page view area When a page is selected you can move it cut it copy it or clear it Select All Pages command The Select All Pages command select...

Page 147: ...ave a scanner with an ADF that feeds pages in reverse order With such scanners when you open the document in the Editor the first page scanned will be Page 1 the second page scanned Page 2 and so on Y...

Page 148: ...rectly Zoom in or out one zoom level Uses scanned dots per inch to calculate zoom level Figure 4 38 Zoom commands Fit in Window command The Fit in Window command zooms the page so that it fits entirel...

Page 149: ...is Editor later in this chapter for more information The Large Buttons checkbox when selected doubles the size of the toolbar buttons for example The Show Tooltips checkbox when selected shows the nam...

Page 150: ...shows or hides any background tint behind text or pictures that had background tint in the original document For more information about segmented documents refer to About Pagis XIF files earlier in t...

Page 151: ...nu Blank Page command The Blank Page command inserts a blank page in front of the page currently displayed in the Editor s page view area You can leave the page blank or use it as a page to add annota...

Page 152: ...built in TextBridge optical character recognition software on part or all of the displayed document The recognized data is output to the file name and format that you specify With a document displaye...

Page 153: ...layout Click to return to OCR dialog in Pagis Editor Figure 4 42 TextBridge dialog box The TextBridge dialog box provides even finer control over the OCR process You can specify the Page Type of the d...

Page 154: ...h or select a picture segment in a displayed document then select the Picture Edit command MGI PhotoSuite menus and toolbars take over the Editor window Figure 4 43 Movable Color Palette provides 256...

Page 155: ...nd a region on the page to select it With a region selected you can cut copy copy as text or OCR it or drag and drop it to another application Pan command The Pan command places the mouse pointer in P...

Page 156: ...s a dialog box to specify general and save export preferences in the Editor The Options dialog box Figure 4 44 next page is a tabbed dialog with two tabs General and Save Export Under General options...

Page 157: ...mply adjust the slider bar A higher number provides better quality with a larger file size A lower number provides lesser quality with a smaller file size In XIF format Pagis Pro uses JPEG compression...

Page 158: ...t picture and background refinement settings Check on or off the settings that you want to apply to the current page then click OK in the Auto Refine dialog box The settings in the Auto Refine dialog...

Page 159: ...that may touch the lines Only removes lines that are at least a half inch long and no more than 1 28 inch thick Oper ates on binary images unsegmented binary pages text areas of segmented pages binary...

Page 160: ...to close the dialog box Figure 4 46 Manual Straighten dialog box After you become experienced with using this tool you can click the checkbox so that this dialog box no longer appears Click Close to...

Page 161: ...e of rotation Click OK when done Figure 4 47 Rotate Any Angle dialog box Specify the angle of rotation by typing a number 1 359 or by using the or buttons Then specify the direction of rotation Left o...

Page 162: ...ders The numerical values range from 100 to 100 meaning lowest brightness or contrast to greatest brightness or contrast A value of zero means the image should not be changed If you scan a photograph...

Page 163: ...mmand The Blur command applies an image enhancement filter to the current page providing a softer appearance Resize command The Resize command displays a dialog box that lets you adjust the actual siz...

Page 164: ...it Color 4 bit Color 8 bit Color 24 bit The Black White 1 bit command provides a dialog box that lets you define how the grays and colors in the image are to be converted Figure 4 50 You can select an...

Page 165: ...e Background Tint command Convert Text to Black command As illustrated in Figure 4 9 earlier in this chapter Pagis XIF documents can be segmented into a number of layers If Pagis Pro detects colored t...

Page 166: ...ng annotations in a Pagis document later in this chapter Highlighter command The Highlighter command changes the mouse pointer to a highlighter tool with which you can create a transparent colored rec...

Page 167: ...ou can draw an arrow pointing to any area on the page Line command The Line command changes the mouse pointer to the line tool with which you can draw a line on any area of the page Circle command The...

Page 168: ...e Edit Text command places a typing cursor in the currently selected Text or Sticky Note annotation so you can edit the text Options command The Options command displays a dialog box that enables you...

Page 169: ...efault is Yellow Size Select a point size for text from the list box Default is 18 Bold Italic Click a checkbox on or off to make text bold and or italic Line Arrow Color Select a color from the list...

Page 170: ...atures provide simple efficient means to fill out college applications loan applications and so on For related information please refer to Scanning and Typing Into a Form in Chapter 3 Note For best re...

Page 171: ...r inside You can now enter text in the field Click the Select tool to move or resize the field The field now appears as a blue rectangle with corner and side handles for resizing To move the field cli...

Page 172: ...lds themselves remain intact Options command The Options command displays a dialog box to define text attributes for form field annotations Figure 4 55 Specify text color and font Click to apply chang...

Page 173: ...or more information Standard toolbar In the Pagis Editor the Standard toolbar provides many of the same tools you find in other standard Windows applications The Standard toolbar also provide a number...

Page 174: ...ecific paragraphs then use electronic mail to send the article to a friend or colleague This person can use the Pagis Editor or the Pagis Viewer to view the document Figure 4 57 provides summary descr...

Page 175: ...e Specks Remove Lines Figure 4 58 Image toolbar in the Pagis Editor PAGIS INDEX MANAGER AND UPDATE TOOL Every day you probably add one several or many new files to your Windows file system Documents t...

Page 176: ...supported electronic documents and indexes the text they contain On scanned documents and other supported image file formats Pagis Pro uses TextBridge OCR to recognize and index the text they contain...

Page 177: ...m automatically creates the Pagis Index Initially the Pagis Index tracks only the documents in the Pagis Inbox Using the Index Manager you can re define the Pagis Index to include other folders local...

Page 178: ...e 4 59 Pagis Index Manager main window The view area of the Index Manager shows the indexes that have been defined so far on your system Initially only the default index Pagis Index is shown The colum...

Page 179: ...ears This enables you to define the directories to be included in and excluded from the index Click the Extensions button to show a checklist of all the possible file extensions that Pagis Pro can ind...

Page 180: ...efining an index later in this chapter Delete Index command The Delete Index command enables you to delete an existing index Select an index in the Index Manager then select the Delete Index command A...

Page 181: ...dexing process estimating the percentage completed It also lists the complete pathname of each file as it is being indexed Thus if indexing has a problem with a particular file you will be able to not...

Page 182: ...from Index command The Detach from Index command detaches a remote index from your Index Manager In the Index Manager select the remote index From the Index menu select the Detach from Index command N...

Page 183: ...e Help Properties Detach Attach Figure 4 63 Index toolbar in the Index Manager Now that you have explored indexing tools the next several subsections provide step by step procedures to use these tools...

Page 184: ...cters including spaces It cannot contain any of the following characters 4 Enter or browse to a folder in which to store the index If you are indexing files on a mounted Jaz cartridge you could actual...

Page 185: ...are done selecting directories and files click OK 6 Define the file types to be included in the index In the Index Information dialog box click the Extensions button This displays the Extensions dial...

Page 186: ...hedule dialog 8 Click OK in the Index Information dialog box The new empty index is created and added to the Index Manager index list Notice that under the Last Modified column the N A not applicable...

Page 187: ...sk on which you are storing an index should have the same volume label Write once read only CD ROM DVD ROM With read only media you must keep the index on your local hard drive or on some other readab...

Page 188: ...og box 6 Define the file types to be included in the index In the Index Information dialog box click the Extensions button to display the Extensions dialog box refer to Figure 4 65 Uncheck the file ex...

Page 189: ...for these documents Following are the tasks required to share indexes in a networked environment In Windows make sure the file server is available under Network Neighborhood For example Share_Volume1...

Page 190: ...indexes that you have defined and kept updated on your system As described in Index Manager and Update Tool earlier in this chapter you can define and update one or more search indexes to reference a...

Page 191: ...ever you can define and save a search to re use it later 2 Type a search string in the Containing text box Search strings can be very simple a single word or a phrase or they can be quite complex See...

Page 192: ...ch In a few moments documents meeting the search criteria are shown in the view area of the Search Tool main window refer to Figure 4 66 See the following subsections for details about the Search Tool...

Page 193: ...an To broaden the search you can use the comma as a separator For example if you wanted to search for documents that contained information about any computer device you could type hard disk scanner pr...

Page 194: ...e documents For example scanner and fax not printer This string finds documents that contain both scanner and fax but do not contain printer You can also use parentheses to build more complex search s...

Page 195: ...d in this case 32 bit order near scanner the term 32 bit must precede the term scanner 32 bit sentence scanner the terms 32 bit and scanner must be found in the same sentence 32 bit paragraph scanner...

Page 196: ...e four other tabbed groups of search properties to define a search Search Options Date Modified Keywords and Name Type Click a tab to bring its properties to the front The tabbed groups are described...

Page 197: ...n or modification dates of documents Search for files created during a particular timeframe Figure 4 68 Date Modified tab in the Search Tool The default is Any Date meaning that the search will not be...

Page 198: ...reated For more information refer to Defining keywords and other index properties for a file earlier in this chapter To search for files that have any of these attributes simply enter the appropriate...

Page 199: ...area It opens the selected file in the appropriate program For example if you select a found XIF file and select the Open Selected command it opens the file in the Pagis Editor Properties command The...

Page 200: ...h xfs file Later you can double click this file to open the Search Tool with the same search string and other properties in place Exit command The Exit command closes the Search Tool Edit menu This se...

Page 201: ...rief summaries and highlights important features of all commands in the Search Tool s View menu Figure 4 72 Show or hide tools and status Control file view and arrangement Figure 4 72 View menu in the...

Page 202: ...s found files in the Search Tool s file view area as a standard Windows file list Details command The Details command the default view displays found files in the Search Tool s file view area with fil...

Page 203: ...ults command enables you to limit the number of found documents that are displayed in the Search Tool s file view area When you select the command the Configure Search Results dialog box is displayed...

Page 204: ...ndexes command The Update Indexes command launches the Update Tool which allows you to select one or more indexes and start the update process Please refer to Pagis Index Manager and Update Tool earli...

Page 205: ...arge Icons Small Icons Help Update Indexes Manage Indexes Configure Results Details List Figure 4 76 Search toolbar Working with found documents After the Search Tool completes a search it displays al...

Page 206: ...ch string The Search Tool locates and analyzes each document and assigns it a score that is based on the density of words that match the search string as well as other factors Based on this score the...

Page 207: ...This section describes some of the ways in which Pagis Pro can help you be more productive and creative in your work or home environment Specifically these ideas are discussed Scan manuscripts and ph...

Page 208: ...source material from other publications Using the Scan Tool and the Pagis Editor you can scan and edit graphics that will go into the newsletter For more information about these applications refer to...

Page 209: ...her idea is to regularly publish a CD ROM that contains the full library of company documents The Pagis search index for those documents can be placed on the CD ROM as well Users then can insert the C...

Page 210: ...rom some other format Then the designer can send the XIF file to reviewers or clients via electronic mail file sharing or overnight courier Reviewers can use the Pagis Editor on their end to open eval...

Page 211: ...nvoices to your customers Using the form fill in tools of the Pagis Editor you can scan a blank invoice and fill it in electronically Then you can e mail the XIF document as an attachment to the custo...

Page 212: ...e or tape together In the Pagis Editor use the built in MGI PhotoSuite picture editing tools to change and add colors shapes even special effects to your scanned originals For more information about t...

Page 213: ...earch and retrieval Using the Scan Tool you can scan and save documents to your Windows file system Next using the Index Manager you can create one or more indexes to these scanned documents Finally u...

Page 214: ...gn Author Title and Keywords to each file for search and retrieval purposes Then using a CD ROM recorder connected to your PC you can save these client records to a CD ROM You can index the CD ROM and...

Page 215: ...raphs Recipes You can specify any of these folders as the storage location for your scanned documents Alternatively you can create additional folders to store your documents and locate these folders a...

Page 216: ...rd copy documents into one or many XIF files as you see fit One idea is to scan and organize all of your tax documents into XIF files For example if you needed to save all of your 1998 expense receipt...

Page 217: ...ou can scan and save recipes to your Windows file system for example in the Home folder in the Pagis Inbox Next using the Index Manager you can create a search index to all of your scanned recipes Fin...

Page 218: ...ue and so on Because of the small file size of XIF you can likely store the photographs in one XIF document that would fit on a floppy diskette Then you can make copies of the diskette send one to you...

Page 219: ...e spreadsheet slide presentation or other format into a XIF file For example you might want to assemble data from a number of different sources and mail fax or store the information as a single XIF do...

Page 220: ...and select Pagis Print Driver 3 Optionally specify print properties for paper size and graphics Click the Properties button to display a tabbed dialog box with Paper properties in front Figure 5 1 or...

Page 221: ...h and length and click OK to close the User Defined Size dialog box In the Properties dialog box click the Graphics tab to bring this set of properties to the front Figure 5 3 Specify dither pattern S...

Page 222: ...Error Diffusion for printing photographs that do not have sharp well defined edges Specify a lighter or darker Intensity which controls how dark to print graphics in the resulting XIF document Click t...

Page 223: ...command This immediately starts the Print to XIF process The XIF file is automatically created and given the name Pagis n xif where n is a sequential number With each successive XIF document that you...

Page 224: ...ding XIF files as e mail attachments Pagis Pro 2 0 works with most popular electronic mail programs that support drag and drop technology and some that do not In most cases you can simply drag and dro...

Page 225: ...as usual Then AOL goes through the process of attaching the selected file opening an Attached File Window and opening up a new mail message dialog box Do not interact with AOL while this is occurring...

Page 226: ...p documents into the open window They will be attached to your mail message 2 Send the message as usual Lotus cc Mail and Lotus Notes Follow these steps to attach a document to a mail message using Lo...

Page 227: ...led on your system when you installed Pagis Pro 2 0 the Netscape Mail icon will not be created on your system once you do install Netscape To get the Netscape Mail icon and register Netscape and Netsc...

Page 228: ...stem you probably either removed it from your system or installed Netscape after you installed Pagis Pro To register Netscape and Netscape Mail follow these steps 1 In an Explorer view locate the fold...

Page 229: ...ou can place a XIF image in the application s open document as follows 1 Arrange your desktop for the drag and drop operation You should be able to see both the destination program s open document and...

Page 230: ...drag and drop operations and for full text indexing of scanned and other image documents However you can also run TextBridge Pro as a standalone program accessing all of its automatic and manual proce...

Page 231: ...nt in PhotoSuite use drag and drop instead To run PhotoSuite directly in Windows click Start Programs Pagis Pro 2 0 MGI PhotoSuite The PhotoSuite main window is displayed Figure 5 6 Button bar Image w...

Page 232: ...e Glossary of Terms defines the technical terms used in this manual and serves as a good primer to scanning and imaging concepts Appendix A lists all of the file formats that Pagis Pro can input and o...

Page 233: ...GRAMS In Pagis Pro when you drag a XIF document onto a registered application the image data is converted into a format that the target application can import for example if you drag to Microsoft Word...

Page 234: ...xe TIF outputs a single page only America On Line AOL exe n a Attaches XIF document Art Dabbler artdab exe TIF uncompressed Calendar Creator ccwin exe TXT smart ascii CardScan 3 0 CS exe BMP Claris Fi...

Page 235: ...t 8 WpWin exe WPD Delrina WinFax Pro 7 0 FaxMng exe fax image Delrina WinFax Pro 7 5 FaxMng exe fax image Delrina WinFax Pro 8 0 FaxMng32 exe fax image Eclipse Fax E Faxmrg exe fax image Eudora Mail L...

Page 236: ...s cc Mail 6 0 1 ccMail exe n a Attaches XIF document Lotus Notes Mail 4 6 Notes exe n a Attaches XIF document Lotus WordPro WordPro exe SAM Lotus WordPro 97 WordPro exe SAM MS Excel 5 Excel exe XLS MS...

Page 237: ...This causes the converted text to be hidden Set the page size to letter in Works to correct this MS Write Write exe WRI NetScape 3 01 Netscape exe HTM NetScapeCommunicator 4 01 Netscape exe HTM NetSc...

Page 238: ...tes whether you can control output as either high resolution binary for text purposes or lower resolution color for imaging purposes The Comments column notes items such as whether a format can suppor...

Page 239: ...Interlaced gif Yes Yes Yes Single page only Icon Resource ico Yes Yes Yes Single page only Interchange File Format iff Yes Yes Yes Single page only IOCA Group 3 ica Yes Yes No Single page only IOCA G...

Page 240: ...o Single page only Raw Group 4 raw Yes Yes No Single page only SGI Image File Format sgi Yes Yes Yes Single page only Sun Raster Data ras Yes Yes Yes Single page only TIFF Group 3 tif Yes Yes No Outpu...

Page 241: ...rmat Ext Import Export Options Comments if applicable Windows DIB dib Yes No n a Windows Metafile wmf Yes Yes Yes Single page only WordPerfect Graphic wpg Yes No n a X Bitmap xbm Yes Yes No Single pag...

Page 242: ...atic document feeder ADF An attachment to a flatbed scanner that allows multiple pages to be loaded at one time and automatically scanned auto orientation In Pagis Pro a capability to rotate a scanned...

Page 243: ...file of some type onto the program icon launching the program and importing the file contents into the program s open document For example in Pagis Pro you can drag a XIF file in the Pagis Inbox onto...

Page 244: ...ayer containing color or grayscale pictures the black and white text layer the text color layer and the background tint layer Each layer has an appropriate resolution bit depth and compression method...

Page 245: ...ypertext A capability to navigate a text data base an on line Help system for example in a number of different ways by selecting a subject from a topic list by stepping sequentially forward and backwa...

Page 246: ...age on which lines of print flow across the wider dimension or length of the page This is opposed to portrait pages on which lines of print flow across the more narrow dimension or width of the page F...

Page 247: ...w Pagis Index The default search index for Pagis Pro A search index stores information about the location contents author title and key words assigned to a group of documents Pagis Index Manager One o...

Page 248: ...tation rotation format analysis recognition of text styles bold italic and conversion to a variety of popular text formats recognition language pack A system dictionary for a particular language that...

Page 249: ...tion about the contents and location of files as well as any author title or keyword assigned to the files By using the index and the Pagis Search Tool you can easily search and retrieve documents seg...

Page 250: ...a scanner Scanner manufacturers provide this software with their scanners The software enables the scanners to run with other programs and also provides menus buttons and options to control the scann...

Page 251: ...r in Pagis Editor 4 100 picture of 3 17 Annotations searching on 1 7 specifying whether to print or not 4 69 using to provide comments on a shared document 5 4 Arrange Items command 4 128 Arrow comman...

Page 252: ...93 Clear All Text command 4 98 Collate Copies setting 4 57 Color Copy setting 4 57 Color copying with Pagis Pro 1 5 4 54 Color depth converting in the Pagis Editor 4 90 Configure Index command 4 106 C...

Page 253: ...entation conventions xv Document management 5 3 Document search and retrieval 1 7 Double sided documents scanning 4 45 Drag and Drop Registration Wizard 1 4 4 4 4 12 Drag and drop 1 3 1 4 3 5 4 9 A 26...

Page 254: ...for typing into and editing 4 96 Forms menu in Pagis Editor 4 96 Freehand command 4 93 G GIF 4 66 H Halftone setting 4 61 Highlighter command 4 92 HTML scanning documents into 4 47 I Image conversion...

Page 255: ...ext search 4 111 scheduling automatic updates 4 106 sharing in a networked environment 4 115 In place activation 5 23 Installation folder for Pagis Pro choosing 2 7 Installation of Pagis Pro 2 1 Inver...

Page 256: ...MGI PhotoSuite 1 2 1 6 5 6 choosing not to install 2 8 integrated into the Pagis Editor 3 21 4 80 multimedia tutorial 5 25 user documentation xvi using standalone 5 25 Microprocessor needed to run Pa...

Page 257: ...nts 3 1 4 15 converting to other image formats 4 20 Pagis Editor 1 6 3 4 3 15 4 64 adding search attributes to a document 4 68 adjusting the amount of JPEG compression 4 83 Annotate menu 4 92 annotati...

Page 258: ...amples provided for organizing scanned documents 1 4 5 9 Pagis Inbox 1 3 3 1 4 1 5 9 changing its location 4 13 default location in different Windows operating systems 3 2 4 13 File menu 4 3 menus and...

Page 259: ...space requirements 2 1 document format XIF 1 2 documentation on line 1 2 Drag and Drop Registration Wizard 1 4 Editor 3 15 electronic registration 2 11 features 1 3 image enhancement tools 3 16 image...

Page 260: ...arch Tool 1 7 searching for documents 3 25 4 116 selecting a scanner or digital camera driver 4 28 SendTo Bar program shortcuts adding 4 10 SendTo Bar program shortcuts defining 2 8 SendTo Bar 2 12 3...

Page 261: ...s 4 15 Pagis Pro setup program 2 6 Pagis SendTo Bar 1 3 1 4 4 9 in the Pagis Inbox 3 3 Pagis ToolBar 1 1 1 3 2 12 3 6 4 7 Control menu for picture of 4 8 in the Pagis Inbox 3 3 launching on the Window...

Page 262: ...4 85 Resize command 4 89 Resolution changing in the Pagis Editor 4 90 Rotate command 4 87 S Sample files 1 2 Save Search command 4 126 Scan Tool 3 3 4 26 Auto Save properties in 4 38 Copier tab in 3 1...

Page 263: ...rted by Pagis Pro 2 2 with automatic document feeders 3 6 Scanners with ADFs 4 45 Scanning and copyright laws 5 2 directly to an application 4 47 double sided documents 4 45 part of a document 4 51 pr...

Page 264: ...nching 4 116 menus and commands 4 125 natural language searching 4 121 Options menu 4 129 proximity searches 4 121 saving a search 4 126 search by example 4 122 search properties 4 122 using to displa...

Page 265: ...te Text and Pictures 4 85 Setup of Pagis Pro 2 1 Setup program 2 6 Shared files removing during Pagis uninstall 2 15 Sharpen command 4 89 Small Icons command 4 128 Software registration 1 2 Stack Docu...

Page 266: ...are displayed 4 5 Tinted background removing 4 91 Title attribute 4 23 Toolbar command 4 127 Troubleshooting scanner problems xvii 2 11 4 30 TWAIN scanner configuring to use its own dialog box 2 10 4...

Page 267: ...e File format 1 2 4 15 dragging to an open application 5 23 background tint in 4 76 converting electronic documents to 5 13 converting to other image formats 4 20 details about 4 15 dragging and dropp...

Reviews: