59
5790 733 - 07
Vitocrossal 300 CA3 Series 2.5 to 6.0 Installation/Service
General Venting Information
WARNING
The venting system is approved for indoor installations
only. Do not install the venting system outdoors.
WARNING
Ensure that the entire venting system is protected from
physical damages. A damaged venting system may
cause unsafe conditions.
IMPORTANT
Installation steps (outline)
Boiler operation in marine environments (damp, salty
coastal areas):
The service life of the Vitocrossal 300, CA3 boiler’s exposed
metallic surfaces, such as the casing and fan housing, is
directly influenced by proximity to damp and salty marine
environments. In such areas, higher concentration levels of
chlorides from sea spray, coupled with relative humidity,
can lead to degradation of the exposed metallic surfaces
mentioned above.
Therefore, it is imperative that boilers installed in such
environments not be installed using direct vent systems
which draw outdoor air for combustion. Such boilers must
be installed using room air dependent vent systems; i.e.
using room air for combustion. The indoor air will have a
much lower relative humidity and hence, the corrosion will
be minimized.
Route vent pipe as directly as possible and with as few
bends as possible to the boiler.
Check proper location of gaskets in rigid PP(s) pipe collars.
(Only use supplied parts with the polypropylene venting
system.) Apply water to lubricate the joint ends of the
vent pipe collar and if used, the air intake pipe collar.
Slide pipes into each other with a gentle twisting motion.
Condensate must drain from the flue pipe to the boiler.
Ensure a suitable gradient of at least 2º-3º based on the
vent manufacturer’s system design [example: for a 3º
system approx. 2 in. per 3.3 ft. (50 mm per 1 m) on any
horizontal venting components].
Use a hacksaw or sheet metal snips (for stainless steel)
to cut pipes to length (if necessary). Use a file to
smooth rough edges. Pipe must be round and not bent
into an oval shape.
When cutting pipes to length, deburr and clean pipes.
For stainless steel and PP(s) venting systems:
In conjunction with these instructions, follow the
installation instructions supplied by the special venting
manufacturer.
If using room air-independent venting system, connect
the air intake pipe (from outdoors) to the combustion air
intake kit. If room air-dependent venting system is used,
the air is drawn into the burner inlet through the screens
on the right side of the boiler.
IMPORTANT
Recommended venting practice
When installing a venting system the following
recommended venting practices apply:
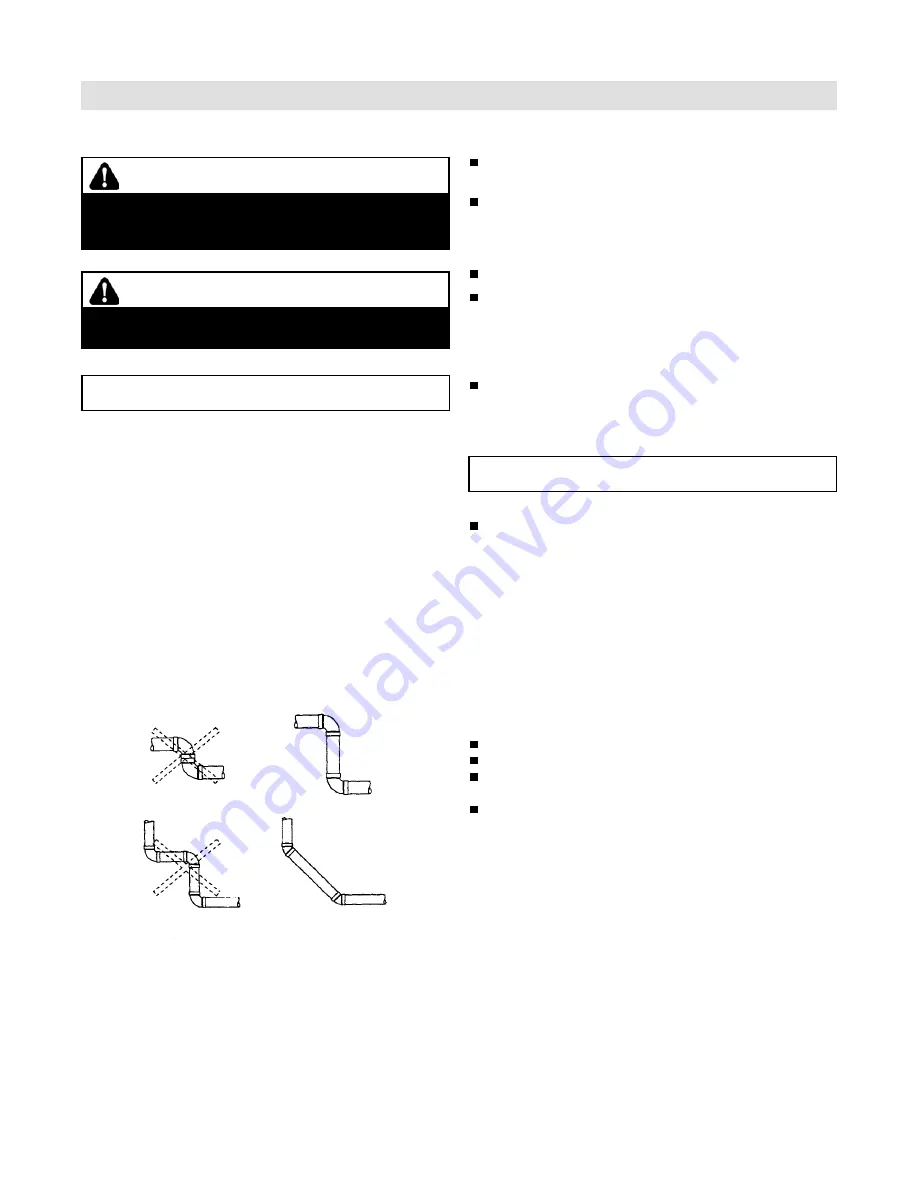
Keep length and number of 90º elbows to a minimum.
Try not to use back-to-back 90º elbows.
Use 45º elbows where possible to minimize the number
of 90º elbows in case redirection of flue gas is required.
The special vent system shall not be routed into,
through, or within any other vent such as an existing
masonry or factory-built chimney.
Exception:
A masonry chimney flue may be used to route the venting
system only if no other appliance is vented in the same flue.
Venting


