3. Press the GFCI Reset button to restore power and continue the pre-dive steps.
When using a power source that includes a GFCI, the VideoRay supplied GFCI is not needed and
can be removed from the power cord.
Power On and LIM Tests
Set the Power switch to the On position. The green Power On indicator light should turn on. If the
green Power On indicator light is not on, make sure the system is connected to a working power
source and the GFCI switch is turned on.
Twist the ROV Power switch to the On position. The green 400 V Power On indicator light should turn
on. If the green 400 V Power On indicator light is not on, make sure the system is connected to a
working power source and the GFCI and main power switches are turned on.
Test the LIM. The LIM can be found on the right side of the User Control Console. The GFCI switch
and the main and 400 V Power switches must both be set to On in order to perform this test.
1. The yellow Alarm light should be off. If the yellow light is on, press and hold the Reset button
until the yellow Alarm light turns off.
2. To test the LIM, press and hold the Test button until the yellow Alarm light turns on. This may
take up to 10 seconds. Release the button when the yellow Alarm light turns on.
3. Press and hold the Reset button to reset the LIM. The yellow Alarm light should turn off.
Release the button when the yellow Alarm light turns off.
Starting the VideoRay Control Software
Make sure the system is connected to a working power source and the GFCI / Circuit Breaker and
Power switches are turned on.
1. Turn on the User Control Console and wait for the system to complete the boot up process.
2. To start the MSS EOD Workspace control software, double click on the Defender icon
on
the desktop.
See the
for more information about the VideoRay control software.
Testing the System's Functions
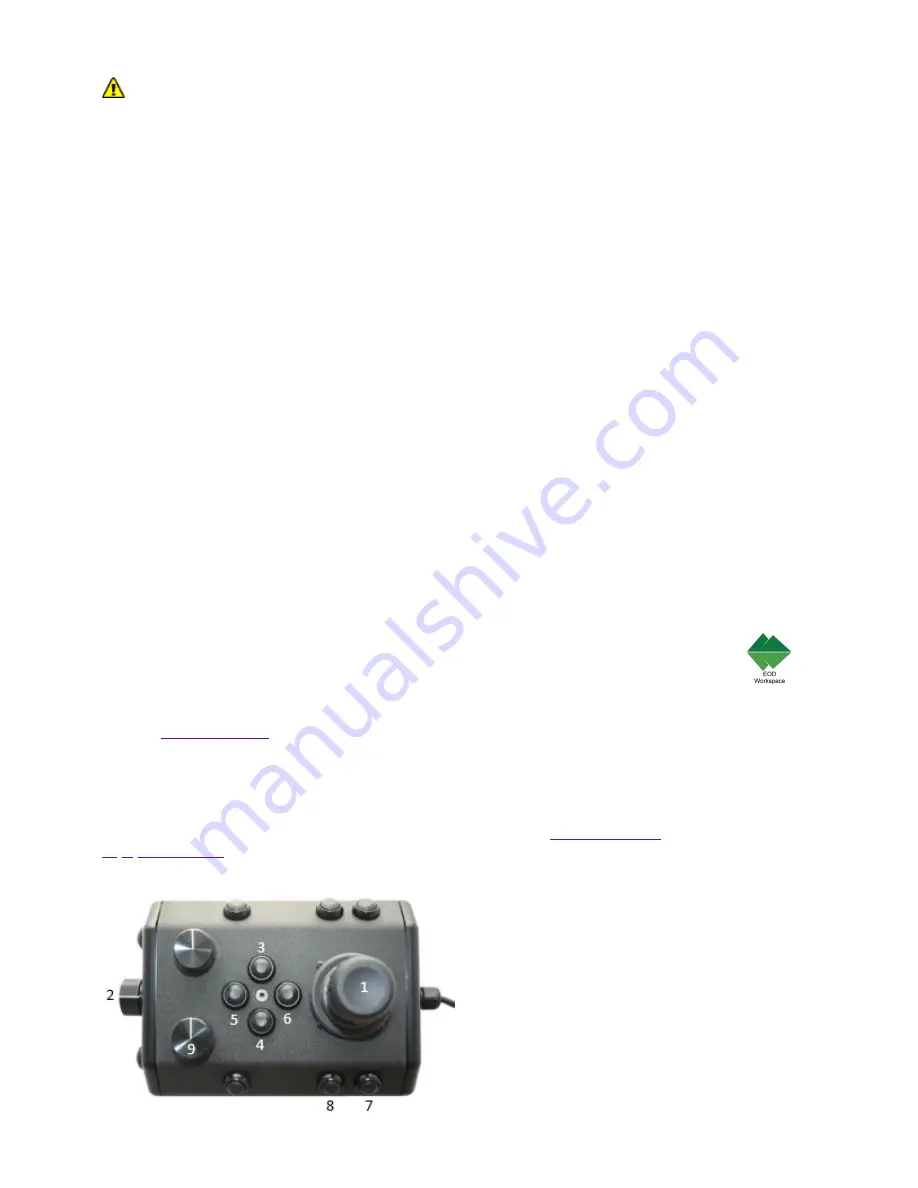
The next step is to ensure that the essential features of the ROV are functioning properly. Use the
hand controller to perform the following tests. The manipulator functions listed below do not
necessarily represent the full capabilities of the system. See the
section of the
for the complete list of functions and more information about using the hand
controller.
1 Horizontal Control joystick
2 Depth Control knob
3 Camera Tilt Up button
4 Camera Tilt Down button
5 Camera Focus In button
6 Camera Focus Out button
9 Lights Intensity knob
Summary of Contents for Defender MSS
Page 1: ...MSS Defender Operator s Manual...
Page 9: ...Accessory Support Statement...
Page 30: ...Hand Controller Tether...
Page 60: ...Sonar Mode...
Page 61: ...Camera Lights Mode...
Page 62: ...Manipulator Mode...
Page 63: ...Raw Input...
Page 64: ......
Page 87: ......
Page 109: ......


